
The following is an excerpt from React Quickly, a hands-on book by Azat Mardan for anyone who wants to learn React.js fast.
When accessing, working with, and manipulating state in React, it’s important to know what you’re doing (and why you’re doing it!). In this article, you will be learning about state in React and how to work with it. We will also talk about some of the differences between state and props, as well as how to work with “stateless” components. But before we dive into all that, in order to work with state, we need to know how to access the values, update them and how to set the initial values. Let’s get started with accessing state in React components. The source code for the examples in this article can be found in the ch04 folder of the book’s GitHub repository.Accessing States
The state object is an attribute of a component and can be accessed withthis reference, e.g., this.state.name. We can access and print variables in JSX with curly braces {}. Similarly, we can render this.state (as any other variable or a custom component class attributes) inside of render(). For example, {this.state.inputFieldValue}. This syntax is like accessing properties with this.props.name.
Let’s go ahead and try to implement a clock (Figure 1). The goal is to have a self-contained component class anyone can import and use in their application without having to jump through hoops. The clock must render the current time.
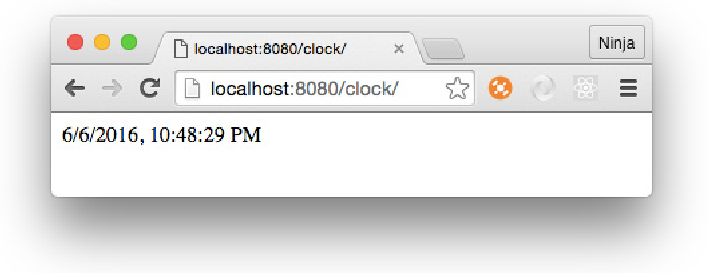 Figure 1: Clock component shows current time in digital format—updated every second
The structure of the Clock project is as follows:
Figure 1: Clock component shows current time in digital format—updated every second
The structure of the Clock project is as follows:
/clock
  - index.html
  /jsx
    - script.jsx
    - clock.jsx
  /js
    - script.js
    - clock.js
    - react-15.0.2.js
    - react-dom-15.0.2.js
-w and a directory flag -d to compile all source JSX files from clock/jsx to a destination folder clock/js and recompile on change. Moreover, I’ve saved the command as an npm script in my package.json file in a parent folder called ch04 in order to run npm run build-clock from ch04:
"scripts": {
    "build-clock": "./node_modules/.bin/babel clock/jsx -d clock/js -w"
},
currentTime and try to render this state as shown in Listing 1.
class Clock extends React.Component {
  render() {
    return <div>{this.state.currentTime}</div>
  }
}

ReactDOM.render(
  <Clock />,
  document.getElementById('content')
)
Uncaught TypeError: Cannot read property 'currentTime' of null. Normally, JavaScript error messages are as helpful as a glass of cold water to a drowning man. It’s good that in this case JavaScript gives us a helpful error message. This one means we don’t have any value for currentTime. Unlike props, states aren’t set on a parent. We can’t setState in render() either, because it’ll create a circular (setState >render >setState…) loop and, in this case, React will throw an error.
Setting the Initial State
You’ve seen that before using a state data inrender(), we must initialize it. To set the initial state, use this.state in the constructor with your ES6 class React.Component syntax. Don’t forget to invoke super() with properties, otherwise the logic in parent (React.Component) won’t work.
class MyFancyComponent extends React.Component {
  constructor(props) {
    super(props)
    this.state = {...}
  }
  render() {
    ...
  }
}
currentTime using new Date(). We can even use toLocaleString() to get the proper date and time format in the user’s location:
class Clock extends React.Component {
  constructor(props) {
    super(props)
    this.state = {currentTime: (new Date()).toLocaleString()}
  }
  ...
}
this.state must be an object. We won’t get into a lot of details about ES6 constructor(), because there’s information in the ES6 cheatsheet. The gist is that, as with other OOP languages, constructor() is invoked when an instance of this class is created. The constructor method name must be constructor. Think about it as an ES6 convention. Furthermore, if you create a constructor() method, you almost always need to invoke super() inside of it, otherwise the parent’s constructor won’t be executed. On the other hand, if you don’t define a constructor() method, then the call to super() is assumed.
Class Attributes
Hopefully, TC39 (the people behind the ECMAScript standard) will add attributes to the class syntax in future versions of ECMAScript! This way, developers can set state not only in the constructor, but in the body of the class:class Clock extends React.Component {
state = {
...
}
}
curentTime is an arbitrary name, and we’ll need to use the same name later when accessing and updating this state. You can name your state anyway you want if you refer to it later using this name.
The state object can have nested objects or arrays. Look at this example, where I add an array of my books to the state:
class Content extends React.Component {
  constructor(props) {
    super(props)
    this.state = {
      githubName: 'azat-co',
      books: [
        'pro express.js',
        'practical node.js',
        'rapid prototyping with js'
      ]
    }
  }
  render() {
    ...
  }
}
constructor() method will be called once, when a React element is created from this class. This way, we can set state directly by using this.state, in the constructor() method. Avoid setting and updating state directly with this.state = ... anywhere else, because it might lead to unintended consequences.
With React’s ownThis will only get us the first value, which becomes outdated quickly; in one second. What’s the point of a clock that doesn’t show the current time? Luckily, there’s a way to update the state.createClass()method to define a component, you’ll need to usegetInitialState().
Updating States
We change the state with thethis.setState(data, callback) class method. When this method is invoked, React merges the data with current states and calls render(). After that, React calls callback.
Having the callback in setState() is important because the methods work asynchronously. If you’re relying on the new state, you can use callback to make sure this new state is available. If you rely on a new state without waiting for setState() to finish its work, i.e., working synchronously with asynchronous operation, then you might have a bug when the state is still an old state.
We’ve rendered the time from a state, we also set the initial state, but we need to update the time every second, right? We can use a browser timer function setInterval() which will execute the state update every n milliseconds. The setInterval() method is implemented in virtually all modern browsers as a global, which means developers can use it without any libraries or prefixes.
setInterval(()=>{
  console.log('Updating time...')
  this.setState({
    currentTime: (new Date()).toLocaleString()
  })
}, 1000)
setInterval() once. We can create a method launchClock() to do that. We’ll call launchClock() in the constructor. The final Clock might look like the one shown in Listing 3.
Listing 3: Implementing clock with React state and setInterval() (ch04/clock/jsx/clock.jsx).
class Clock extends React.Component {
  constructor(props) {
    super(props)
    this.launchClock()                                      <1>
    this.state = {
      currentTime: (new Date()).toLocaleString()            <2>
    }
  }
  launchClock() {
    setInterval(()=>{
      console.log('Updating time...')
      this.setState({
        currentTime: (new Date()).toLocaleString()          <3>
      })
    }, 1000)                                                <4>
  }
  render() {
    console.log('Rendering Clock...')
    return <div>{this.state.currentTime}</div>              <5>
  }
}
launchClock()
<2> Set initial state to current time
<3> Update state with current time every second
<4> Bind context to reference the component instance
<5> Render state
You can use setState() anywhere, not only in launchClock() (which is invoked by constructor), as shown in the example. Typically, setState() is called from the event handler or as a callback for incoming data or data updates.
Changing a state value in your code like thisIt’s important to note thatthis.state.name= 'new name'won’t do any good. It won’t trigger a re-render and a possible real DOM update, which we want. For the most part, changing state directly withoutsetStateis an anti-pattern and should be avoided.
setState() only updates the states that you pass it (partial or merge, but not a complete replace). It’s not replacing the entire state object each time. If you have three states and then change one, the other two remain unchanged. In the example below, userEmail and userId will remain intact:
constructor(props) {
  super(props)
  this.state = {
    userName: 'Azat Mardan',
    userEmail: 'hi@azat.co',
    userId: 3967
  }
}
updateValues() {
  this.setState({userName: 'Azat'})
}
setState(). Another method sometimes seen in old React code, but which no longer works and was deprecated, is this.replaceState() method. As you can guess from the name, it replaced the entire state object with all its attributes.
Keep in mind that setState() triggers render(). It works in most cases. In some edge-case scenarios, when the code depends on external data, you can trigger re-render with this.forceUpdate(), but this approach should be avoided because it relies on external data, rather than the state, making components more fragile and dependent upon external factors (tight coupling).
As mentioned before, you can access the state object with this.state. If you remember, we output values with curly braces ({}); therefore, to declare a state property in the view (render‘s return statement), apply this.state.NAME.
React magic happens when you use state data in the view (for example, to print in if/else as a value of an attribute, or as a child’s property value) and then give setState() new values. Boom! React updates the HTML for you. You can observe it in your DevTools console. It should show cycles of updating… and then rendering… And, the best part is that ONLY the minimum required DOM elements are affected.
Binding this in JavaScript
In JavaScript,this mutates (changes) its value depending on where a function is called from. To ensure that this refers to our component class, we need to bind the function to the proper context (this value is our component class).
If you’re using ES6+/ES2015+ as I’m doing here, then you can use fat arrow function syntax to create a function with an autobinding:
setInterval(()=>{
  this.setState({
    currentTime: (new Date()).toLocaleString()
  })
}, 1000)
this which is, in our case, Clock.
The manual approach is to use bind(this) method on the closure:
function() {...}.bind(this)
setInterval(function(){
  this.setState({
    currentTime: (new Date()).toLocaleString()
  })
}.bind(this), 1000)
this keyword mutates inside a function’s closure, and we need to either bind it or save the context (this) value for later use. Typically, we’ll see variables like self, that, or _this used to save the value of the original this. Most of you probably have probably seen statements like the following:
var that = this
var _this = this
var self = this
this. The new variable won’t be a copy, but a reference to the original this value. Here’s our setInterval():
var _this = this
setInterval(function(){
  _this.setState({
    currentTime: (new Date()).toLocaleString()
  })
}, 1000)
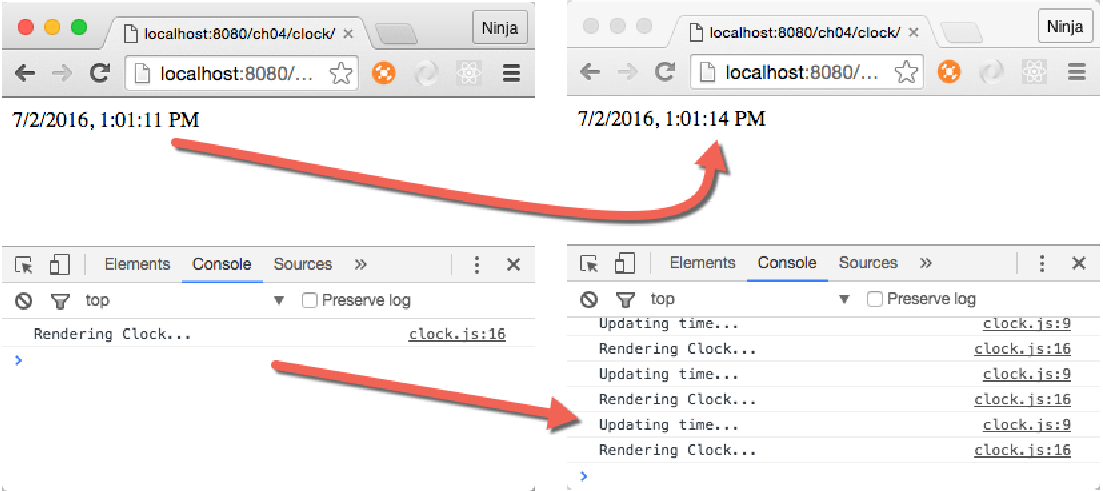 Figure 2: The Clock is Ticking
One thing before we move on. You can see how React is reusing the same DOM
Figure 2: The Clock is Ticking
One thing before we move on. You can see how React is reusing the same DOM <div> element and only changes the text inside it. Go ahead and use DevTools to modify the CSS of this element. I added a style to make text blue (color: blue) as shown in Figure 3. It created an inline style, not a class. The element and its new inline style stayed the same (blue) as the time kept on ticking.
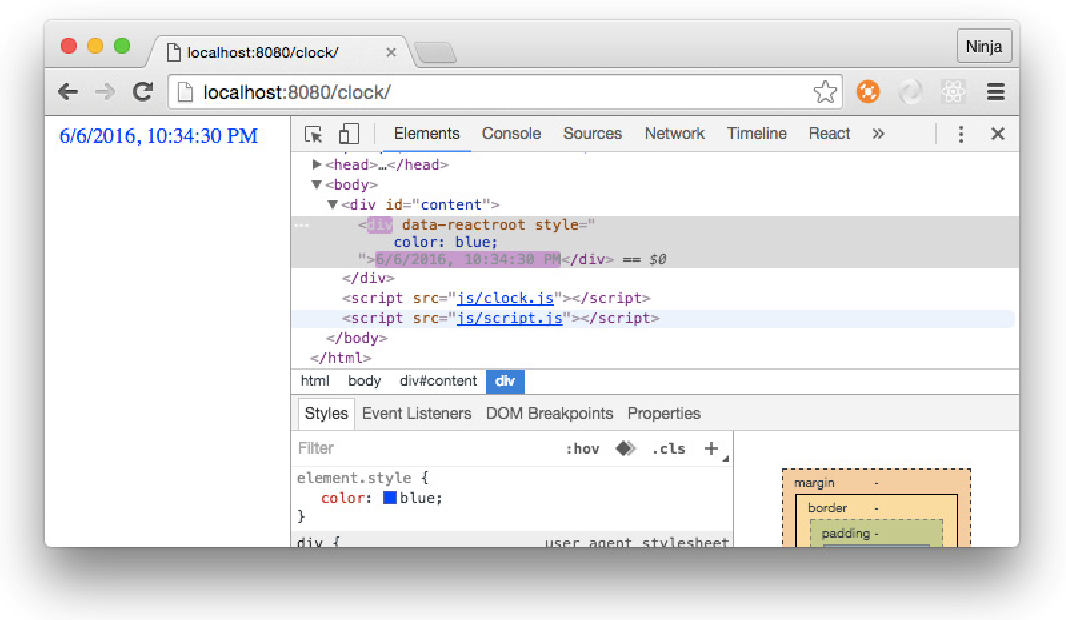 Figure 3: React updates the time as text, not the div element (manually added color: blue)
React will only update the inner HTML (the content of the second
Figure 3: React updates the time as text, not the div element (manually added color: blue)
React will only update the inner HTML (the content of the second <div> container). The <div> and all other elements on this page, remain intact. Neat. ;-)
States and Properties
States and properties are both attributes for a class, meaning they’rethis.state and this.props. That’s the only similarity! One of the main differences between properties and state is that the former is immutable and the latter is mutable.
Another difference between properties and states is that we pass properties from parent components, as we define states in the component itself, not its parent. The philosophy here is that you can only change the value of a property from the parent, not the component itself. Properties determine the view upon creation and then they stay static (they don’t change). The state, on the other hand, is set and updated by the object itself.
Props and states serve different purposes, but both are accessible as attributes of component class, and both help developers to compose components with different representation (view). Numerous differences between props and states exist when it comes to component lifecycle. Think about props and states as inputs for a function that produces different outputs. Those outputs are views. You can have different UIs (views) for each set of props and states (Figure 4).
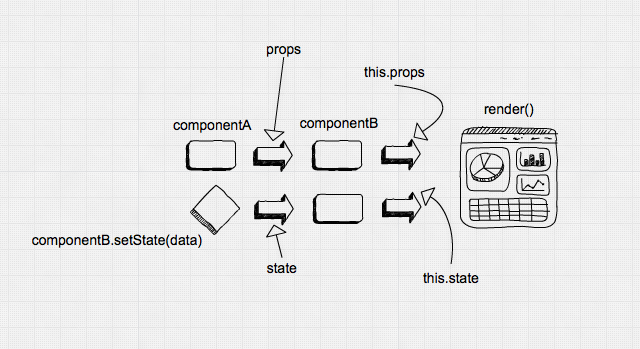 Figure 4: New values for props and states can change the UI, but for props the new values come from a parent and for state from the component itself
Not all components need to have state. Let’s take a look at how to use properties with stateless components.
Figure 4: New values for props and states can change the UI, but for props the new values come from a parent and for state from the component itself
Not all components need to have state. Let’s take a look at how to use properties with stateless components.
Stateless Components
The concept of a stateless component is a component that has no states, no components, nor any other React lifecycle events/methods. The purpose of a stateless component is to render the view. The only thing it can do is take properties and do something with them—a simple function with an input (property) and an output (UI element). The benefit of using stateless components is they’re predictable, because we’ve one input which determines the output. Predictability means they’re easier to understand, maintain, and debug. In fact, not having a state is the most desired React practice—the more stateless components you use and the less ‘stateful’ they are, the better. This Hello World script is a good example of a stateless component (listing 4):class HelloWorld extends React.Component {
render() {
return <h1 {...this.props}>Hello {this.props.frameworkName} World!!!</h1>
}
}
<h1>:
const HelloWorld = function(props){
  return <h1 {...props}>Hello {props.frameworkName} world!!!</h1>
}
const HelloWorld = (props)=>{
  return <h1 {...props}>Hello {props.frameworkName} world!!!</h1>
}
Link is a stateless component:
function Link (props) {
  return <a href={props.href} target="_blank" className="btn btn-primary">{props.text}</a>
}

ReactDOM.render(
  <Link text='Buy React Quickly' href='https://www.manning.com/books/react-quickly'/>,
  document.getElementById('content')
)
const Link = props=> <a href={props.href} target="_blank" className="btn btn-primary">{props.text}</a>
propTypes and defaultProps. We set them on the object:
function Link (props) {
  return <a href={props.href} target="_blank" className="btn btn-primary">{props.text}</a>
}
Link.propTypes = {...}
Link.defaultProps = {...}
refs ) with stateless functions. If you need to use refs, you can wrap a stateless component in a normal React component.
Conclusion
In this article I have introduced state in React and demonstrated how to work with it. I have looked at some of the differences between state and props, as well as how to work with so-called stateless components. And that’s all for now — hopefully this has given you a better understanding of working with states in React. For more on React and its myriad of uses go checkout the book: React Quickly.Frequently Asked Questions (FAQs) about Working with and Manipulating State in React
What is the significance of state in React?
In React, state is a built-in object that stores property values that belong to a component. It is one of the key concepts in React that enables components to create and manage their own data. So, unlike props, components cannot pass state data to other components directly. However, they can set up functions to allow other components to change their state. This makes the state data dynamic and mutable, allowing for interactive components.
How do I initialize state in a class component?
In a class component, the state is initialized in the constructor method. The constructor method is a special method for creating and initializing an object created with a class. Here’s an example:class MyComponent extends React.Component {
constructor(props) {
super(props);
this.state = { name: 'Initial State' };
}}
How can I update the state in React?
The state in React can be updated using the setState() method. This method schedules an update to a component’s state object and tells React that this component and its children need to be re-rendered with the updated state. Here’s an example:this.setState({ name: 'Updated State' });
Can I directly modify the state in React?
No, you should not directly modify the state in React. The only place where you can assign this.state is the constructor. For all other updates, you must use setState(). Directly modifying the state does not re-render the component.
What is the difference between state and props in React?
Both props and state are plain JavaScript objects. While both of them hold information that influences the output of render, they are handled slightly differently. Props get passed to the component similar to function parameters whereas state is managed within the component similar to variables declared within a function.
How do I use state in functional components?
In functional components, you can use state by using the useState Hook. The useState Hook lets you add state to functional components. Here’s an example:import React, { useState } from 'react';function MyComponent() {
const [name, setName] = useState('Initial State');
return (
// JSX here
);}
What is the difference between state and setState in React?
state is a built-in object that stores property values that belong to a component. setState is a method that is used to update the state. It schedules an update to a component’s state object and tells React that this component and its children need to be re-rendered with the updated state.
How can I access the previous state in React?
You can access the previous state in React by passing a function to setState. The function will receive the previous state as the first argument. Here’s an example:this.setState((prevState) => {
return { counter: prevState.counter + 1 };});
Can I use state in all components in React?
Yes, you can use state in both class and functional components in React. In class components, you use the this.state property to set and access state. In functional components, you use the useState Hook to set and access state.
How does React know when to re-render the UI?
React knows when to re-render the UI when there are changes to either the component’s state or props. When setState is called, React re-renders the component and all its children.
 Azat Mardan
Azat is a Technology Fellow, Manager at Capital One, and a JavaScript/Node.js expert with several online courses on Udemy and Node University, and 12 books published on the topic, including top-sellers React Quickly (Manning, 2016), Full Stack JavaScript (Apress, 2015), Practical Node.js (Apress, 2014) and Pro Express.js (Apress, 2014). In his spare time, Azat writes about tech on Webapplog.com, speaks at conferences and contributes to open-source. Before becoming an expert in Node.js, Azat finished his Master’s in Information Systems Technology; and worked at U.S. federal government agencies, small startups and big corporations with various technologies such as Java, SQL, PHP, Ruby, etc. Azat is passionate about technology and finance, as well as new disruptive ways of educating and empowering people. Website: http://azat.co LinkedIn: http://www.linkedin.com/in/azatm Professional Blog: http://webapplog.com/ Amazon Profile: https://www.amazon.com/Azat-Mardan/e/B00GM6QNI4/