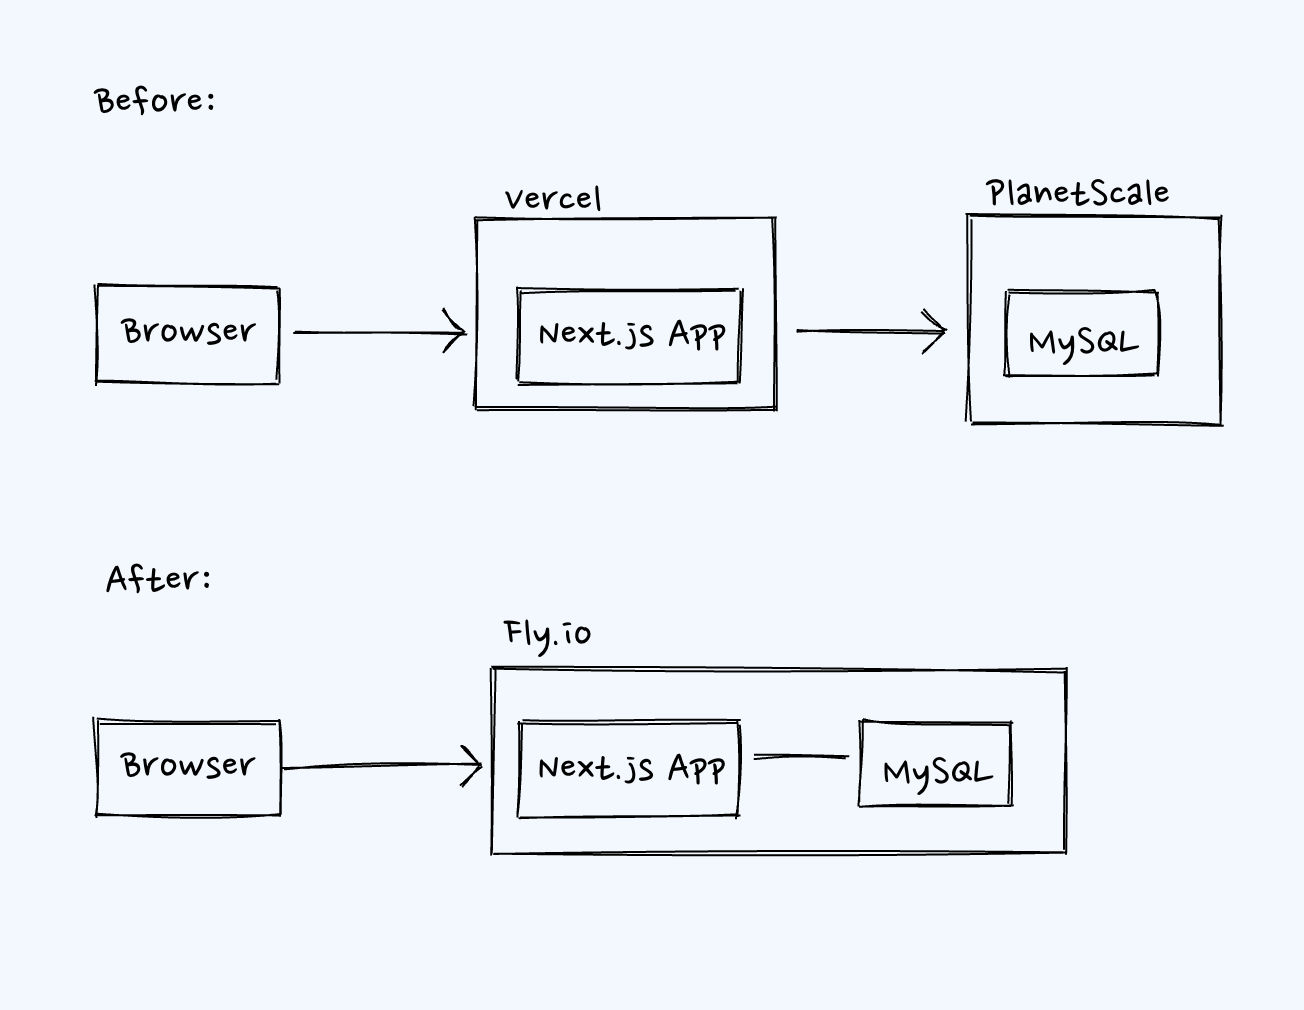
Migrate Next.js app away from "Vercel + PlanetScale" to "Fly.io"
In other words: How to deploy a Next.js app (SSR mode) with MySQL as a database, to Fly.io
In this article, I will show you a step-by-step guide on deploying a Next.js app (SSR mode) to Fly.io. We will deploy a MySQL database to Fly.io as well. Although you have the option to choose other databases, I will be using MySQL in this case as I am migrating away from PlanetScale, which is a MySQL database under the hood.
What does the result look like?
In the end, your application architecture will be:
- Next.js app (SSR mode) running on a VM (via Docker container) in Fly.io.
- MySQL database also running on Fly.io, with an attached persistent volume, and residing in the same private network as the Next.js app.
- We will use Cloudflare as a DNS and handle non-www to www redirection (i.e., redirect
crispyscript.comtowww.crispyscript.com).
Step 1: [MySQL] Initialize Fly.io setup for MySQL
For reference, you can consult the documentation.
-
Begin by creating a new directory. This can be nested within the Next.js project's directory or in another location on your computer.
mkdir my-mysql cd my-mysql -
Initialize the Fly.io setup.
fly launch --no-deploy --image mysql:8 -
Edit the
fly.tomlfile generated byfly launch:- Remove the entire
[http_service]block. - Add
MYSQL_DATABASEandMYSQL_USERinto the[env]block. - Add
[processes]and[mounts]blocks.
The final
fly.tomlfile should resemble the following (note that I've chosen the "shared-cpu-1x" machine with "1gb" memory):app = 'my-mysql' primary_region = 'sin' [build] image = 'mysql:8' [[vm]] size = 'shared-cpu-1x' memory = "1gb" [processes] app = """--datadir /data/mysql \ --default-authentication-plugin mysql_native_password""" # We will create `mysqldata` with `fly volumes` later [mounts] source = "mysqldata" destination = "/data" # For non-sensitive env variables only! # The other sensitive env variables(including `MYSQL_PASSWORD`) are in `fly secrets` [env] MYSQL_DATABASE = "blog" MYSQL_USER = "any_username" - Remove the entire
Step 2 (Optional): [MySQL] Set up auto start/stop feature
Edited: I found that sometimes the auto-start feature does not work properly. It causes an unexpected error when trying to connect to MySQL via *.flycast address. My recommendation is to skip this step until the issue is fixed.
The original content:
For reference, you can refer to Q&A 1 | Q&A 2 | The Documentation.
This step is optional.
You can configure Fly.io to automatically stop a MySQL container when there is no traffic to save costs.
-
Add
[[services]]and[[services.ports]]blocks tofly.tomlfile.# Add this to the end of `fly.toml` file in "Step 1" [[services]] internal_port = 3306 protocol = "tcp" processes = ["app"] auto_stop_machines = true auto_start_machines = true min_machines_running = 0 [[services.ports]] handlers = [] port = 3306 -
Complete "Step 3" to "Step 5" to deploy MySQL for the first time. Then, return here and proceed to "3." below.
-
While still in the
my-mysqldirectory, execute this command:fly ips allocate-v6 --privateThe result should resemble this when you run the
fly ips listcommand:VERSION IP TYPE REGION CREATED AT v6 fdaa:0:22b7:0:1::3 private global just now
Now, for the remainder of this article, replace any of my-mysql.internal with my-mysql.flycast.
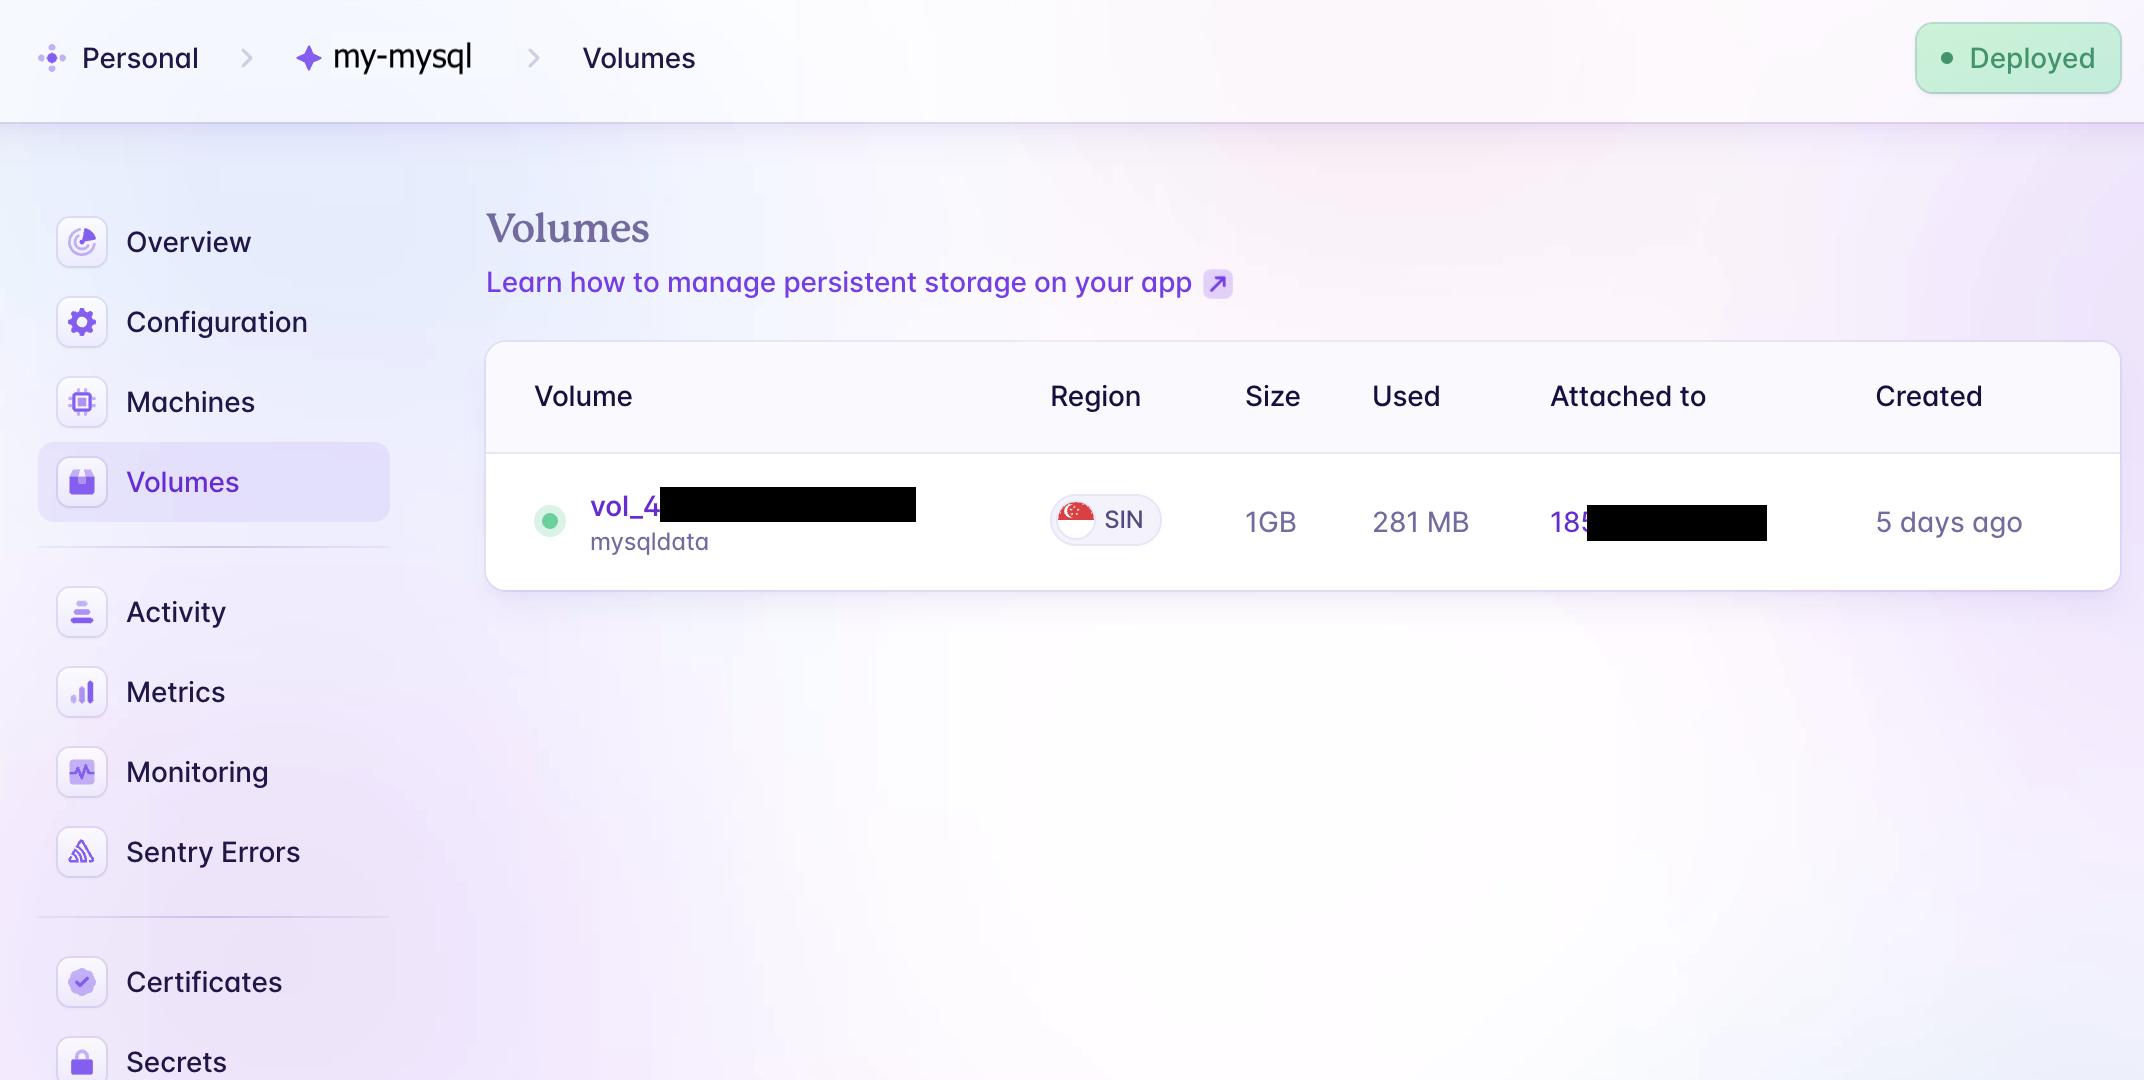
Step 3: [MySQL] Create a volume
For reference, consult the documentation.
In the my-mysql directory, run the following command to create the mysqldata volume. I've opted for 1GB of disk space, as my website is relatively simple.
# Create a volume named "mysqldata" within our app "my-mysql"
fly volumes create mysqldata --size 1 # gb
Step 4: [MySQL] Add sensitive env variables into fly secrets
For reference, refer to the documentation.
The MySQL container requires two sensitive environment variables: MYSQL_PASSWORD and MYSQL_ROOT_PASSWORD. Place them into fly secrets.
# Set secrets:
# MYSQL_PASSWORD      - password set for user $MYSQL_USER (which we already set the value in "Step 1")
# MYSQL_ROOT_PASSWORD - password set for user "root"
fly secrets set MYSQL_PASSWORD=your_password MYSQL_ROOT_PASSWORD=your_root_password
You can check the result by:
fly secrets list
Step 5: [MySQL] Deploy MySQL to Fly.io
Finally, run this command in the my-mysql directory:
fly deploy
Caveat: Upon the first deployment, if any mistakes were made or if the username/password weren't set properly, broken data may persist in the volume, and subsequent deployments may still read this broken data. To fix this, you can remove the mysqldata volume and recreate it from scratch.
Step 6 (Optional): [PlanetScale Migration] Migrate data from PlanetScale to MySQL (in Fly.io)
This step is optional.
For people who want to migrate the existing data in PlanetScale to Fly.io, the following steps are what you're looking for.
-
Connect your local machine to MySQL in Fly.io. You'll need to install WireGuard and create a Fly.io tunnel. Refer to the documentation.
-
Install WireGuard
-
In the
my-mysqldirectory, run:fly wireguard create -
Follow the instructions and save the output as a file,
basic.conf, for instance:!!!! WARNING: Output includes private key. Private keys cannot be recovered !!!! !!!! after creating the peer; if you lose the key, you’ll need to remove !!!! !!!! and re-add the peering connection. !!!! ? Filename to store WireGuard configuration in, or 'stdout': basic.conf Wrote WireGuard configuration to 'basic.conf'; load in your WireGuard clientNote: don't push this file,
basic.conf, to GitHub! -
Run the WireGuard app. Click the
Import tunnel(s) from filebutton. Select your configuration file. After successfully imported,Activateit. -
Now, you should be able to connect to
my-mysql.internal:3306, using yourMYSQL_USER,MYSQL_PASSWORD, andMYSQL_DATABASE. Try it with any MySQL clients, e.g. TablePlus, cli tools.
-
-
Back up all schemas and data from PlanetScale. Refer to the documentation.
pscale db dump <DATABASE_NAME> <BRANCH_NAME>For example, if your database name in PlanetScale is
planetblog:pscale db dump planetblog mainYou will receive a directory name similar to
pscale_dump_planetblog_main_20240305_144231. Within the directory, you'll find aplanetblog.TableName-schema.sqlfile containing the schema for the database, as well as one or more files with names likeplanetblog.TableName.00001.sql, which contain the data. Note: Do not push thepscale_dump_*directory to GitHub! -
Restore the backup to MySQL in Fly.io.
-
Install
mydumperbrew install mydumper -
Create a
db.inifile to provide all necessary information on how to connect to Fly.io MySQL from the local machine. Note: Do not push this file to GitHub![myloader] host = my-mysql.internal user = any_username password = your_password database = blog port = 3306 -
Execute this command:
myloader --defaults-file db.ini --directory pscale_dump_planetblog_main_20240305_144231/
-
Now, all data between PlanetScale and Fly.io MySQL should be identical.
Step 7: [Next.js] Initialize Fly.io setup and set NEXT_PUBLIC_* env variables
For reference, consult the documentation.
After signing in to Fly.io and installing their CLI tool (flyctl), navigate to the directory containing your Next.js app. Run fly launch to initialize the Fly.io setup. For example, if the Next.js project is in the my-next-app directory, execute:
cd my-next-app
fly launch
You should get Dockerfile and fly.toml files. Next, add all your NEXT_PUBLIC_* env variables into the Dockerfile below the FROM base as build line.
In the end, your Dockerfile should resemble this:
ARG NODE_VERSION=21.6.2

FROM node:${NODE_VERSION}-slim as base
LABEL fly_launch_runtime="Next.js/Prisma"
WORKDIR /app
ENV NODE_ENV="production"
ARG PNPM_VERSION=8.15.4
RUN npm install -g pnpm@$PNPM_VERSION

FROM base as build

# ----- All `NEXT_PUBLIC_*` env variables go here -----
ARG NEXT_PUBLIC_WEB_URL="https://crispyscript.com"
# -----------------------------------------------------

RUN apt-get update -qq && \
    apt-get install --no-install-recommends -y build-essential node-gyp openssl pkg-config python-is-python3
COPY --link package.json pnpm-lock.yaml ./
RUN pnpm install --frozen-lockfile --prod=false
COPY --link prisma .
RUN npx prisma generate
COPY --link . .
RUN pnpm run build
RUN pnpm prune --prod

FROM base
RUN apt-get update -qq && \
    apt-get install --no-install-recommends -y openssl && \
    rm -rf /var/lib/apt/lists /var/cache/apt/archives
COPY --from=build /app /app
EXPOSE 3000
CMD [ "pnpm", "run", "start" ]
Tip: If you plan to connect your Next.js app with PlanetScale later, you need to
apt-get install ca-certificatessince PlanetScale requires a SSL connection. Edit the last section inDockerfile:... (no change) FROM base RUN apt-get update -qq && \ # ------ Add ca-certificates to the next line ------ apt-get install --no-install-recommends -y openssl ca-certificates && \ rm -rf /var/lib/apt/lists /var/cache/apt/archives COPY --from=build /app /app ... (no change)
Additionally, the fly.toml file should resemble this (note that I've selected the "shared-cpu-1x" machine with "512mb" of memory):
app = 'my-next-app'
primary_region = 'sin'

[build]

[http_service]
  internal_port = 3000
  force_https = true
  auto_stop_machines = true
  auto_start_machines = true
  min_machines_running = 0
  processes = ['app']

[[vm]]
  size = 'shared-cpu-1x'
  memory = "512mb"
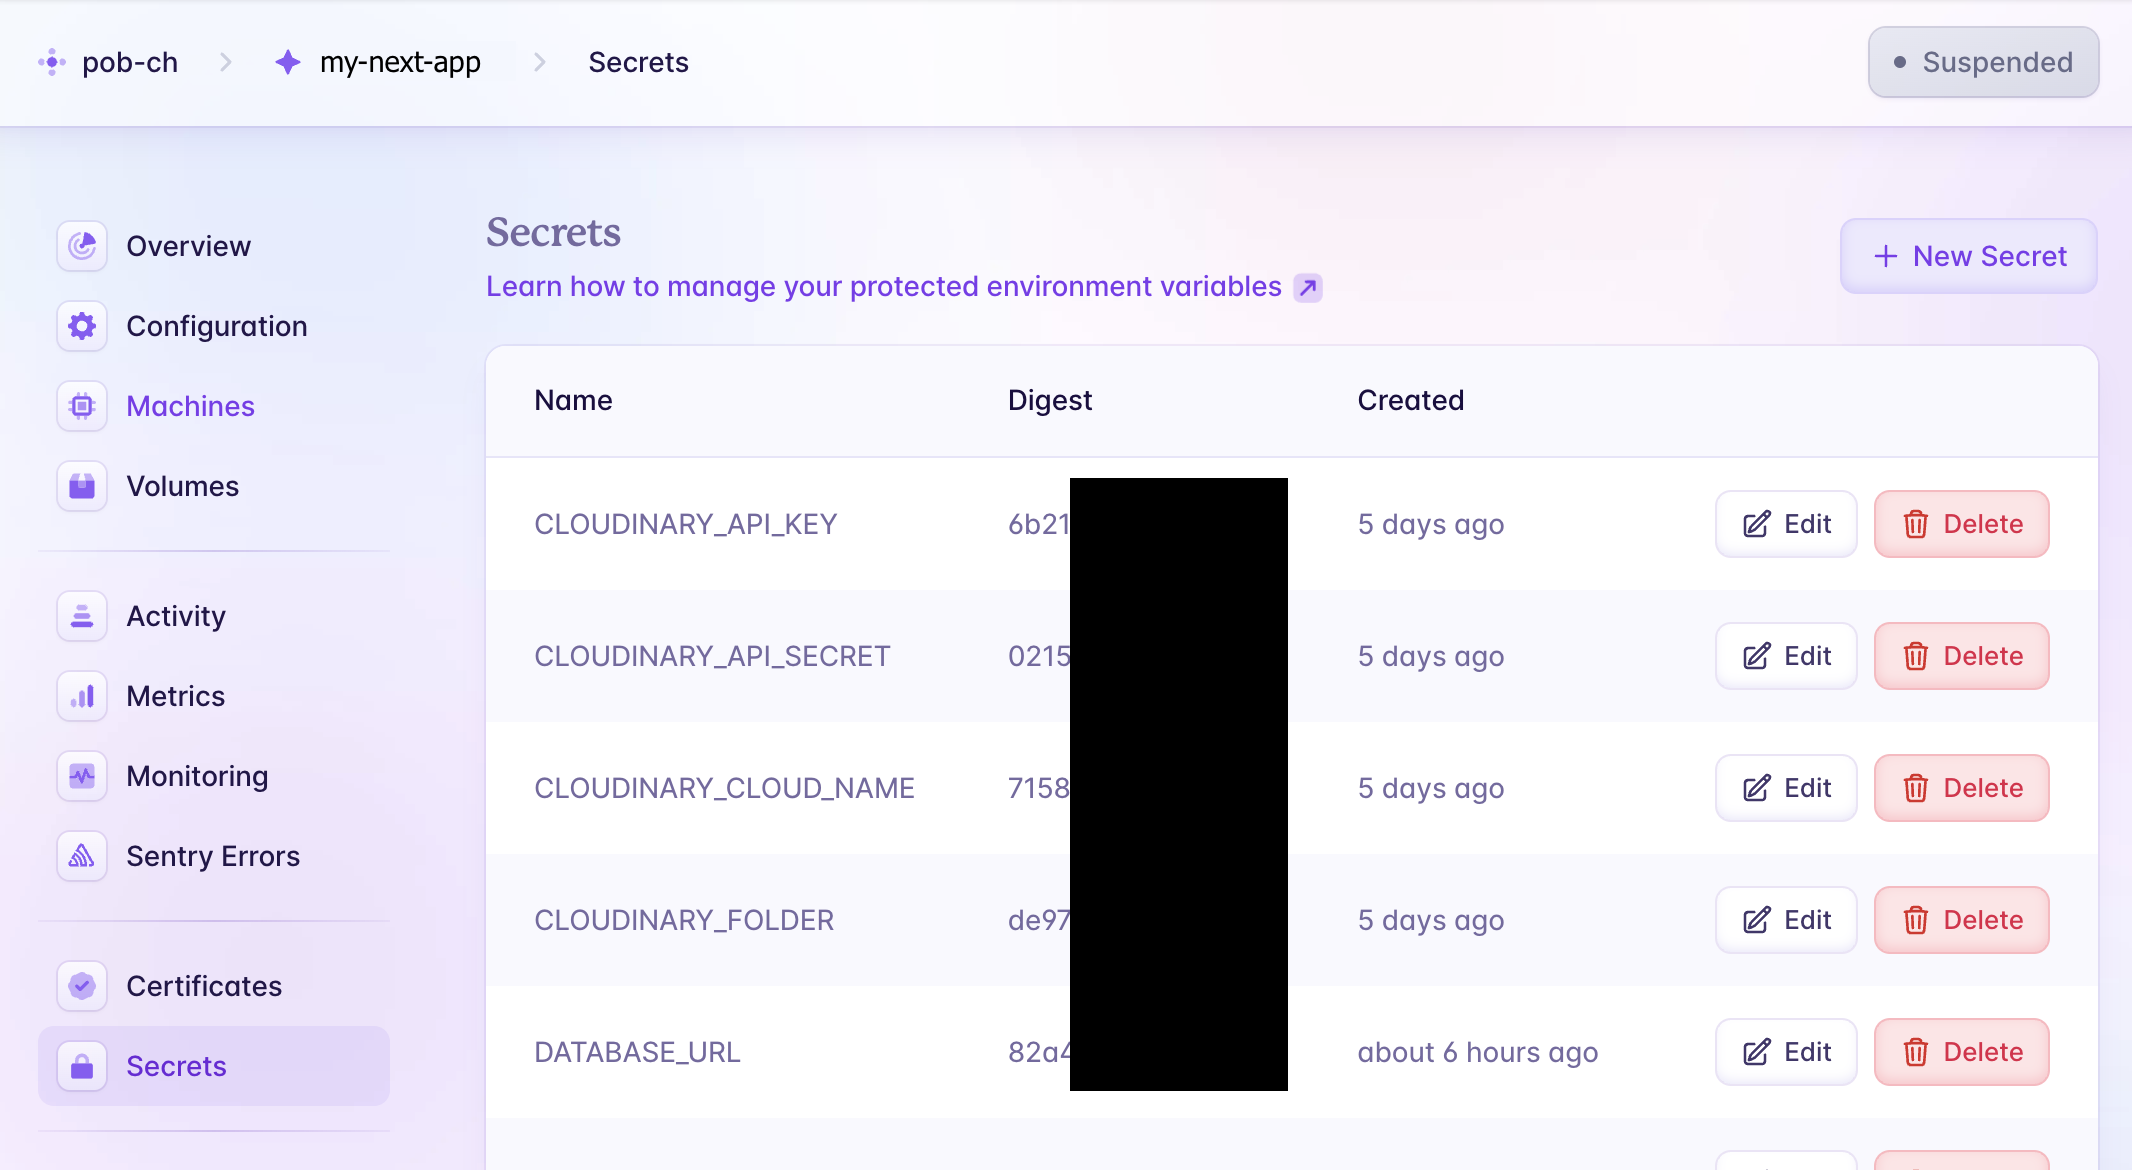
Step 8: [Next.js] Set up remaining env variables
For reference, refer to the documentation.
There are two groups of environment variables for the Next.js app:
- Group 1:
NEXT_PUBLIC_*variables - Put them into theDockerfileas mentioned in "Step 7" above. - Group 2: All runtime variables including sensitive variables, e.g.,
DATABASE_URL,NEXTAUTH_URL,CLOUDINARY_API_KEY- Place them intofly secretsin this step.
In the my-next-app directory, execute this command to place all "Group 2" variables into fly secrets one by one:
fly secrets set NEXTAUTH_URL=https://crispyscript.com
fly secrets set CLOUDINARY_API_KEY=xxxxx
...
For the DATABASE_URL variable, use a connection string following this pattern: mysql://{MYSQL_USER}:{MYSQL_PASSWORD}@my-mysql.internal/{MYSQL_DATABASE}. Prisma will use this variable to connect to MySQL. If you use another ORM, please adjust accordingly.
fly secrets set DATABASE_URL='mysql://any_username:[email protected]/blog'
Note:
- If you've set up Flycast in "Step 2 (Optional)", use
my-mysql.flycastinstead ofmy-mysql.internalforDATABASE_URL. - We aren't utilizing SSL connection between our Next.js app and MySQL since they are within the same private network.
To list all variable names, which have been set so far:
fly secrets list
Step 9: [Next.js] Install sharp
Since we'll be self-hosting the Next.js app on our VM instead of utilizing the Vercel platform, we need the sharp package for image optimization feature.
pnpm add sharp
Step 10: [Next.js] Deploy the Next.js app to Fly.io
In the my-next-app directory, simply run:
fly deploy
You'll receive the deployed URL (e.g., https://my-next-app.fly.dev) as a result.
Note: You can utilize fly logs to debug or access the tailing log of the Next.js app.
Step 11: [DNS] Set up Cloudflare to redirect non-www to www URL
If you're not already using Cloudflare as your DNS provider, go through their documentation to set it up. For example, I set up Cloudflare as a DNS provider with a Namecheap domain by following this documentation.
After setting up Cloudflare as your DNS provider, there are a few more steps:
-
In the
my-next-appdirectory, executefly certs addfor both the www and non-www URLs. Refer to the documentation for guidance.fly certs add crispyscript.com fly certs add www.crispyscript.com
-
Navigate to the Cloudflare dashboard -> "DNS" menu -> "Records" menu.
-
Add the following 2 records:
Type      Name      Content                 Proxy status      TTL
CNAME     @         my-next-app.fly.dev     Proxied           Auto
CNAME     www       my-next-app.fly.dev     Proxied           Auto
-
Go to the Cloudflare dashboard -> "SSL/TLS" menu -> "Overview" menu.
-
Select "Full - Encrypts end-to-end, using a self-signed certificate on the server." This step is crucial. The default option "Flexible" causes a
520error on my website. Refer to this solution.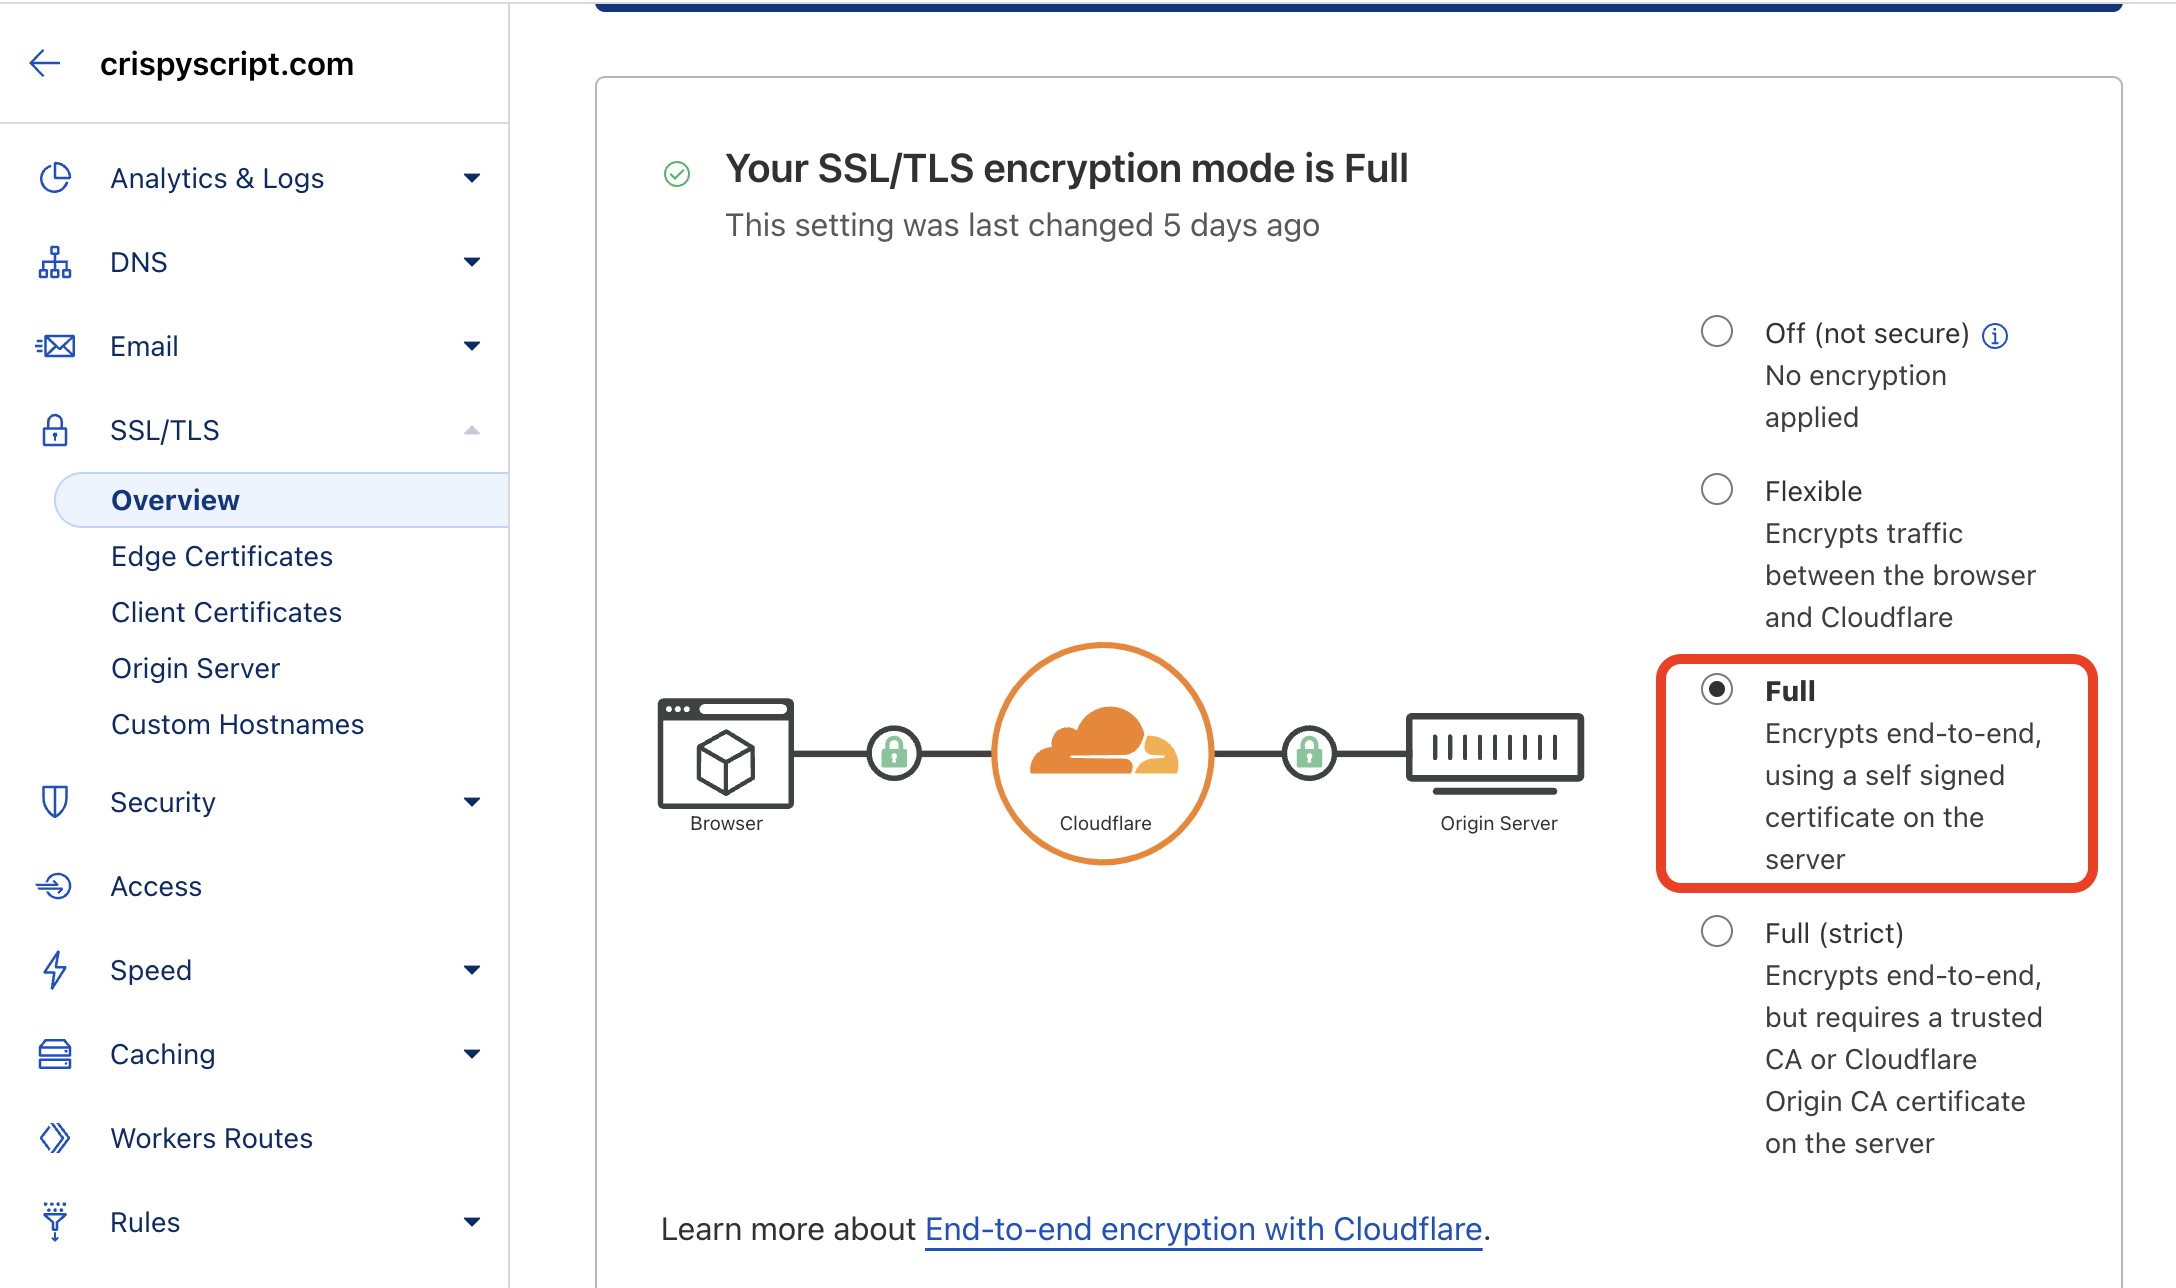
-
Navigate to the Cloudflare dashboard -> "Rules" menu -> "Page Rules" menu.
-
Create a page rule to redirect non-www to www:
URL:
crispyscript.com/*

Then the settings are:
Forwarding URL - 301 Permanent Redirect

Destination URL:
https://www.crispyscript.com/$1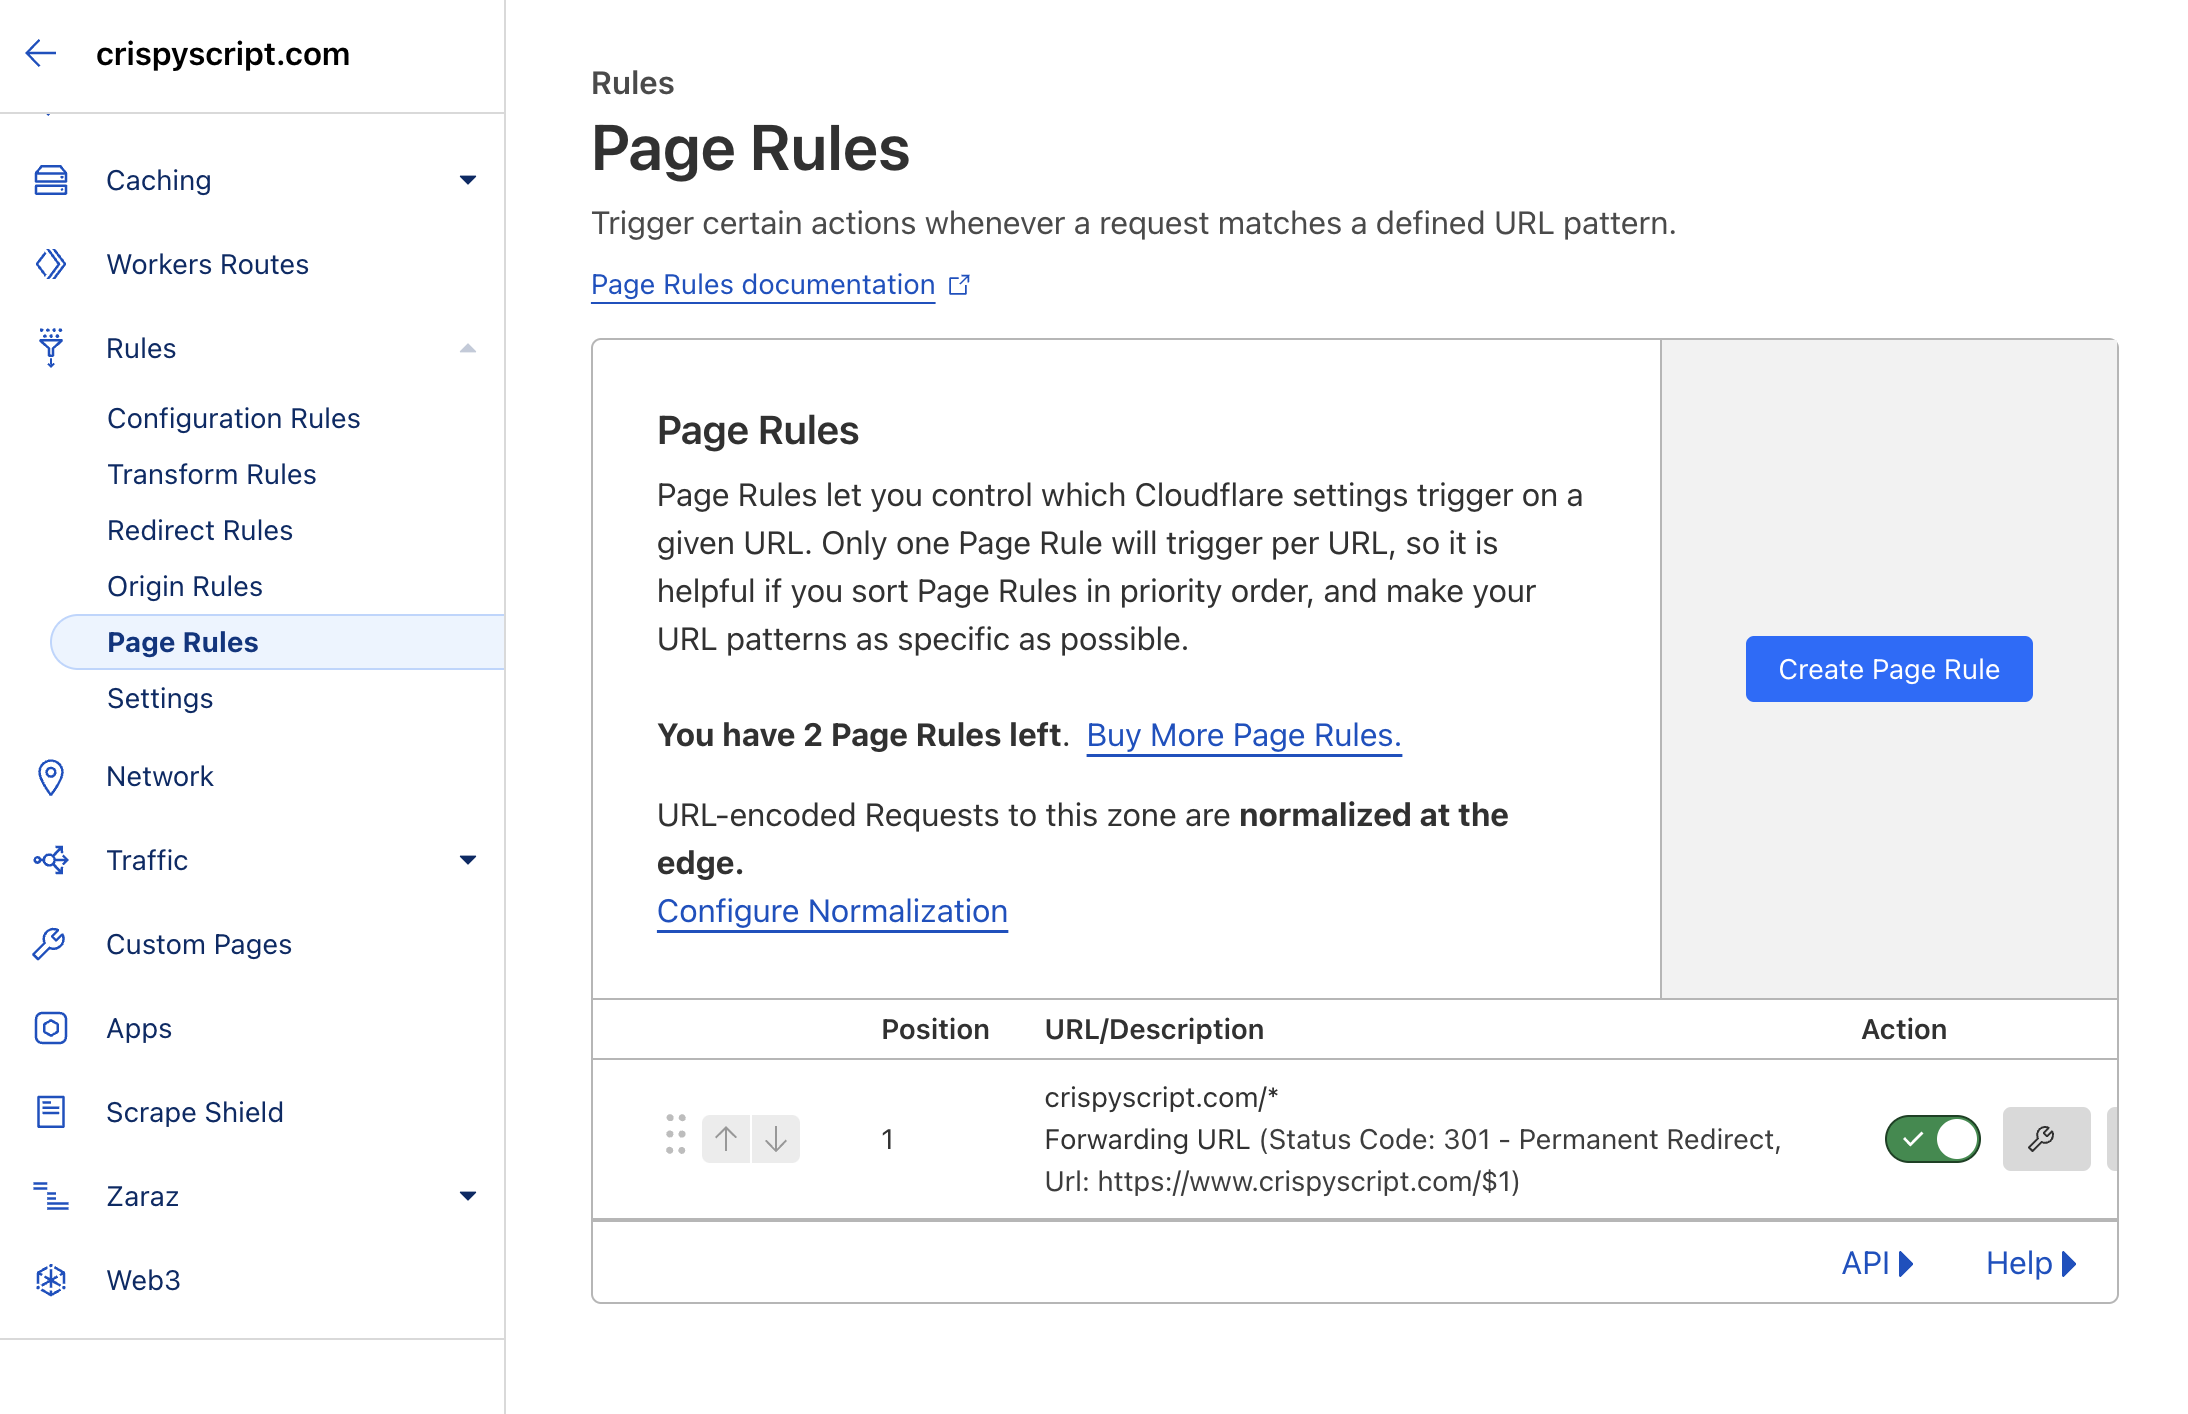
Final Result
After going through all steps, the final result would be:
-
All of these URLs:
http://crispyscript.com
https://crispyscript.com
http://www.crispyscript.com
https://www.crispyscript.com
should be redirected to:
https://www.crispyscript.com -
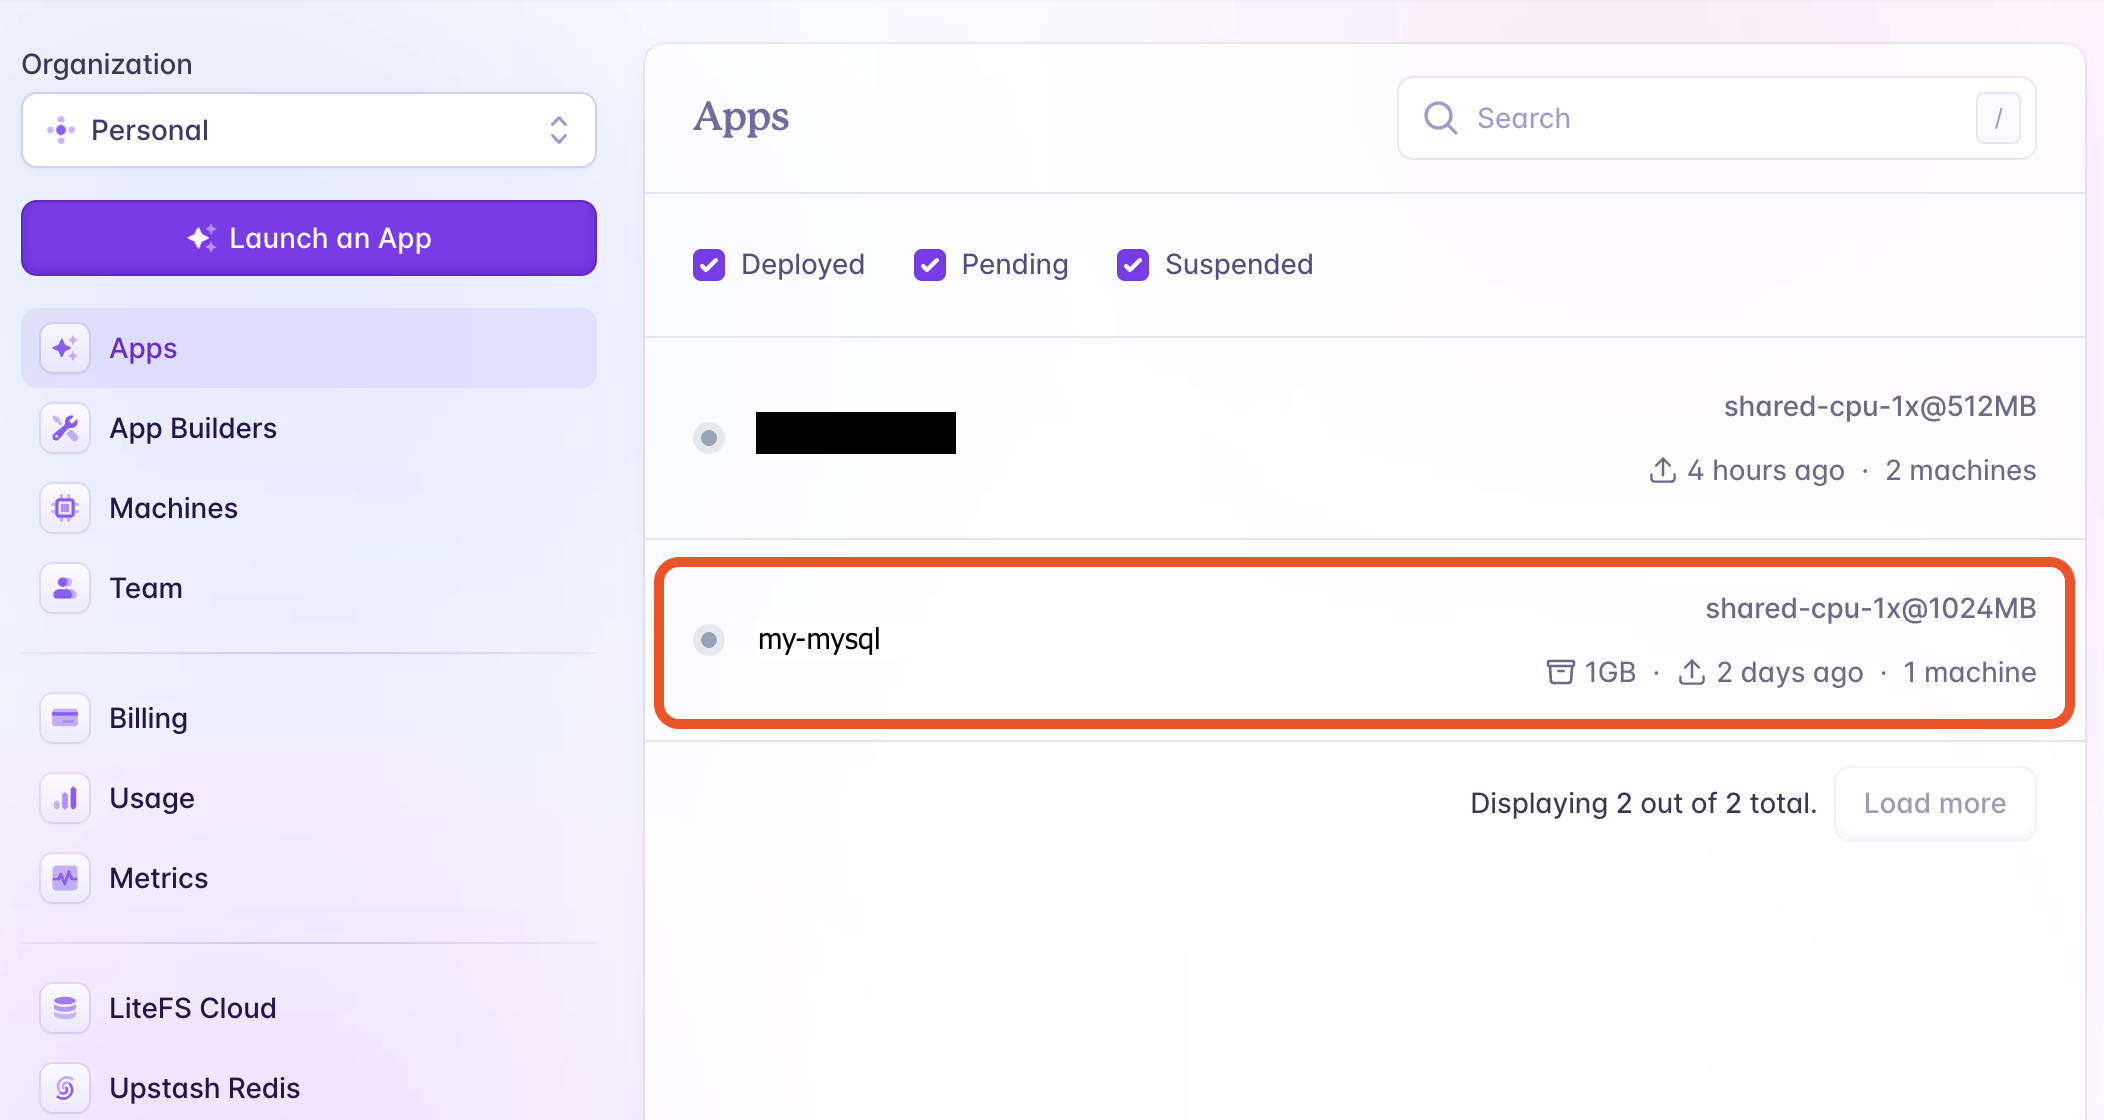
There will be two apps on Fly.io: the Next.js app (named
my-next-app) and MySQL (namedmy-mysql). You can check their status on the Fly.io dashboard.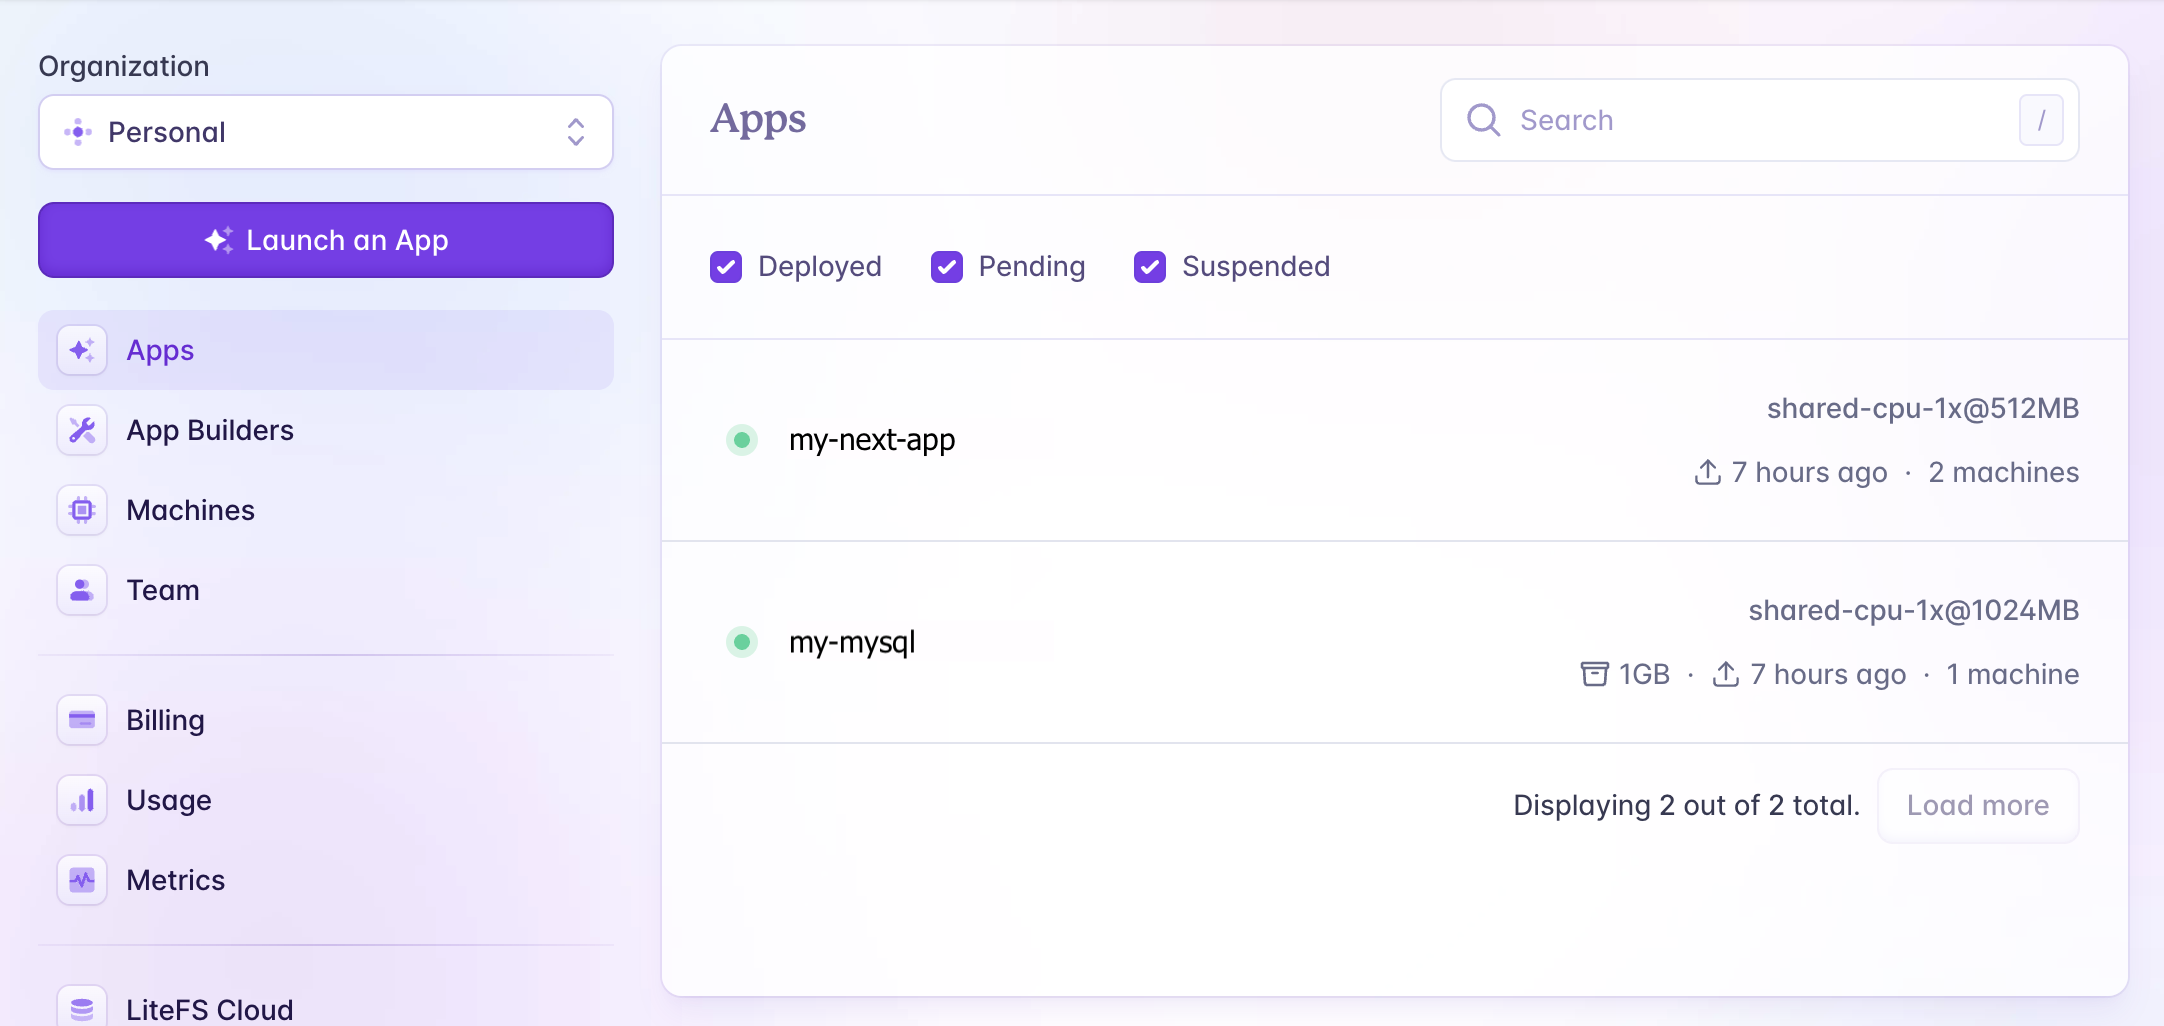
Next Steps
You can also set up a custom email address (e.g., [email protected]) and integrate it with your free Gmail account. This enables you to "send" and "receive" emails on behalf of the custom email address. Follow this instruction if you're interested.