

My philosophy is simple. To become good at something, you need to do it a lot.
It's not enough to do it once. You need to do it again, and again and again. It will never end. I used the same philosophy to get good at programming.
One thing I've noticed on this journey is that it's a lot more fun to build things that are interesting, and that look good. Things you can show you friends and be proud of. Something that makes you excited to get started when you sit down in front of your keyboard.
That's why I built a chatbot.
Which morphed into a npm package.
So let's build one together. If you want to take on this challenge on your own, you can go directly to the documentation (which is actually a chatbot). Or, if you are a visual learner, I created a tutorial on YouTube.
Otherwise, let's go. I'm going to assume that you have Node installed, and access to the npx command. If not, go get it here.
Initial setup
// Run these commands from your command line
npx create-react-app chatbot
cd chatbot
yarn add react-chatbot-kit
yarn start
This should install the npm package and open the development server at localhost:3000.
Next head over to App.js and make these changes:
import Chatbot from 'react-chatbot-kit'

function App() {
  return (
    <div className="App">
      <header className="App-header">
        <Chatbot />
      </header>
    </div>
  );
}
Great job. We're getting there. You should see this in your development server now:
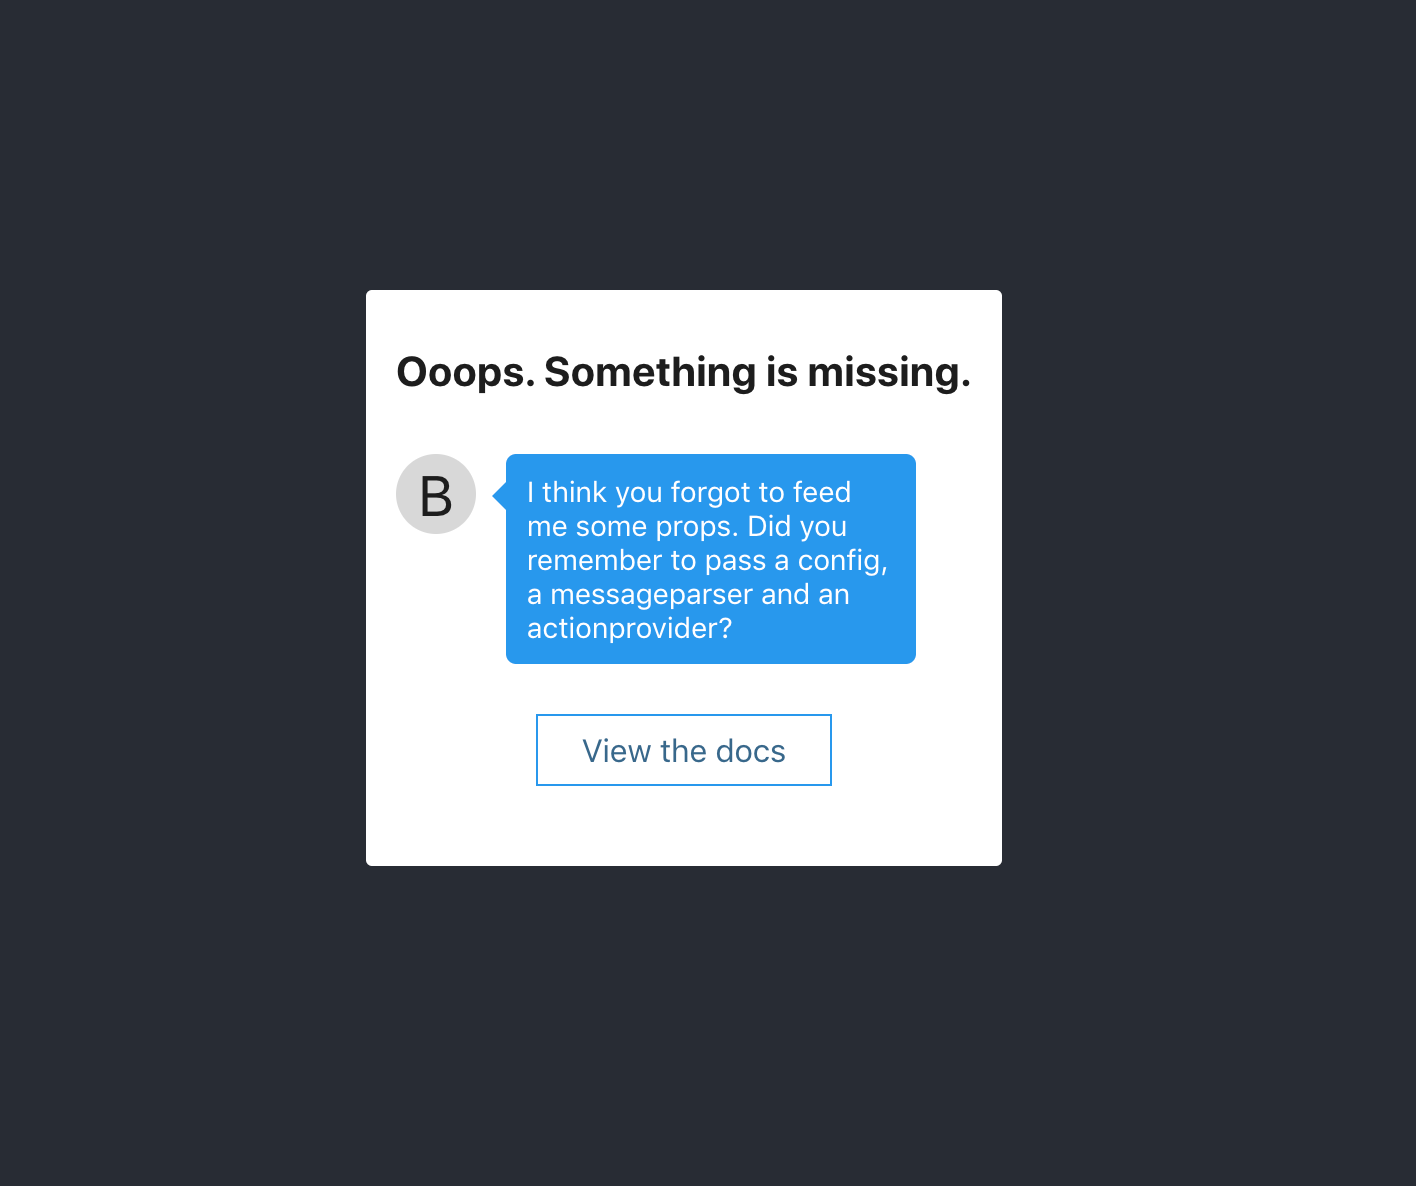
The chatbot takes three props that must be included for it to work. First, it needs a config which must include an initialMessages property with chatbot message objects.
Secondly, it needs a MessageParser class that must implement a parse method.
Thirdly, it needs an ActionProvider class which will implement actions that we want to take based on parsing the message.
We'll go deeper into this later. For now, go here to get the boilerplate code to get started.
- Put the
MessageParsercode in a file calledMessageParser.js - Put the
ActionProvidercode in a file calledActionProvider.js - Put the config code in a file called
config.js
When that's done, go back to your App.js file and add this code:
import React from 'react';
import Chatbot from 'react-chatbot-kit'
import './App.css';

import ActionProvider from './ActionProvider';
import MessageParser from './MessageParser';
import config from './config';

function App() {
  return (
    <div className="App">
      <header className="App-header">
        <Chatbot config={config} actionProvider={ActionProvider} 	    messageParser={MessageParser} />
      </header>
    </div>
  );
}
You should now see this on localhost:3000:
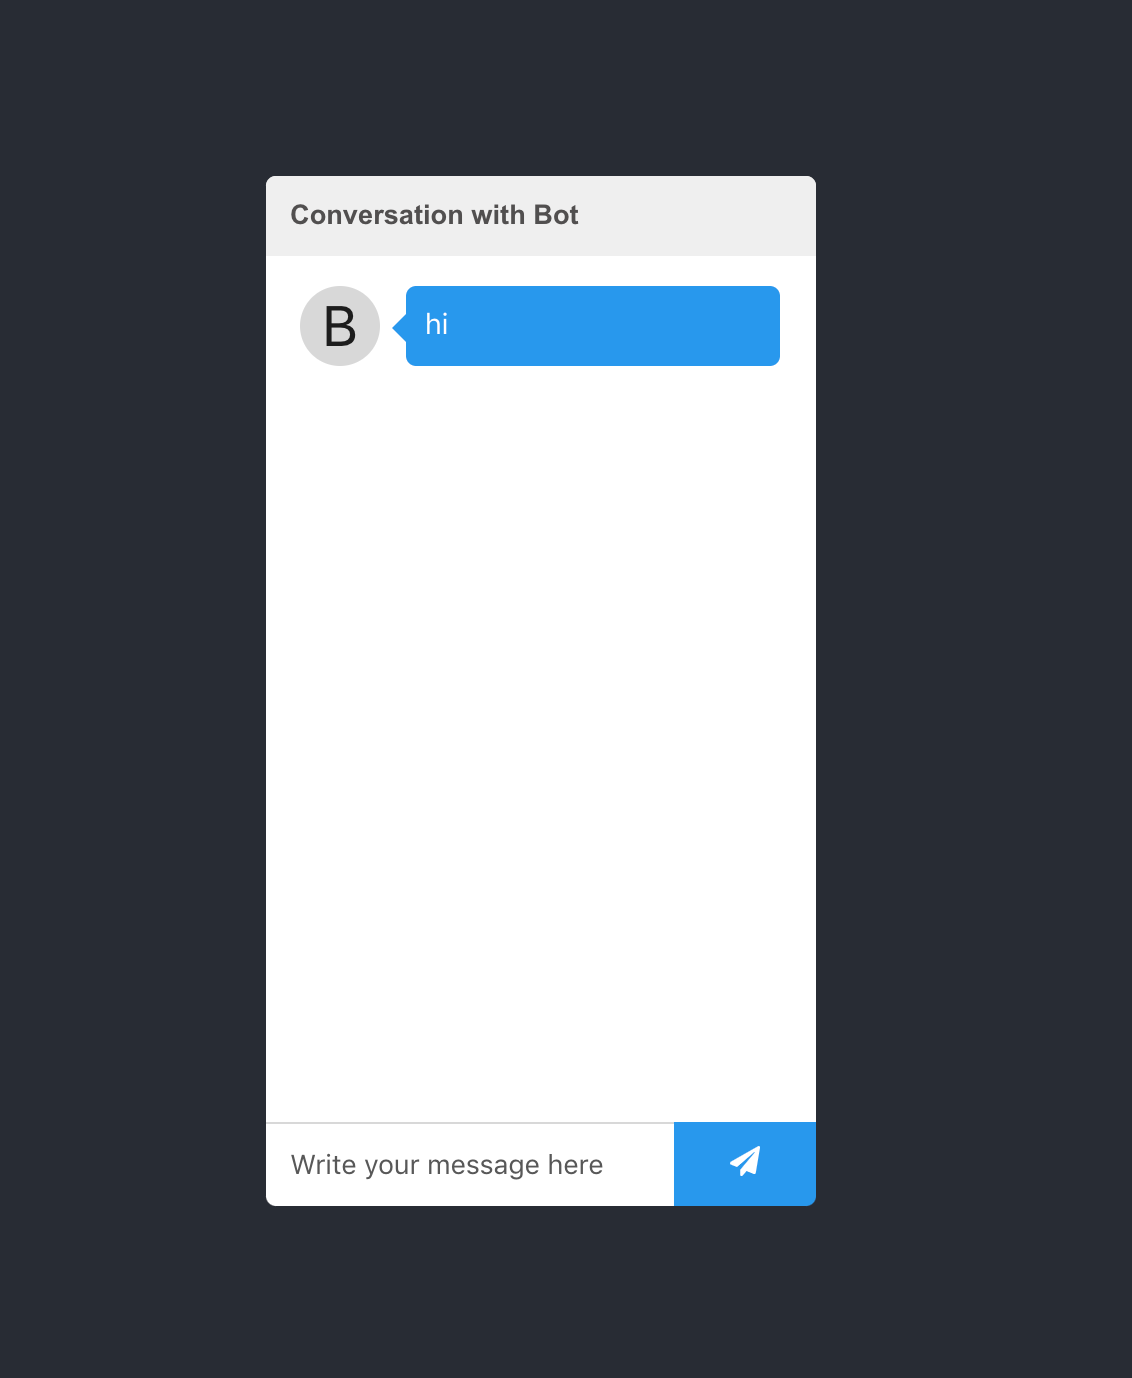
Sweet. Now we have the chatbot rendered to the screen and we can write in the input field and submit it to send a message to the chat. But when we try that, nothing happens.
Understanding how the chatbot works
Here we need to take a pit stop and take a look at how the MessageParser and ActionProvider interacts to make our bot take action.
When the bot is initialized, the initialMessages property from the config is put into the chatbot's internal state in a property called messages, which is used to render messages to the screen.
Moreover, when we write and push the submit button in the chat field, our MessageParser (which we passed as props to the chatbot) is calling its parse method. This is why this method must be implemented.
Let's take a closer look at the MessageParser starter code:
class MessageParser {
  constructor(actionProvider) {
    this.actionProvider = actionProvider;
  }

  parse(message) {
    ... parse logic
  }
}
If we look closely, this method is constructed with an actionProvider. This is the same ActionProvider class that we pass as props to the chatbot. This means that we control two things - how the message is parsed, and what action to take based on said parsing.
Let's use this information to create a simple chatbot response. First alter the MessageParser like this:
class MessageParser {
constructor(actionProvider) {
this.actionProvider = actionProvider;
}
parse(message) {
const lowerCaseMessage = message.toLowerCase()
if (lowerCaseMessage.includes("hello")) {
this.actionProvider.greet()
}
}
}
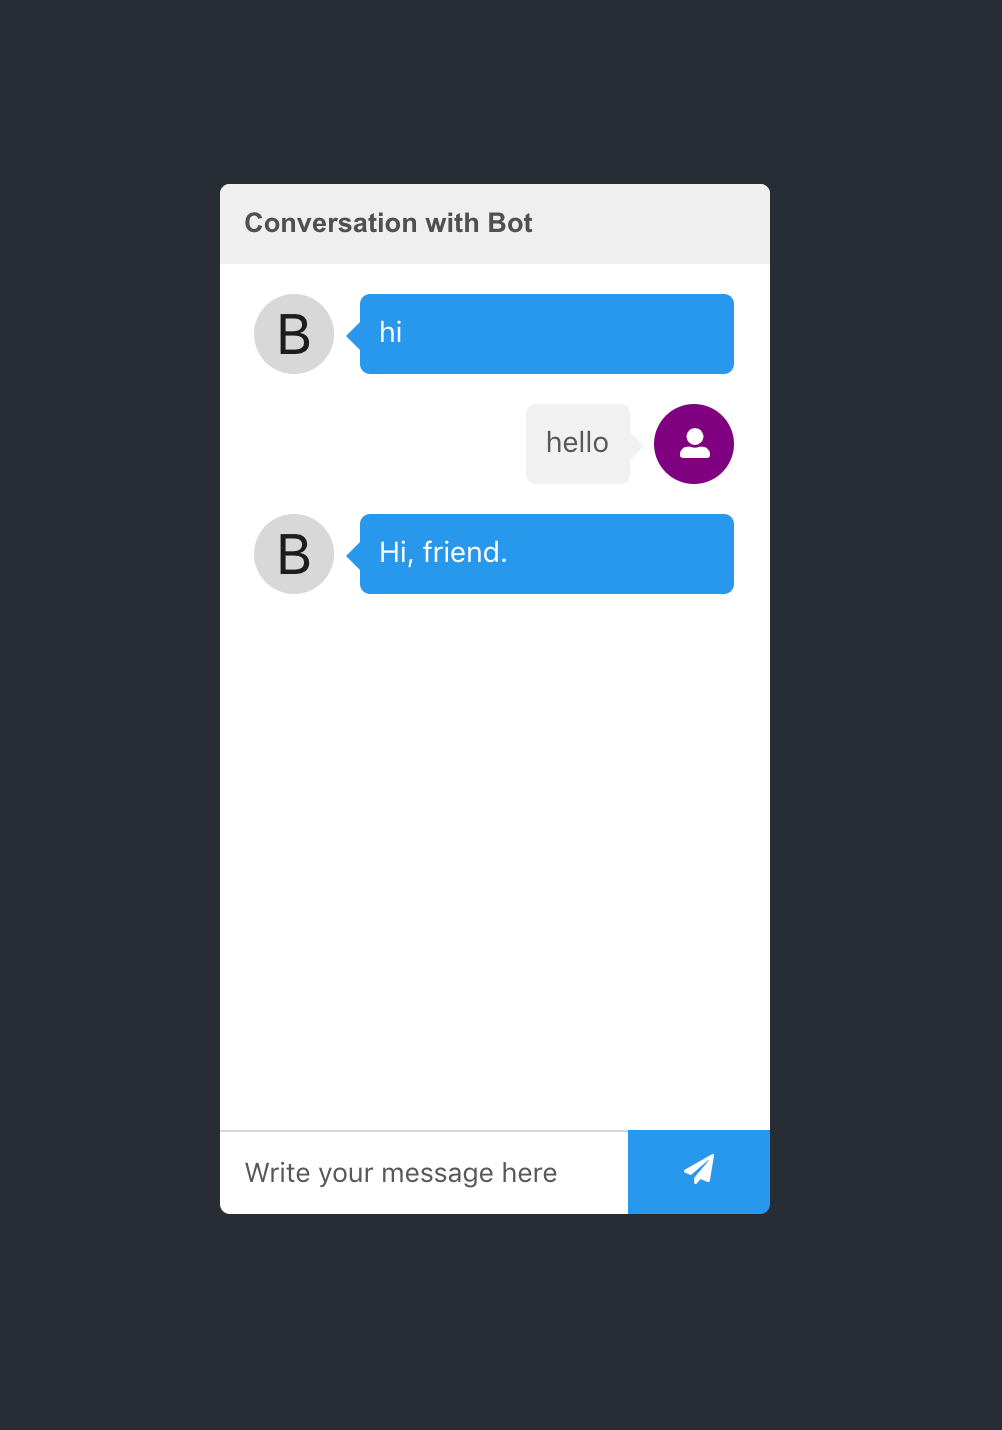
export default MessageParserNow our MessageParser is receiving the user message, checking if it includes the word "hello". If it does, it calls the greet method on the actionProvider.
Right now, this would crash, because we haven't implemented the greet method. Let's do that next. Head over to ActionProvider.js:
class ActionProvider {
  constructor(createChatBotMessage, setStateFunc) {
    this.createChatBotMessage = createChatBotMessage;
    this.setState = setStateFunc;
  }

  greet() {
    const greetingMessage = this.createChatBotMessage("Hi, friend.")
    this.updateChatbotState(greetingMessage)
  }

  updateChatbotState(message) {

// NOTE: This function is set in the constructor, and is passed in      // from the top level Chatbot component. The setState function here     // actually manipulates the top level state of the Chatbot, so it's     // important that we make sure that we preserve the previous state.


   this.setState(prevState => ({
    	...prevState, messages: [...prevState.messages, message]
    }))
  }
}

export default ActionProvider
Nice. Now if we type in "hello" into the chat field, we get this back:
Fantastic. Now that we can control parsing the message and responding with an action, let's try to make something more complicated. Let's try to make a bot that provides you with learning resources for the programming language you ask for.
Creating a learning bot
First, let's go back to our config.js file and make some slight changes:
import { createChatBotMessage } from 'react-chatbot-kit';
const config = {
botName: "LearningBot",
initialMessages: [createChatBotMessage("Hi, I'm here to help. What do you want to learn?")],
customStyles: {
botMessageBox: {
backgroundColor: "#376B7E",
},
chatButton: {
backgroundColor: "#376B7E",
},
},
}
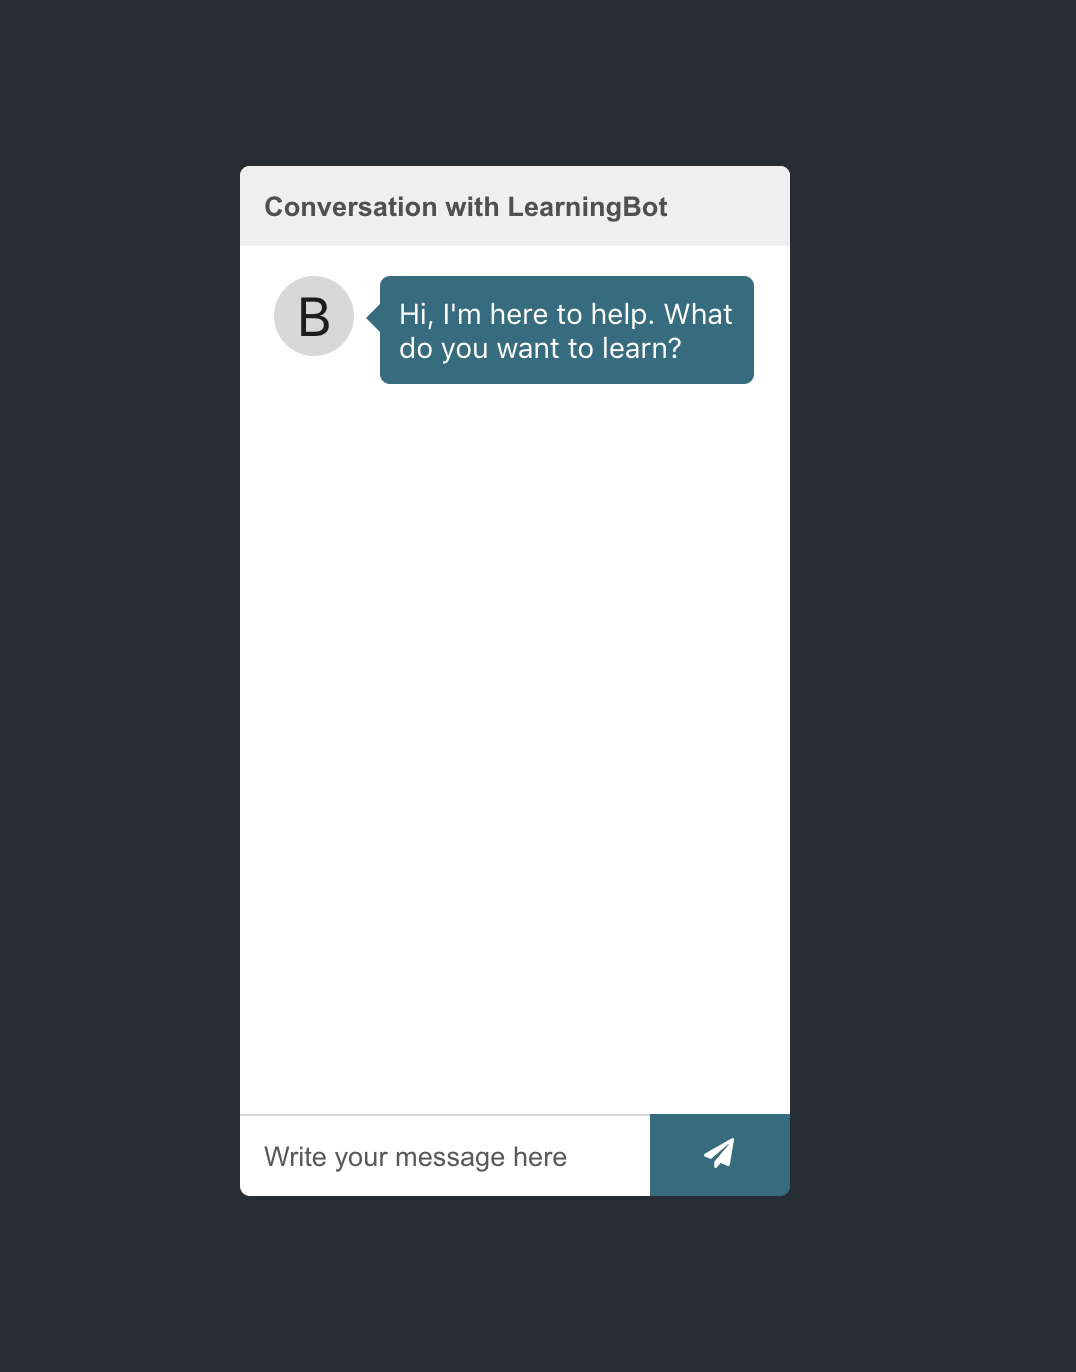
export default configOK, so we've added some properties here and changed our initial message. Most notably we have given the bot a name and changed the color of the messagebox and chatbutton components.
Alright. Now we're getting to the good part.
Not only can we parse messages and the respond to the user with a chatbot message, we can define custom React components that we want to render with the message. These components can be anything we want – they are just plain old React components.
Let's try it out by creating an options component that will guide the user to possible options.
First, we define the learning options component:
// in src/components/LearningOptions/LearningOptions.jsx

import React from "react";

import "./LearningOptions.css";

const LearningOptions = (props) => {
  const options = [
    { text: "Javascript", handler: () => {}, id: 1 },
    { text: "Data visualization", handler: () => {}, id: 2 },
    { text: "APIs", handler: () => {}, id: 3 },
    { text: "Security", handler: () => {}, id: 4 },
    { text: "Interview prep", handler: () => {}, id: 5 },
  ];

  const optionsMarkup = options.map((option) => (
    <button
      className="learning-option-button"
      key={option.id}
      onClick={option.handler}
    >
      {option.text}
    </button>
  ));

  return <div className="learning-options-container">{optionsMarkup}</div>;
};

export default LearningOptions;

// in src/components/LearningOptions/LearningOptions.css

.learning-options-container {
  display: flex;
  align-items: flex-start;
  flex-wrap: wrap;
}

.learning-option-button {
  padding: 0.5rem;
  border-radius: 25px;
  background: transparent;
  border: 1px solid green;
  margin: 3px;
}
Now that we have our component, we need to register it with our chatbot. Head over to config.js and add the following:
import React from "react";
import { createChatBotMessage } from "react-chatbot-kit";

import LearningOptions from "./components/LearningOptions/LearningOptions";

const config = {
initialMessages: [
    createChatBotMessage("Hi, I'm here to help. What do you want to 		learn?", {
      widget: "learningOptions",
    }),
  ],
 ...,
 widgets: [
     {
     	widgetName: "learningOptions",
    	widgetFunc: (props) => <LearningOptions {...props} />,
     },
 ],
}
Understanding widgets
Alright. Let's take a breather and explore what we've done.
- We created the
LearningOptionscomponent. - We registered the component under
widgetsin our config. - We gave the
createChatbotMessagefunction an options object specifying which widget to render with this message.
The result:

Fantastic, but why did we need to register our component in the config as a widget function?
By giving it a function, we control when we perform the invocation. This allows us room to decorate the widget with important properties inside the chatbot.
The widget that we define will receive a number of properties from the chatbot (some of which can be controlled by config properties):
actionProvider- we give theactionProviderto the widget in order to execute actions if we need to.setState- we give the top level chatbotsetStatefunction to the widget in case we need to manipulate state.scrollIntoView- utility function to scroll to the bottom of the chat window, should we need to adjust the view.props- if we define any props in the widget config, those will be passed to the widget under the property nameconfigProps.state- if we define custom state in the config, we can map it to the widget by using themapStateToPropsproperty
If you recall, we defined some options in the LearningOptions component:
  const options = [
    { text: "Javascript", handler: () => {}, id: 1 },
    { text: "Data visualization", handler: () => {}, id: 2 },
    { text: "APIs", handler: () => {}, id: 3 },
    { text: "Security", handler: () => {}, id: 4 },
    { text: "Interview prep", handler: () => {}, id: 5 },
  ];
Currently these have an empty handler. What we want to do now is to replace this handler by a call to the actionProvider.
So what do we want to have happen when we execute these functions? Ideally, we'd have some sort of chatbot message, and an accompanying widget that displays a list of links to helpful resources for each topic. So let's see how we can implement that.
First, we need to create the link list component:
// in src/components/LinkList/LinkList.jsx

import React from "react";

import "./LinkList.css";

const LinkList = (props) => {
  const linkMarkup = props.options.map((link) => (
    <li key={link.id} className="link-list-item">
      <a
        href={link.url}
        target="_blank"
        rel="noopener noreferrer"
        className="link-list-item-url"
      >
        {link.text}
      </a>
    </li>
  ));

  return <ul className="link-list">{linkMarkup}</ul>;
};

export default LinkList;

// in src/components/LinkList/LinkList.css

.link-list {
  padding: 0;
}

.link-list-item {
  text-align: left;
  font-size: 0.9rem;
}

.link-list-item-url {
  text-decoration: none;
  margin: 6px;
  display: block;
  color: #1d1d1d;
  background-color: #f1f1f1;
  padding: 8px;
  border-radius: 3px;
  box-shadow: 2px 2px 4px rgba(150, 149, 149, 0.4);
}
Great. We now have a component that can display a list of links. Now we need to register it in in the widget section of the config:
import React from "react";
import { createChatBotMessage } from "react-chatbot-kit";

import LearningOptions from "./components/LearningOptions/LearningOptions";
import LinkList from "./components/LinkList/LinkList";

const config = {
  ...
  widgets: [
    {
      widgetName: "learningOptions",
      widgetFunc: (props) => <LearningOptions {...props} />,
    },
    {
      widgetName: "javascriptLinks",
      widgetFunc: (props) => <LinkList {...props} />,
    },
  ],
};

export default config;
So far so good, but we want to dynamically pass in props to this component so that we can reuse it for the other options as well. This means that we need to add another property to the widget object in the config:
import React from "react";
import { createChatBotMessage } from "react-chatbot-kit";

import LearningOptions from "./components/LearningOptions/LearningOptions";
import LinkList from "./components/LinkList/LinkList";

const config = {
  ...,
  widgets: [
    ...,
    {
      widgetName: "javascriptLinks",
      widgetFunc: (props) => <LinkList {...props} />,
      props: {
        options: [
          {
            text: "Introduction to JS",
            url:
              "https://www.freecodecamp.org/learn/javascript-algorithms-and-data-structures/basic-javascript/",
            id: 1,
          },
          {
            text: "Mozilla JS Guide",
            url:
              "https://developer.mozilla.org/en-US/docs/Web/JavaScript/Guide",
            id: 2,
          },
          {
            text: "Frontend Masters",
            url: "https://frontendmasters.com",
            id: 3,
          },
        ],
      },
    },
  ],
};

export default config;
Now these props will be passed to the LinkList component as props.
Now we need to do two more things.
- We need to add a method to the
actionProvider
class ActionProvider {
  constructor(createChatBotMessage, setStateFunc) {
    this.createChatBotMessage = createChatBotMessage;
    this.setState = setStateFunc;
  }

  handleJavascriptList = () => {
    const message = this.createChatBotMessage(
      "Fantastic, I've got the following resources for you on Javascript:",
      {
        widget: "javascriptLinks",
      }
    );

    this.updateChatbotState(message);
  };

  updateChatbotState(message) {
    // NOTICE: This function is set in the constructor, and is passed in from the top level Chatbot component. The setState function here actually manipulates the top level state of the Chatbot, so it's important that we make sure that we preserve the previous state.

    this.setState((prevState) => ({
      ...prevState,
      messages: [...prevState.messages, message],
    }));
  }
}

export default ActionProvider;
2. We need to add this method as the handler in the LearningOptions component:
import React from "react";

import "./LearningOptions.css";

const LearningOptions = (props) => {
  const options = [
    {
      text: "Javascript",
      handler: props.actionProvider.handleJavascriptList,
      id: 1,
    },
    { text: "Data visualization", handler: () => {}, id: 2 },
    { text: "APIs", handler: () => {}, id: 3 },
    { text: "Security", handler: () => {}, id: 4 },
    { text: "Interview prep", handler: () => {}, id: 5 },
  ];

  const optionsMarkup = options.map((option) => (
    <button
      className="learning-option-button"
      key={option.id}
      onClick={option.handler}
    >
      {option.text}
    </button>
  ));

  return <div className="learning-options-container">{optionsMarkup}</div>;
};

export default LearningOptions;
Alright! That was quite a lot of information. But if we now try to click the JavaScript option in the chatbot, we get this result:
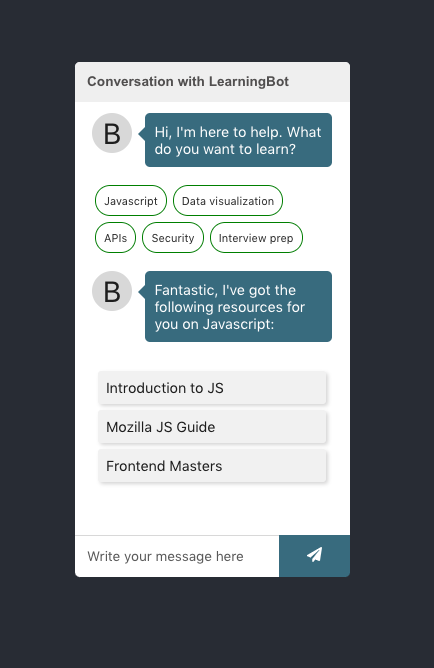
Perfect. But we don't want to stop there, this is a chatbot after all. We want to be able to respond to users who want to use the input field as well. So we need to make a new rule in MessageParser.
Let's update our MessageParser.js file to look like this:
class MessageParser {
  constructor(actionProvider) {
    this.actionProvider = actionProvider;
  }

  parse(message) {
    const lowerCaseMessage = message.toLowerCase();

    if (lowerCaseMessage.includes("hello")) {
      this.actionProvider.greet();
    }

    if (lowerCaseMessage.includes("javascript")) {
      this.actionProvider.handleJavascriptList();
    }
  }
}

export default MessageParser;
Now try typing "javascript" into the input field and sending the message. You should get the same list in response from the chatbot.
So there you have it. We've set up a chatbot that renders a list of possible options and responds to user input.
For now, we've only set up the bot to handle when someone clicks or types in JavaScript, but you can try to expand the other options on your own. Here's a link to the repository.
All the code is on GitHub, so feel free to dive into the react-chatbot-kit code or docs.
Conclusion
Building things is fun, and a great way to expand your skillset. There are no limits to where you could take this next.
Perhaps you could make a chatbot that finds the ideal product in webshop based on some simple questions (utilising routing in the app), or maybe you can make one for your company taking care of the most common customer inquiries.
Feel free to expand, come up with new ideas, and test them out. And if you see something that can be improved, send a pull request.
If you want to improve as a developer, I encourage you to keep building. It truly is the only path forward. If you enjoyed this article, and would like to know when I post more content, you can follow me on Twitter.