Hello folks, welcome to this tutorial. Before we begin you should be familiar with basic ReactJS concepts. If you're not, I would recommend that you go through the ReactJS documentation.
We will use the following components in this application:
How our application is going to look:
Application Architecture:
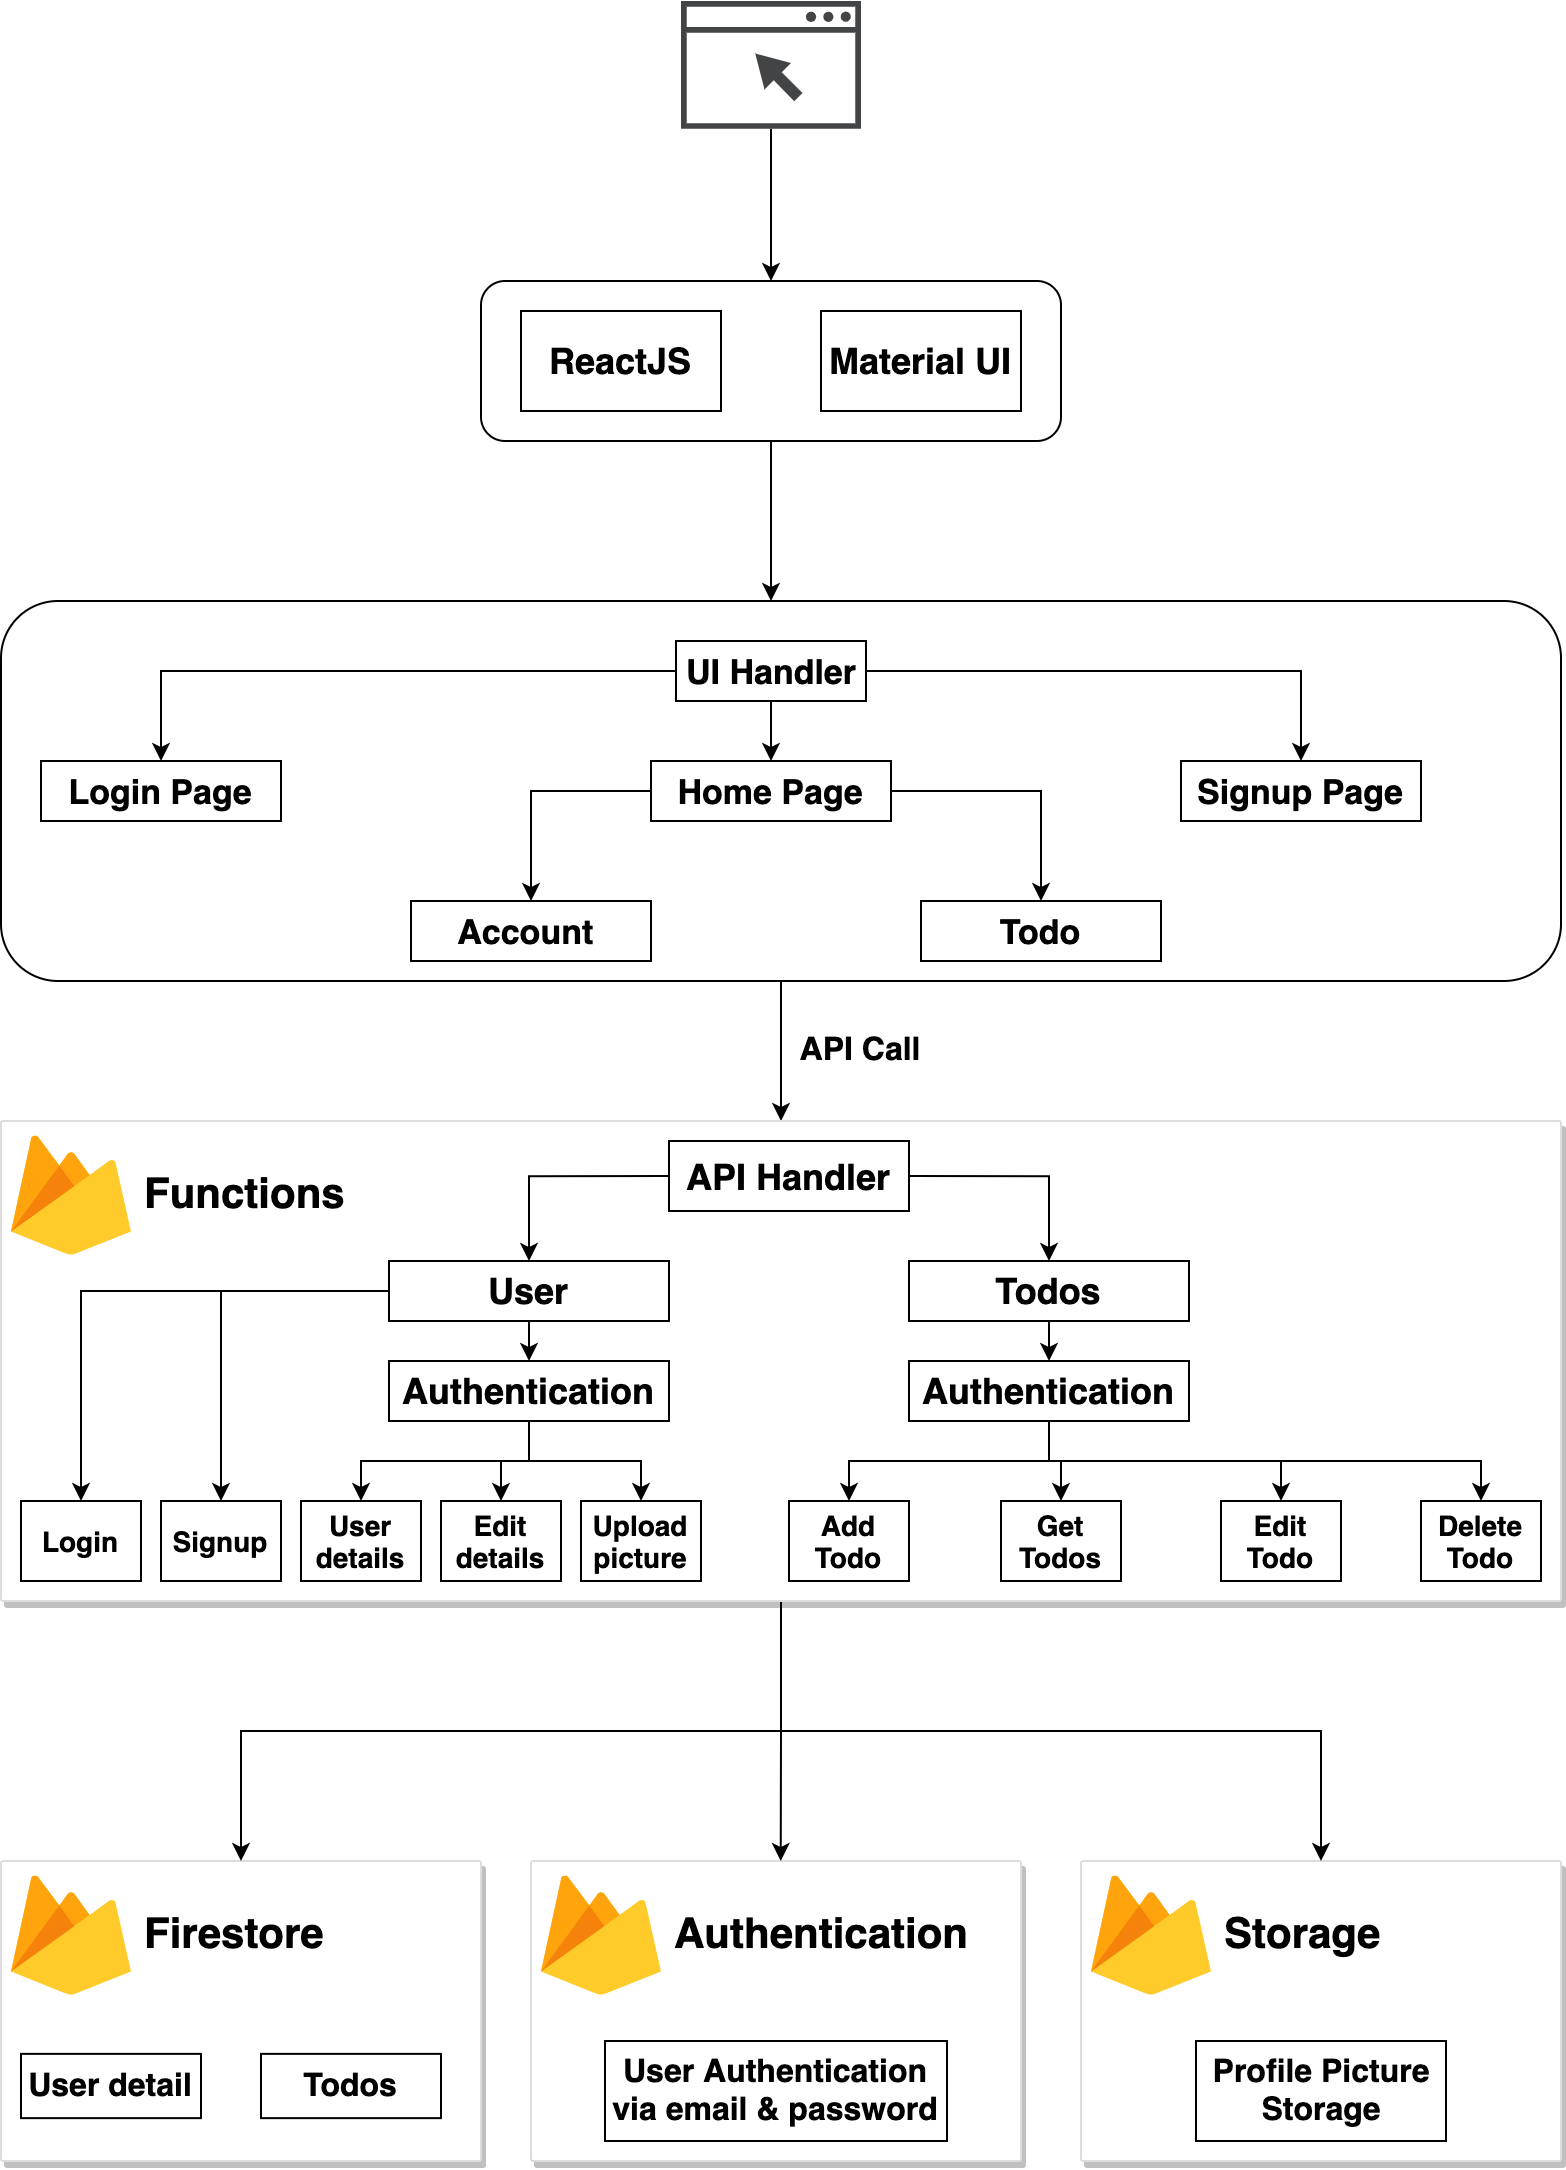
Understanding our components:
You may be wondering why we are using firebase in this application. Well, it provides secure Authentication, a Real-time database, a Serverless Component, and a Storage bucket.
We are using Express here so that we don't need to handle HTTP Exceptions. We are going to use all the firebase packages in our functions component. This is because we don't want to make our client application too big, which tends to slow the loading process of the UI.
Note: I am going to divide this tutorial into four separate sections. At the start of every section, you will find a git commit that has the code developed in that section. Also If you want to see the complete code then it is available in this repository.
Section 1: Developing Todo APIs
In this section, we are going to develop these elements:
- Configure the firebase functions.
- Install the Express framework and build Todo APIs.
- Configuring firestore as database.
The Todo API code implemented in this section can be found at this commit.
Configure Firebase Functions:
Go to the Firebase console.
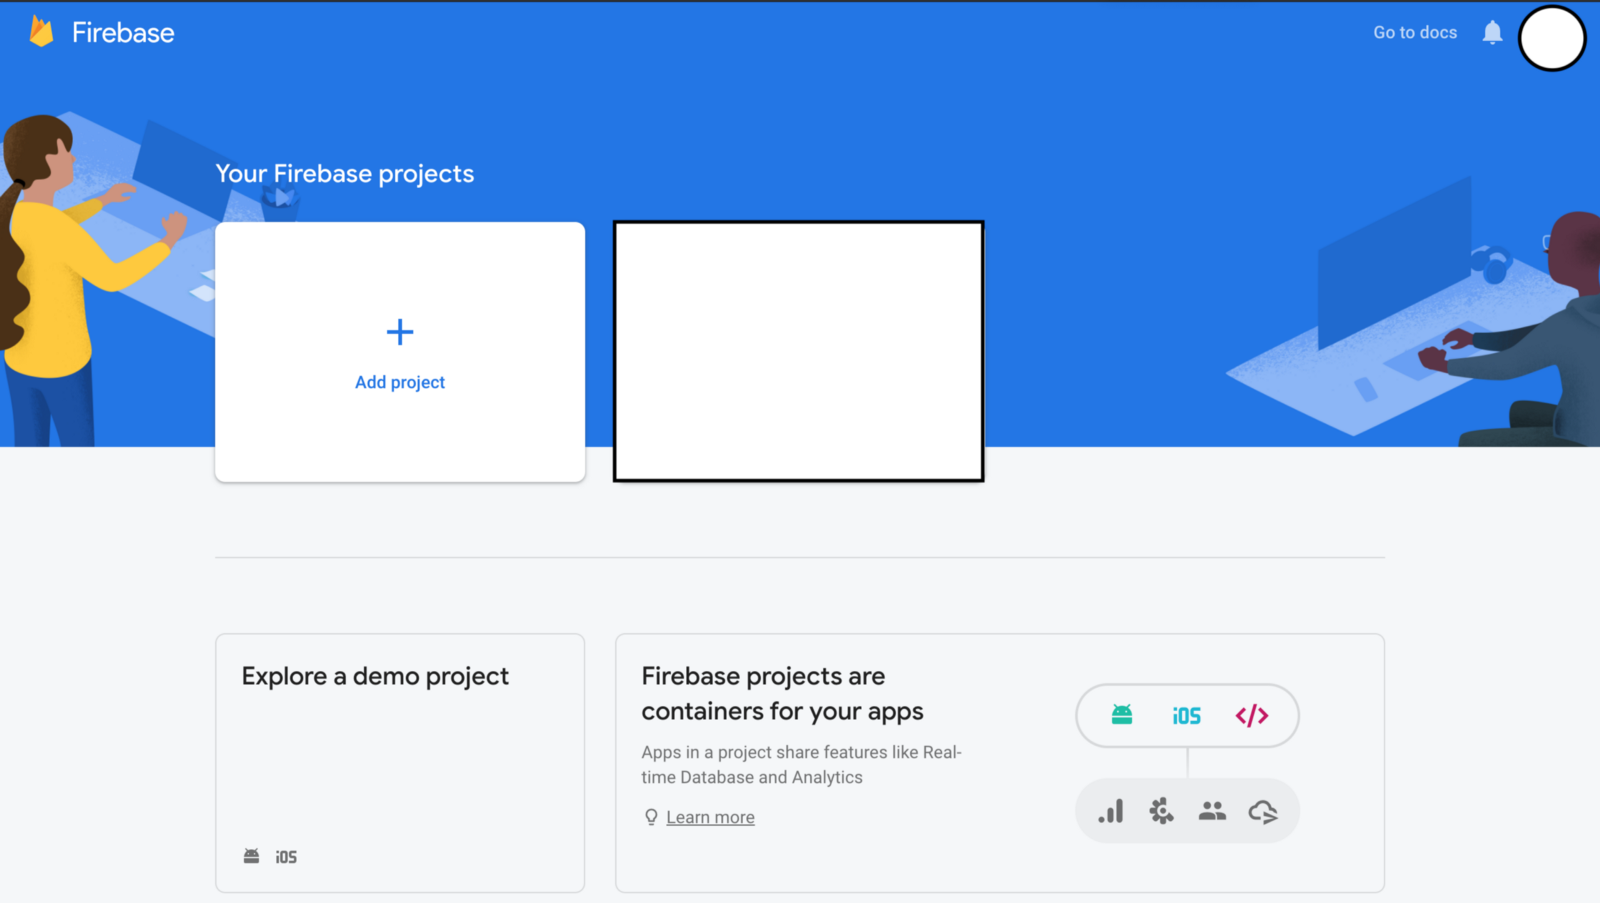
Select the Add Project option. After that follow the gif down below step by step to configure the firebase project.
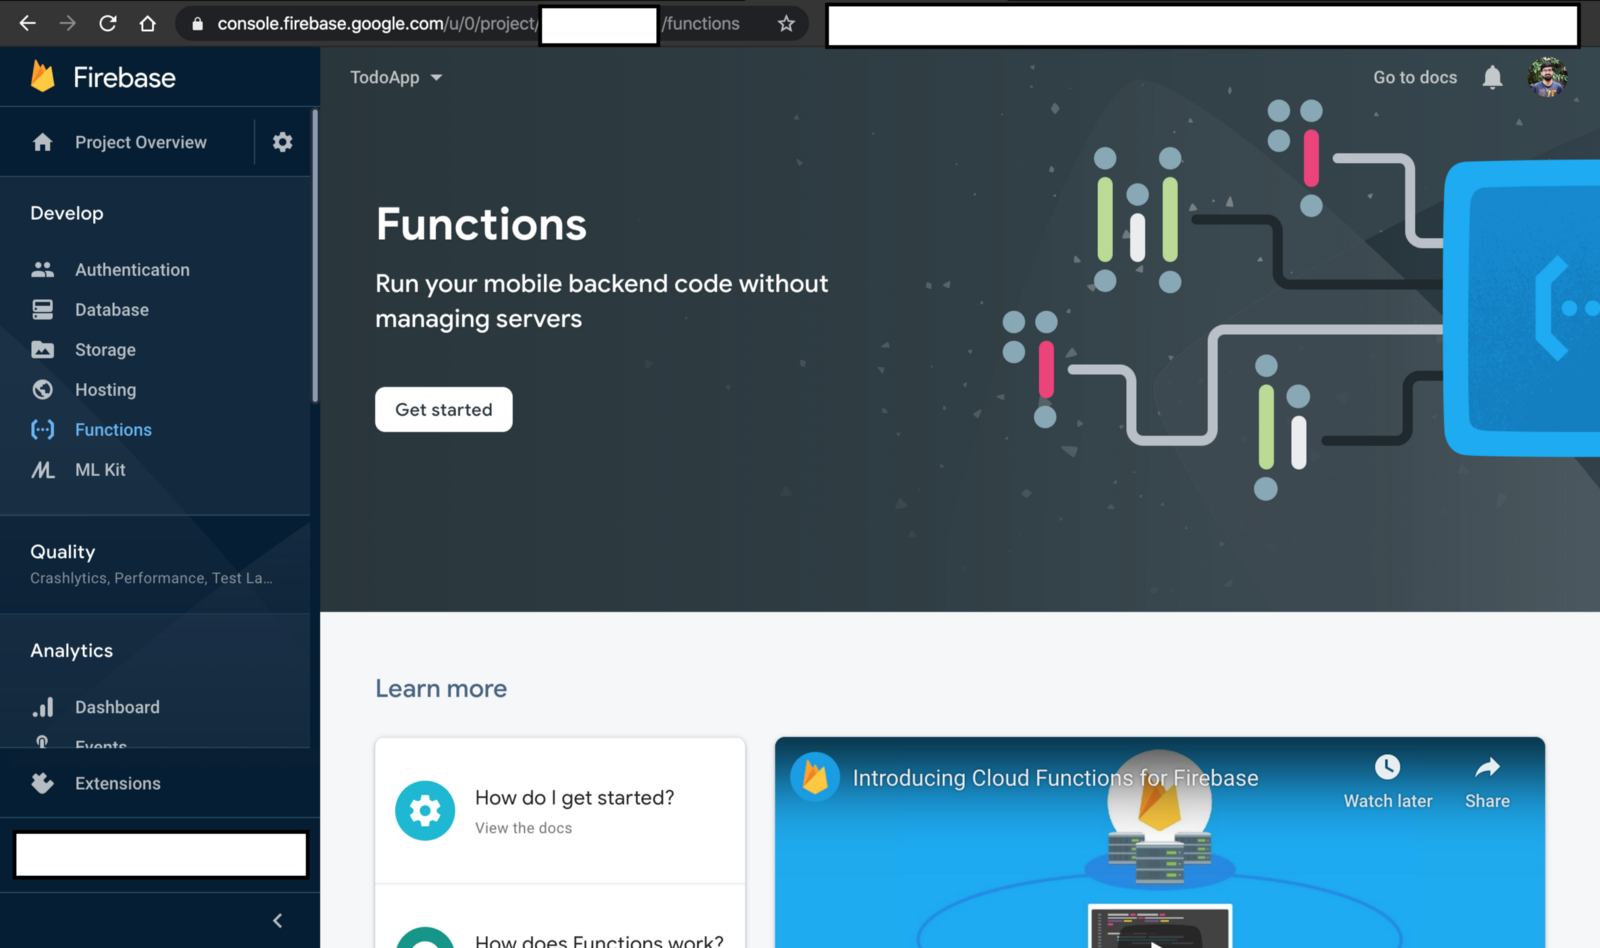
Go to the functions tab and click on the Get Started button:
You will see a dialogue box which has instructions on How to set up the Firebase Functions. Go to your local environment. Open a command-line tool. To install the firebase tools in your machine use the command below:
npm install -g firebase-toolsOnce that is done then use the command firebase init to configure the firebase functions in your local environment. Select the following options when initialising the firebase function in the local environment:
- Which Firebase CLI features do you want to set up for this folder? Press Space to select features, then Enter to confirm your choices => Functions: Configure and deploy Cloud Functions
- First, let’s associate this project directory with a Firebase project …. => Use an existing project
- Select a default Firebase project for this directory => application_name
- What language would you like to use to write Cloud Functions? => JavaScript
- Do you want to use ESLint to catch probable bugs and enforce style? => N
- Do you want to install dependencies with npm now? (Y/n) => Y
After the configuration is done you will get the following message:
✔ Firebase initialization complete!This will be our directory structure once the initialization is completed:
+-- firebase.json
+-- functions
|   +-- index.js
|   +-- node_modules
|   +-- package-lock.json
|   +-- package.json
Now open the index.js under functions directory and copy-paste the following code:
const functions = require('firebase-functions');

exports.helloWorld = functions.https.onRequest((request, response) => {
     response.send("Hello from Firebase!");
});
Deploy the code to firebase functions using the following command:
firebase deployOnce the deployment is done you will get the following logline at the end of your command line:
> ✔  Deploy complete!
> Project Console: https://console.firebase.google.com/project/todoapp-<id>/overview
Go to the Project Console > Functions and there you will find the URL of the API. The URL will look like this:
https://<hosting-region>-todoapp-<id>.cloudfunctions.net/helloWorldCopy this URL and paste it in the browser. You will get the following response:
Hello from Firebase!This confirms that our Firebase function has been configured properly.
Install the Express Framework:
Now let’s install the Express framework in our project using the following command:
npm i expressNow let's create an APIs directory inside the functions directory. Inside that directory, we will create a file named todos.js. Remove everything from the index.js and then copy-paste the following code:
//index.js

const functions = require('firebase-functions');
const app = require('express')();

const {
    getAllTodos
} = require('./APIs/todos')

app.get('/todos', getAllTodos);
exports.api = functions.https.onRequest(app);
We have assigned the getAllTodos function to the /todos route. So all the API calls on this route will execute via the getAllTodos function. Now go to the todos.js file under APIs directory and here we will write the getAllTodos function.
//todos.js

exports.getAllTodos = (request, response) => {
    todos = [
        {
            'id': '1',
            'title': 'greeting',
            'body': 'Hello world from sharvin shah'
        },
        {
            'id': '2',
            'title': 'greeting2',
            'body': 'Hello2 world2 from sharvin shah'
        }
    ]
    return response.json(todos);
}
Here we have declared a sample JSON object. Later we will derive that from the Firestore. But for the time being we will return this. Now deploy this to your firebase function using the command firebase deploy. It will ask for permission to delete the module helloworld – just enter y.
The following functions are found in your project but do not exist in your local source code: helloWorld

Would you like to proceed with deletion? Selecting no will continue the rest of the deployments. (y/N) y
Once this is done go to the Project Console > Functions and there you will find the URL of the API. The API will look like this:
https://<hosting-region>-todoapp-<id>.cloudfunctions.net/apiNow go to the browser and copy-paste the URL and add /todos at the end of this URL. You will get the following output:
[
        {
            'id': '1',
            'title': 'greeting',
            'body': 'Hello world from sharvin shah'
        },
        {
            'id': '2',
            'title': 'greeting2',
            'body': 'Hello2 world2 from sharvin shah'
        }
]
Firebase Firestore:
We will use a firebase firestore as a real-time database for our application. Now go to the Console > Database in Firebase Console. To configure firestore follow the gif below:

Once the configuration is done then click on the Start Collection button and set Collection ID as todos. Click Next and you will get the following popup:
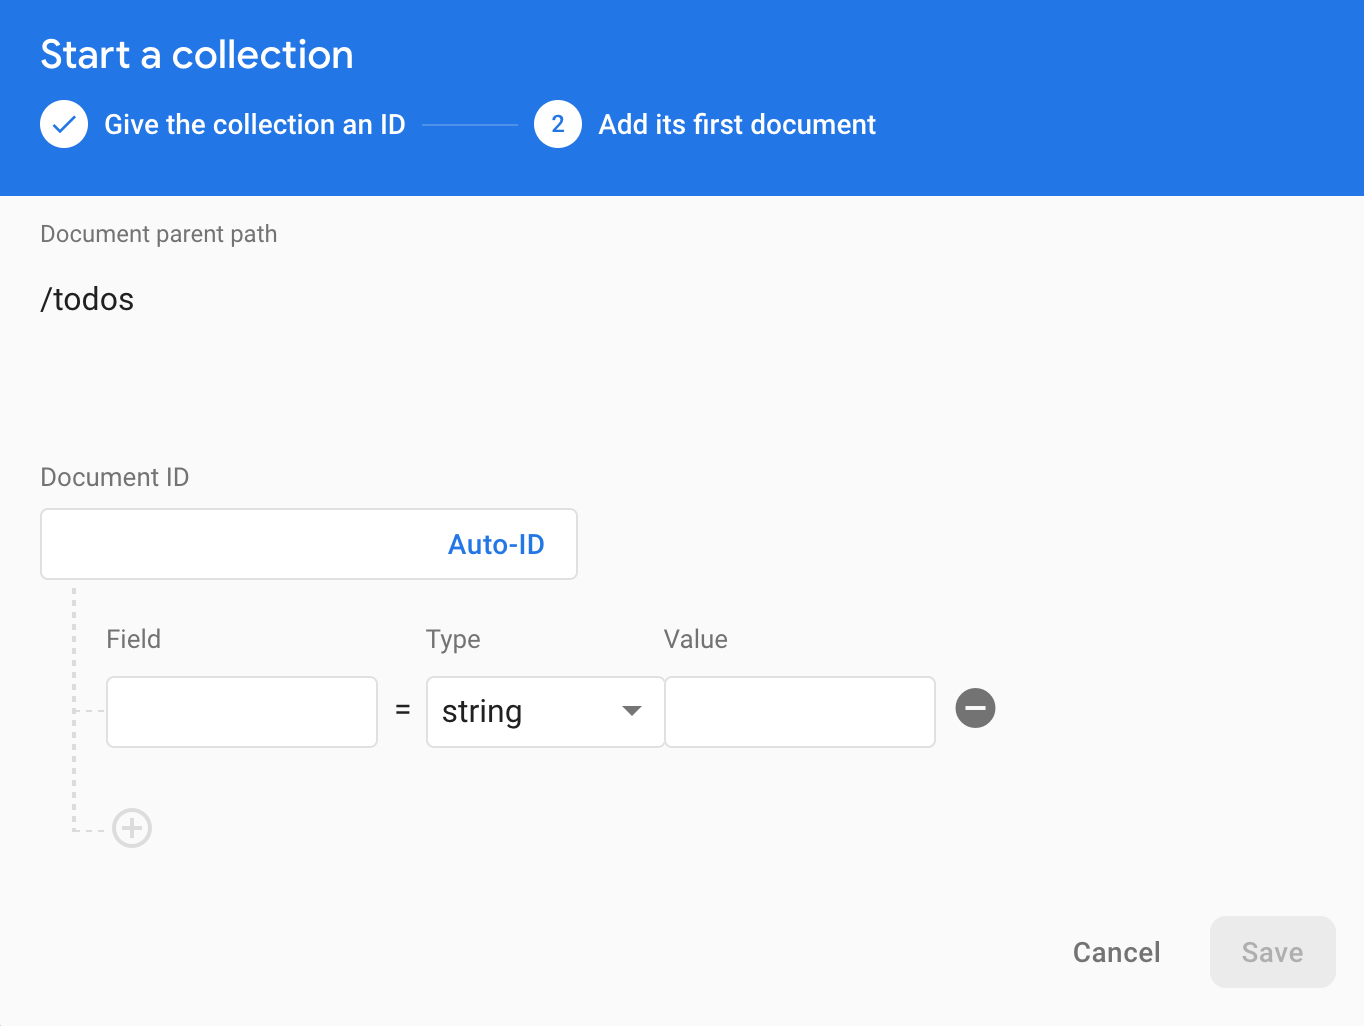
Ignore the DocumentID key. For the field, type, and value, refer to the JSON down below. Update the value accordingly:
{
    Field: title,
    Type: String,
    Value: Hello World
},
{
    Field: body,
    Type: String,
    Value: Hello folks I hope you are staying home...
},
{
    Field: createtAt,
    type: timestamp,
    value: Add the current date and time here
}
Press the save button. You will see that the collection and the document is created. Go back to the local environment. We need to install firebase-admin which has the firestore package that we need. Use this command to install it:
npm i firebase-adminCreate a directory named util under the functions directory. Go to this directory and create a file name admin.js. In this file we will import the firebase admin package and initialize the firestore database object. We will export this so that other modules can use it.
//admin.js

const admin = require('firebase-admin');

admin.initializeApp();

const db = admin.firestore();

module.exports = { admin, db };
Now let’s write an API to fetch this data. Go to the todos.js under the functions > APIs directory. Remove the old code and copy-paste the code below:
//todos.js

const { db } = require('../util/admin');

exports.getAllTodos = (request, response) => {
	db
		.collection('todos')
		.orderBy('createdAt', 'desc')
		.get()
		.then((data) => {
			let todos = [];
			data.forEach((doc) => {
				todos.push({
                    todoId: doc.id,
                    title: doc.data().title,
					body: doc.data().body,
					createdAt: doc.data().createdAt,
				});
			});
			return response.json(todos);
		})
		.catch((err) => {
			console.error(err);
			return response.status(500).json({ error: err.code});
		});
};
Here we are fetching all the todos from the database and forwarding them to the client in a list.
You can also run the application locally using firebase serve command instead of deploying it every time. When you run that command you may get an error regarding credentials. To fix it, follow the steps mentioned below:
- Go to the Project Settings (Settings icon at the top left-hand side)
- Go to the service accounts tab
- Down there will be the option of Generating a new key. Click on that option and it will download a file with a JSON extension.
- We need to export these credentials to our command line session. Use the command below to do that:
export GOOGLE_APPLICATION_CREDENTIALS="/home/user/Downloads/[FILE_NAME].json"After that run firebase serve command. If you still get the error then use the following command: firebase login --reauth. It will open the Google sign-in page in a browser. Once sign-in is done then it will work without any error.
You will find a URL in the logs of your command-line tool when you run a firebase serve command. Open this URL in browser and append /todos after it.
✔ functions[api]: http function initialized (http://localhost:5000/todoapp-<project-id>/<region-name>/api).You will get the following JSON output in your browser:
[
    {
        "todoId":"W67t1kSMO0lqvjCIGiuI",
        "title":"Hello World",
        "body":"Hello folks I hope you are staying home...",
        "createdAt":{"_seconds":1585420200,"_nanoseconds":0 }
    }
]
Writing Other APIs:
It's time to write all the other todo APIs that we are going to require for our application.
- Create Todo item: Go to the
index.jsunder the functions directory. Import postOneTodo method under the existing getAllTodos. Also, assign the POST route to that method.
//index.js

const {
    ..,
    postOneTodo
} = require('./APIs/todos')

app.post('/todo', postOneTodo);
Go to the todos.js inside the functions directory and add a new method postOneTodo under the existing getAllTodos method.
//todos.js

exports.postOneTodo = (request, response) => {
	if (request.body.body.trim() === '') {
		return response.status(400).json({ body: 'Must not be empty' });
    }

    if(request.body.title.trim() === '') {
        return response.status(400).json({ title: 'Must not be empty' });
    }

    const newTodoItem = {
        title: request.body.title,
        body: request.body.body,
        createdAt: new Date().toISOString()
    }
    db
        .collection('todos')
        .add(newTodoItem)
        .then((doc)=>{
            const responseTodoItem = newTodoItem;
            responseTodoItem.id = doc.id;
            return response.json(responseTodoItem);
        })
        .catch((err) => {
			response.status(500).json({ error: 'Something went wrong' });
			console.error(err);
		});
};
In this method, we are adding a new Todo to our database. If the elements of our body are empty then we will return a response of 400 or else we will add the data.
Run the firebase serve command and open the postman application. Create a new request and select the method type as POST. Add the URL and a body of type JSON.
URL: http://localhost:5000/todoapp-<app-id>/<region-name>/api/todo

METHOD: POST

Body: {
   "title":"Hello World",
   "body": "We are writing this awesome API"
}
Press the send button and you will get the following response:
{
     "title": "Hello World",
     "body": "We are writing this awesome API",
     "createdAt": "2020-03-29T12:30:48.809Z",
     "id": "nh41IgARCj8LPWBYzjU0"
}
2. Delete Todo item: Go to the index.js under the functions directory. Import the deleteTodo method under the existing postOneTodo. Also, assign the DELETE route to that method.
//index.js

const {
    ..,
    deleteTodo
} = require('./APIs/todos')

app.delete('/todo/:todoId', deleteTodo);
Go to the todos.js and add a new method deleteTodo under the existing postOneTodo method.
//todos.js

exports.deleteTodo = (request, response) => {
    const document = db.doc(`/todos/${request.params.todoId}`);
    document
        .get()
        .then((doc) => {
            if (!doc.exists) {
                return response.status(404).json({ error: 'Todo not found' })
            }
            return document.delete();
        })
        .then(() => {
            response.json({ message: 'Delete successfull' });
        })
        .catch((err) => {
            console.error(err);
            return response.status(500).json({ error: err.code });
        });
};
In this method, we are deleting a Todo from our database. Run the firebase serve command and go to the postman. Create a new request, select the method type as DELETE and add the URL.
URL: http://localhost:5000/todoapp-<app-id>/<region-name>/api/todo/<todo-id>

METHOD: DELETE
Press the send button and you will get the following response:
{
   "message": "Delete successfull"
}
3. Edit Todo item: Go to the index.js under the functions directory. Import the editTodo method under the existing deleteTodo. Also, assign the PUT route to that method.
//index.js

const {
    ..,
    editTodo
} = require('./APIs/todos')

app.put('/todo/:todoId', editTodo);
Go to the todos.js and add a new method editTodo under the existing deleteTodo method.
//todos.js

exports.editTodo = ( request, response ) => {
    if(request.body.todoId || request.body.createdAt){
        response.status(403).json({message: 'Not allowed to edit'});
    }
    let document = db.collection('todos').doc(`${request.params.todoId}`);
    document.update(request.body)
    .then(()=> {
        response.json({message: 'Updated successfully'});
    })
    .catch((err) => {
        console.error(err);
        return response.status(500).json({
                error: err.code
        });
    });
};
In this method, we are editing a Todo from our database. Remember here we are not allowing the user to edit the todoId or createdAt fields. Run the firebase serve command and go to the postman. Create a new request, select the method type as PUT, and add the URL.
URL: http://localhost:5000/todoapp-<app-id>/<region-name>/api/todo/<todo-id>

METHOD: PUT
Press the send button and you will get the following response:
{
   "message": "Updated successfully"
}
Directory structure till now:
+-- firebase.json
+-- functions
|   +-- API
|   +-- +-- todos.js
|   +-- util
|   +-- +-- admin.js
|   +-- index.js
|   +-- node_modules
|   +-- package-lock.json
|   +-- package.json
|   +-- .gitignore
With this, we have completed the first section of the application. You can go ahead have some coffee, take a break, and after that we will work on developing the User APIs.
Section 2: Developing User APIs
In this section, we are going to develop these components:
- User Authentication ( Login and Signup ) API.
- GET and Update user details API.
- Update the user profile picture API.
- Securing the existing Todo API.
The User API code implemented in this section can be found at this commit.
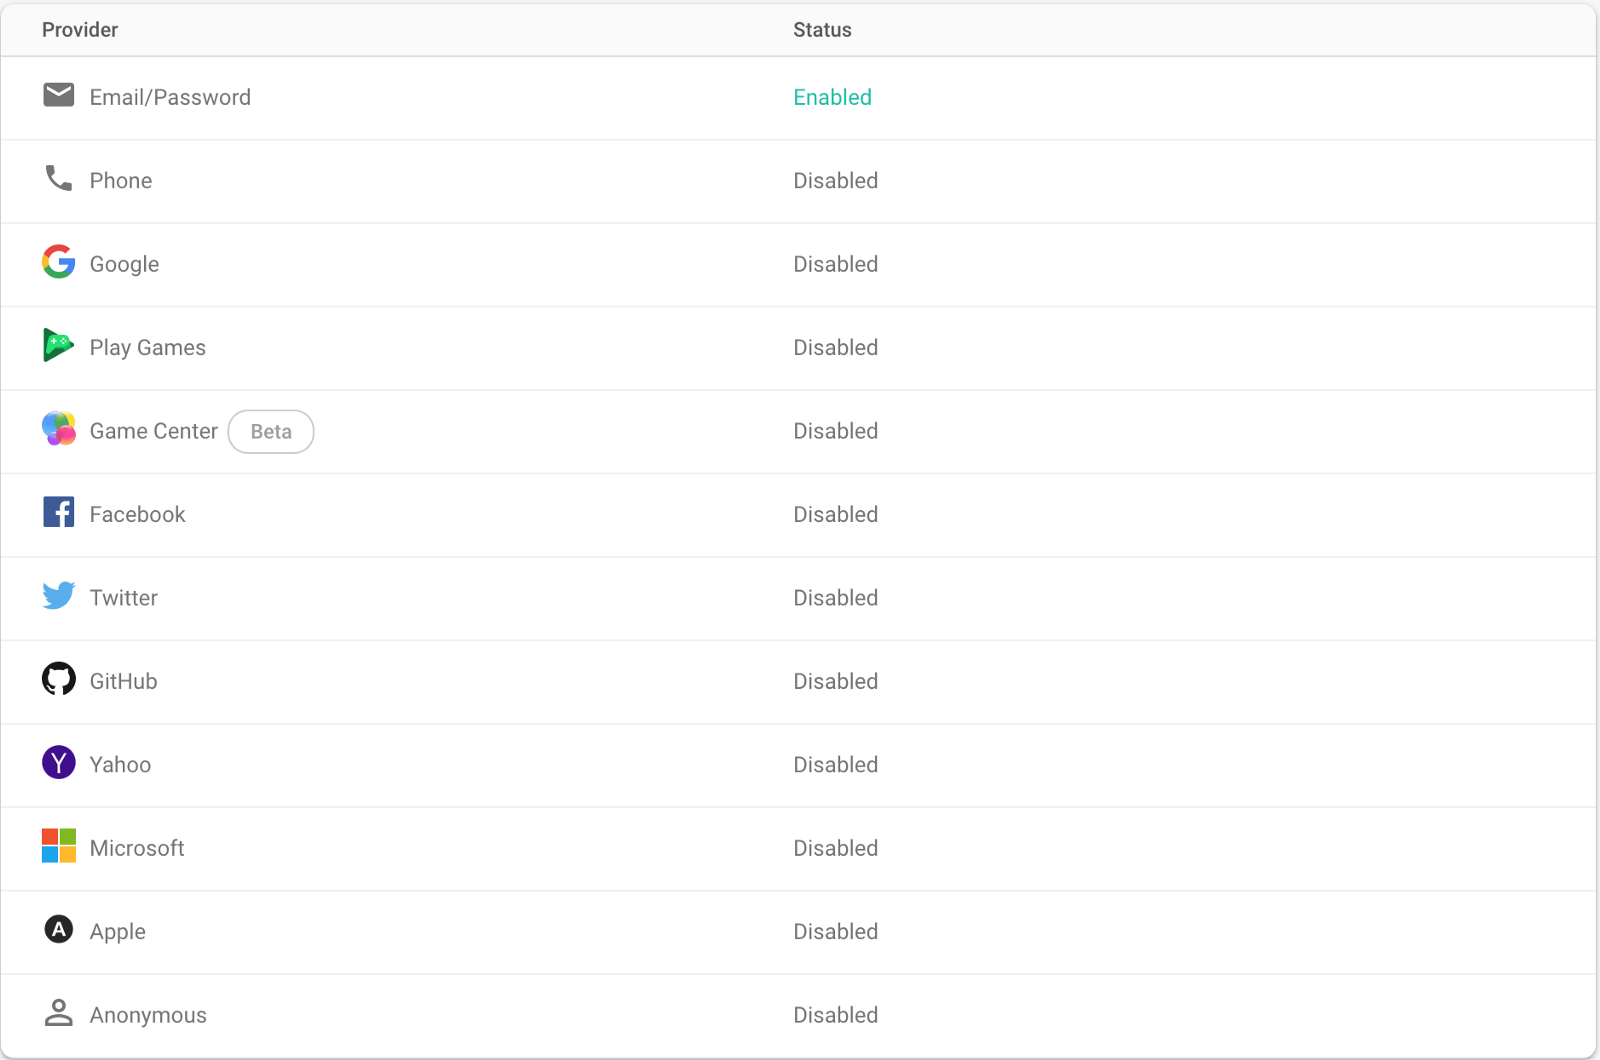
So let’s start building the User Authentication API. Go to the Firebase console > Authentication.
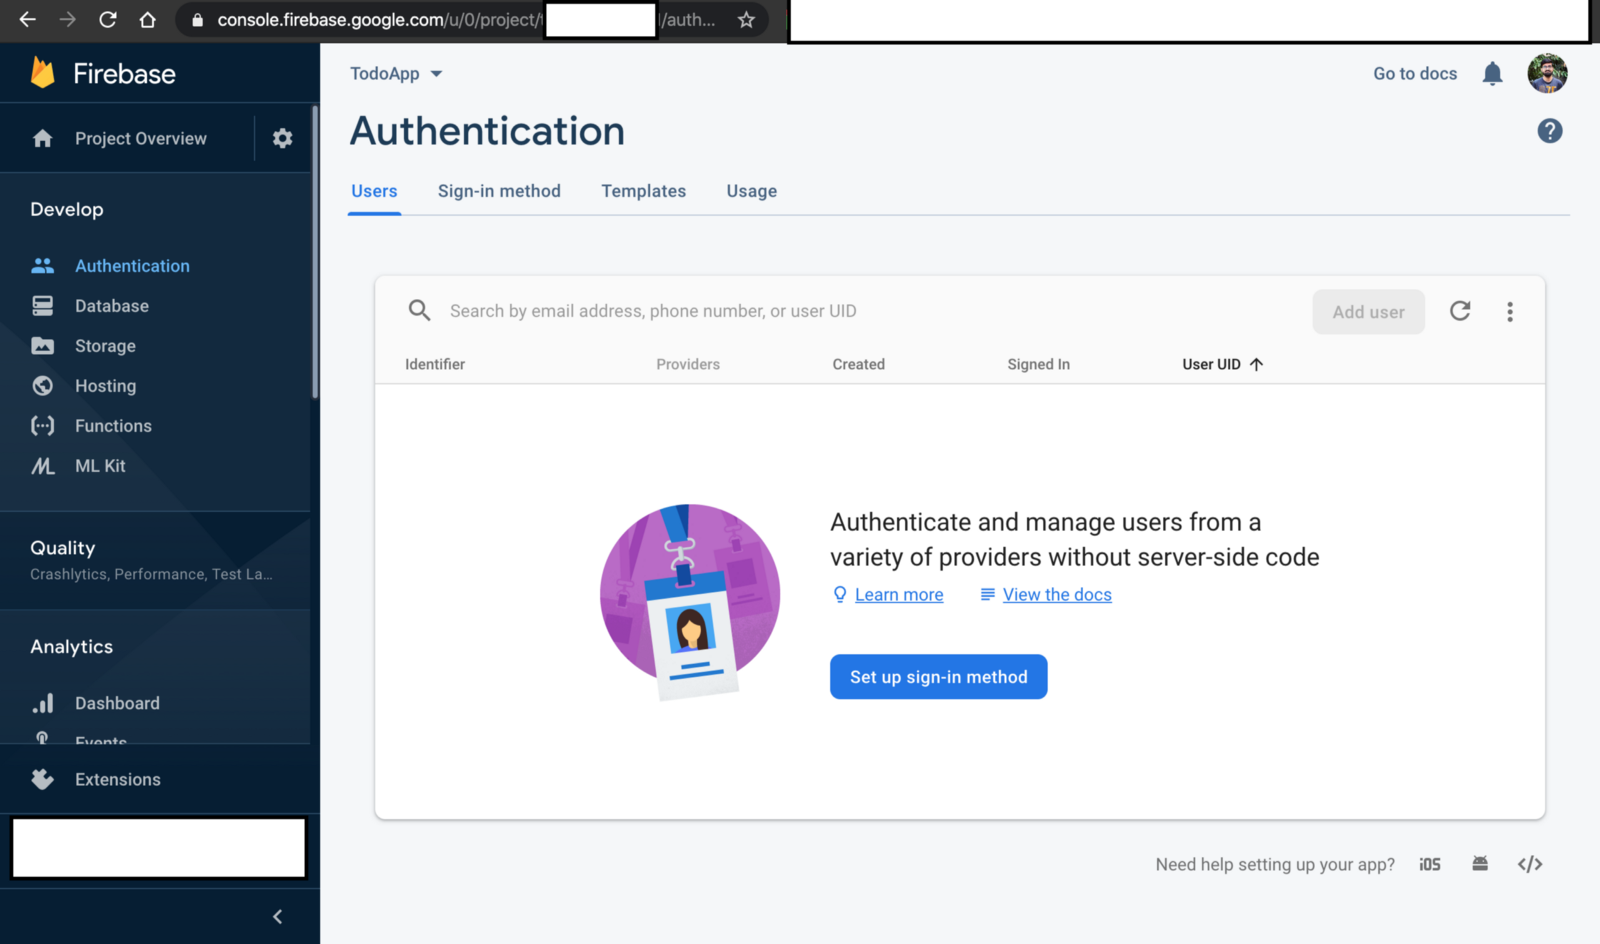
Click on the Set up sign-in-method button. We will use email and password for user validation. Enable the Email/Password option.
Right now we will manually create our user. First, we will build the Login API. After that we will build the Sign-Up API.
Go to the Users Tab under Authentication, fill in the User details, and click on the Add User button.

1. User Login API:
First, we need to install the firebase package, which consists of the Firebase Authentication library, using the following command:
npm i firebaseOnce the installation is done go to the functions > APIs directory. Here we will create a users.js file. Now Inside index.js we import a loginUser method and assign the POST route to it.
//index.js

const {
    loginUser
} = require('./APIs/users')

// Users
app.post('/login', loginUser);
Go to the Project Settings > General and there you will find the following card:

Select the Web Icon and then follow the gif down below:
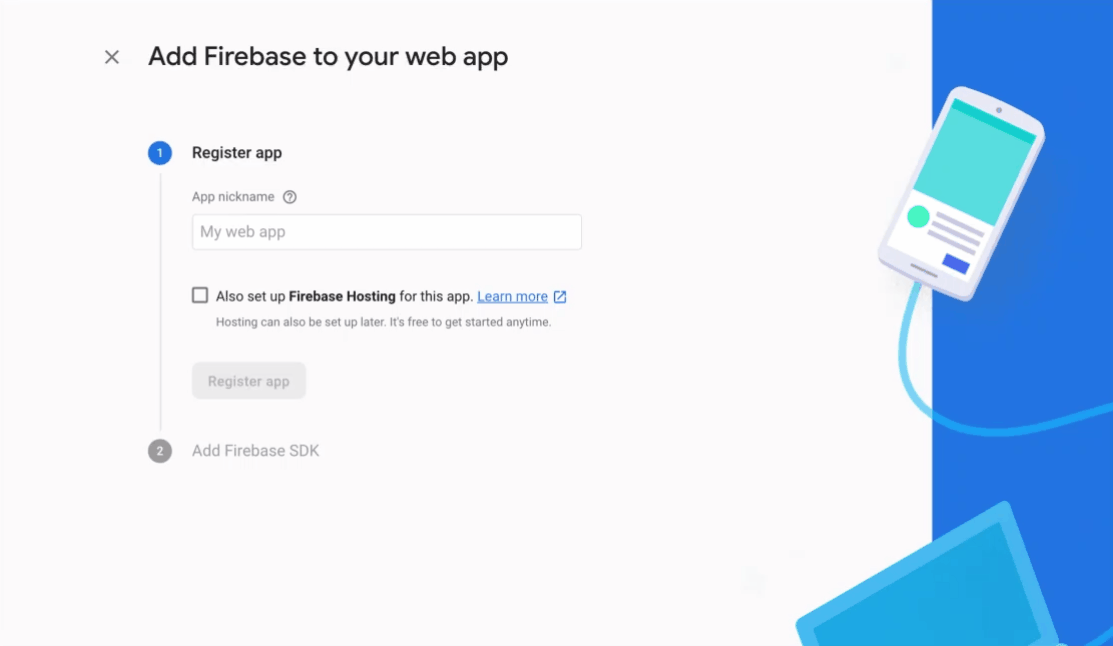
Select the continue to console option. Once this is done you will see a JSON with firebase config. Go to the functions > util directory and create a config.js file. Copy-paste the following code in this file:
// config.js

module.exports = {
    apiKey: "............",
    authDomain: "........",
    databaseURL: "........",
    projectId: ".......",
    storageBucket: ".......",
    messagingSenderId: "........",
    appId: "..........",
    measurementId: "......."
};
Replace ............ with the values that you get under Firebase console > Project settings > General > your apps > Firebase SD snippet > config.
Copy-paste the following code in the users.js file:
// users.js

const { admin, db } = require('../util/admin');
const config = require('../util/config');

const firebase = require('firebase');

firebase.initializeApp(config);

const { validateLoginData, validateSignUpData } = require('../util/validators');

// Login
exports.loginUser = (request, response) => {
    const user = {
        email: request.body.email,
        password: request.body.password
    }

    const { valid, errors } = validateLoginData(user);
	if (!valid) return response.status(400).json(errors);

    firebase
        .auth()
        .signInWithEmailAndPassword(user.email, user.password)
        .then((data) => {
            return data.user.getIdToken();
        })
        .then((token) => {
            return response.json({ token });
        })
        .catch((error) => {
            console.error(error);
            return response.status(403).json({ general: 'wrong credentials, please try again'});
        })
};
Here we are using a firebase signInWithEmailAndPassword module to check if the user-submitted credentials are right. If they are right then we send the token of that user or else a 403 status with a "wrong credentials" message.
Now let’s create validators.js under the functions > util directory. Copy-paste the following code in this file:
// validators.js

const isEmpty = (string) => {
	if (string.trim() === '') return true;
	else return false;
};

exports.validateLoginData = (data) => {
   let errors = {};
   if (isEmpty(data.email)) errors.email = 'Must not be empty';
   if (isEmpty(data.password)) errors.password = 'Must not be  empty';
   return {
       errors,
       valid: Object.keys(errors).length === 0 ? true : false
    };
};
With this our LoginAPI is completed. Run the firebase serve command and go to the postman. Create a new request, select the method type as POST, and add the URL and body.
URL: http://localhost:5000/todoapp-<app-id>/<region-name>/api/login

METHOD: POST

Body: {
    "email":"Add email that is assigned for user in console",
    "password": "Add password that is assigned for user in console"
}
Hit the send request button in postman and you will get the following output:
{
    "token": ".........."
}
We will use this token in an upcoming part to get the user details. Remember this token expires in 60 minutes. To generate a new token use this API again.
2. User Sign-up API:
The default authentication mechanism of firebase only allows you to store information like email, password, etc. But we need more information to identify if this user owns that todo so that they can perform read, update and delete operations on it.
To achieve this goal we are going to create a new collection called users. Under this collection, we will store the user’s data which will be mapped to the todo based on the username. Each username will be unique for all the users on the platform.
Go to the index.js. We import a signUpUser method and assign the POST route to it.
//index.js

const {
    ..,
    signUpUser
} = require('./APIs/users')

app.post('/signup', signUpUser);
Now go to the validators.js and add the following code below the validateLoginData method.
// validators.js

const isEmail = (email) => {
	const emailRegEx = /^(([^<>()\[\]\\.,;:\s@"]+(\.[^<>()\[\]\\.,;:\s@"]+)*)|(".+"))@((\[[0-9]{1,3}\.[0-9]{1,3}\.[0-9]{1,3}\.[0-9]{1,3}\])|(([a-zA-Z\-0-9]+\.)+[a-zA-Z]{2,}))$/;
	if (email.match(emailRegEx)) return true;
	else return false;
};

exports.validateSignUpData = (data) => {
	let errors = {};

	if (isEmpty(data.email)) {
		errors.email = 'Must not be empty';
	} else if (!isEmail(data.email)) {
		errors.email = 'Must be valid email address';
	}

	if (isEmpty(data.firstName)) errors.firstName = 'Must not be empty';
	if (isEmpty(data.lastName)) errors.lastName = 'Must not be empty';
	if (isEmpty(data.phoneNumber)) errors.phoneNumber = 'Must not be empty';
	if (isEmpty(data.country)) errors.country = 'Must not be empty';

	if (isEmpty(data.password)) errors.password = 'Must not be empty';
	if (data.password !== data.confirmPassword) errors.confirmPassword = 'Passowrds must be the same';
	if (isEmpty(data.username)) errors.username = 'Must not be empty';

	return {
		errors,
		valid: Object.keys(errors).length === 0 ? true : false
	};
};
Now go to the users.js and add the following code below the loginUser module.
// users.js

exports.signUpUser = (request, response) => {
    const newUser = {
        firstName: request.body.firstName,
        lastName: request.body.lastName,
        email: request.body.email,
        phoneNumber: request.body.phoneNumber,
        country: request.body.country,
		password: request.body.password,
		confirmPassword: request.body.confirmPassword,
		username: request.body.username
    };

    const { valid, errors } = validateSignUpData(newUser);

	if (!valid) return response.status(400).json(errors);

    let token, userId;
    db
        .doc(`/users/${newUser.username}`)
        .get()
        .then((doc) => {
            if (doc.exists) {
                return response.status(400).json({ username: 'this username is already taken' });
            } else {
                return firebase
                        .auth()
                        .createUserWithEmailAndPassword(
                            newUser.email,
                            newUser.password
                    );
            }
        })
        .then((data) => {
            userId = data.user.uid;
            return data.user.getIdToken();
        })
        .then((idtoken) => {
            token = idtoken;
            const userCredentials = {
                firstName: newUser.firstName,
                lastName: newUser.lastName,
                username: newUser.username,
                phoneNumber: newUser.phoneNumber,
                country: newUser.country,
                email: newUser.email,
                createdAt: new Date().toISOString(),
                userId
            };
            return db
                    .doc(`/users/${newUser.username}`)
                    .set(userCredentials);
        })
        .then(()=>{
            return response.status(201).json({ token });
        })
        .catch((err) => {
			console.error(err);
			if (err.code === 'auth/email-already-in-use') {
				return response.status(400).json({ email: 'Email already in use' });
			} else {
				return response.status(500).json({ general: 'Something went wrong, please try again' });
			}
		});
}
We validate our user data, and after that we send an email and password to the firebase createUserWithEmailAndPassword module to create the user. Once the user is created successfully we save the user credentials in the database.
With this our SignUp API is completed. Run the firebase serve command and go to the postman. Create a new request, select the method type as POST. Add the URL and body.
URL: http://localhost:5000/todoapp-<app-id>/<region-name>/api/signup

METHOD: POST

Body: {
   "firstName": "Add a firstName here",
   "lastName": "Add a lastName here",
   "email":"Add a email here",
   "phoneNumber": "Add a phone number here",
   "country": "Add a country here",
   "password": "Add a password here",
   "confirmPassword": "Add same password here",
   "username": "Add unique username here"
}
Hit the send request button in postman and you will get the following Output:
{
    "token": ".........."
}
Now go to the Firebase console > Database and there you will see the following output:
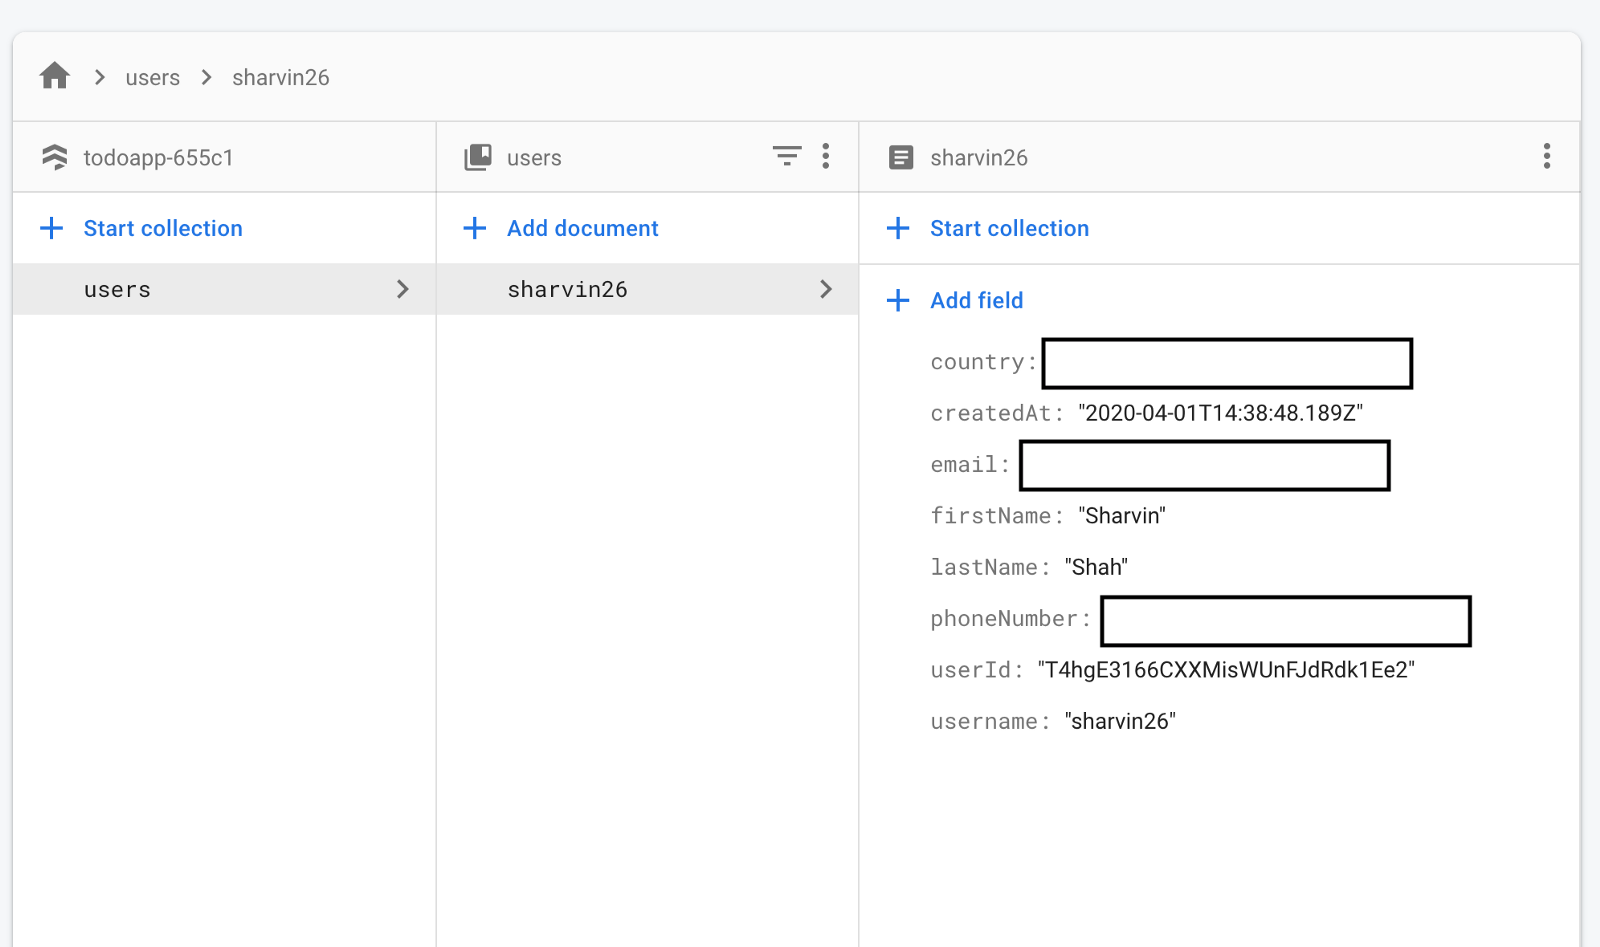
As you can see our user’s collection is successfully created with one document in it.
3. Upload User Profile Picture:
Our users will be able to upload their profile picture. To achieve this we will be using Storage bucket. Go to the Firebase console > Storage and click on the Get started button. Follow the GIF below for the configuration:
Now go to the Rules tab under Storage and update the permission for the bucket access as per the image below:

To upload the profile picture we will be using the package named busboy. To install this package, use the following command:
npm i busboyGo to index.js. Import the uploadProfilePhoto method below the existing signUpUser method. Also assign the POST route to that method.
//index.js

const auth = require('./util/auth');

const {
    ..,
    uploadProfilePhoto
} = require('./APIs/users')

app.post('/user/image', auth, uploadProfilePhoto);
Here we have added an authentication layer so that only a user associated with that account can upload the image. Now create a file named auth.js in functions > utils directory. Copy-paste the following code in that file:
// auth.js

const { admin, db } = require('./admin');

module.exports = (request, response, next) => {
	let idToken;
	if (request.headers.authorization && request.headers.authorization.startsWith('Bearer ')) {
		idToken = request.headers.authorization.split('Bearer ')[1];
	} else {
		console.error('No token found');
		return response.status(403).json({ error: 'Unauthorized' });
	}
	admin
		.auth()
		.verifyIdToken(idToken)
		.then((decodedToken) => {
			request.user = decodedToken;
			return db.collection('users').where('userId', '==', request.user.uid).limit(1).get();
		})
		.then((data) => {
			request.user.username = data.docs[0].data().username;
			request.user.imageUrl = data.docs[0].data().imageUrl;
			return next();
		})
		.catch((err) => {
			console.error('Error while verifying token', err);
			return response.status(403).json(err);
		});
};
Here we are using the firebase verifyIdToken module to verify the token. After that we are decoding the user details and passing them in the existing request.
Go to the users.js and add the following code below the signup method:
// users.js

deleteImage = (imageName) => {
    const bucket = admin.storage().bucket();
    const path = `${imageName}`
    return bucket.file(path).delete()
    .then(() => {
        return
    })
    .catch((error) => {
        return
    })
}

// Upload profile picture
exports.uploadProfilePhoto = (request, response) => {
    const BusBoy = require('busboy');
	const path = require('path');
	const os = require('os');
	const fs = require('fs');
	const busboy = new BusBoy({ headers: request.headers });

	let imageFileName;
	let imageToBeUploaded = {};

	busboy.on('file', (fieldname, file, filename, encoding, mimetype) => {
		if (mimetype !== 'image/png' && mimetype !== 'image/jpeg') {
			return response.status(400).json({ error: 'Wrong file type submited' });
		}
		const imageExtension = filename.split('.')[filename.split('.').length - 1];
        imageFileName = `${request.user.username}.${imageExtension}`;
		const filePath = path.join(os.tmpdir(), imageFileName);
		imageToBeUploaded = { filePath, mimetype };
		file.pipe(fs.createWriteStream(filePath));
    });
    deleteImage(imageFileName);
	busboy.on('finish', () => {
		admin
			.storage()
			.bucket()
			.upload(imageToBeUploaded.filePath, {
				resumable: false,
				metadata: {
					metadata: {
						contentType: imageToBeUploaded.mimetype
					}
				}
			})
			.then(() => {
				const imageUrl = `https://firebasestorage.googleapis.com/v0/b/${config.storageBucket}/o/${imageFileName}?alt=media`;
				return db.doc(`/users/${request.user.username}`).update({
					imageUrl
				});
			})
			.then(() => {
				return response.json({ message: 'Image uploaded successfully' });
			})
			.catch((error) => {
				console.error(error);
				return response.status(500).json({ error: error.code });
			});
	});
	busboy.end(request.rawBody);
};
With this our Upload Profile Picture API is completed. Run the firebase serve command and go to the postman. Create a new request, select the method type as POST, add the URL, and in the body section select type as form-data.
The request is protected so you’ll need to send the bearer token also. To send the bearer token, log in again if the token has expired. After that in Postman App > Authorization tab > Type > Bearer Token and in the token section paste the token.
URL: http://localhost:5000/todoapp-<app-id>/<region-name>/api/user/image

METHOD: GET

Body: { REFER THE IMAGE down below }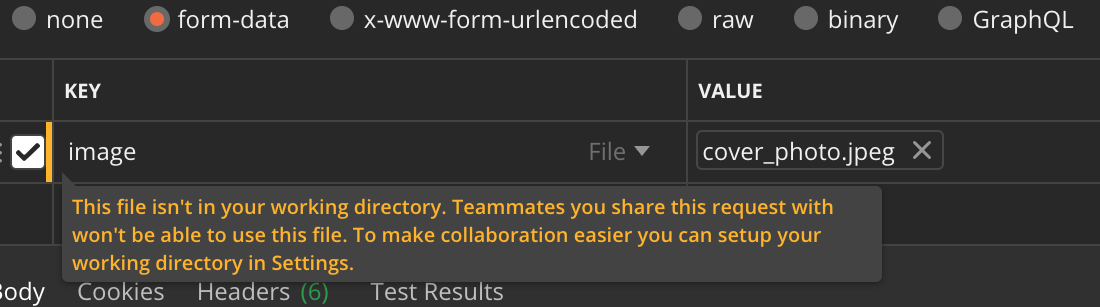
Hit the send request button in postman and you will get the following Output:
{
    "message": "Image uploaded successfully"
}
4. Get User Details:
Here we are fetching the data of our user from the database. Go to the index.js and import the getUserDetail method and assign GET route to it.
// index.js

const {
    ..,
    getUserDetail
} = require('./APIs/users')

app.get('/user', auth, getUserDetail);
Now go to the users.js and add the following code after the uploadProfilePhoto module:
// users.js

exports.getUserDetail = (request, response) => {
    let userData = {};
	db
		.doc(`/users/${request.user.username}`)
		.get()
		.then((doc) => {
			if (doc.exists) {
                userData.userCredentials = doc.data();
                return response.json(userData);
			}
		})
		.catch((error) => {
			console.error(error);
			return response.status(500).json({ error: error.code });
		});
}
We are using the firebase doc().get() module to derive the user details. With this our GET User Details API is completed. Run the firebase serve command and go to the postman. Create a new request, select the method type: GET, and add the URL and body.
The request is protected so you’ll need to send the bearer token also. To send the bearer token, log in again if the token has expired.
URL: http://localhost:5000/todoapp-<app-id>/<region-name>/api/user
METHOD: GET
Hit the send request button in postman and you will get the following Output:
{
   "userCredentials": {
       "phoneNumber": "........",
       "email": "........",
       "country": "........",
       "userId": "........",
       "username": "........",
       "createdAt": "........",
       "lastName": "........",
       "firstName": "........"
    }
}
5. Update user details:
Now let’s add the functionality to update the user details. Go to the index.js and copy-paste the following code:
// index.js

const {
    ..,
    updateUserDetails
} = require('./APIs/users')

app.post('/user', auth, updateUserDetails);
Now go to the users.js and add the updateUserDetails module below the existing getUserDetails :
// users.js

exports.updateUserDetails = (request, response) => {
    let document = db.collection('users').doc(`${request.user.username}`);
    document.update(request.body)
    .then(()=> {
        response.json({message: 'Updated successfully'});
    })
    .catch((error) => {
        console.error(error);
        return response.status(500).json({
            message: "Cannot Update the value"
        });
    });
}
Here we are using the firebase update method. With this our Update User Details API is completed. Follow the same procedure for a request as with the Get User Details API above with one change. Add body in the request here and method as POST.
URL: http://localhost:5000/todoapp-<app-id>/<region-name>/api/user

METHOD: POST

Body : {
    // You can edit First Name, last Name and country
    // We will disable other Form Tags from our UI
}
Hit the send request button in postman and you will get the following Output:
{
    "message": "Updated successfully"
}
6. Securing Todo APIs:
To secure the Todo API so that only the chosen user can access it, we will make a few changes in our existing code. Firstly, we will update our index.js as follows:
// index.js

// Todos
app.get('/todos', auth, getAllTodos);
app.get('/todo/:todoId', auth, getOneTodo);
app.post('/todo',auth, postOneTodo);
app.delete('/todo/:todoId',auth, deleteTodo);
app.put('/todo/:todoId',auth, editTodo);
We have updated all the Todo routes by adding auth so that all the API calls will require a token and can only be accessed by the particular user.
After that go to the todos.js under the functions > APIs directory.
- Create Todo API: Open the
todos.jsand under the postOneTodo method add the username key as follows:
const newTodoItem = {
     ..,
     username: request.user.username,
     ..
}
2. GET All Todos API: Open the todos.js and under the getAllTodos method add the where clause as follows:
db
.collection('todos')
.where('username', '==', request.user.username)
.orderBy('createdAt', 'desc')
Run the firebase serve and test our GET API. Don’t forget to send the bearer token. Here you will get a response error as follows:
{
    "error": 9
}
Go to the command line and you will see the following lines logged:
i functions: Beginning execution of "api"> Error: 9 FAILED_PRECONDITION: The query requires an index. You can create it here: <URL>> at callErrorFromStatusOpen this <URL> in the browser and click on create index.
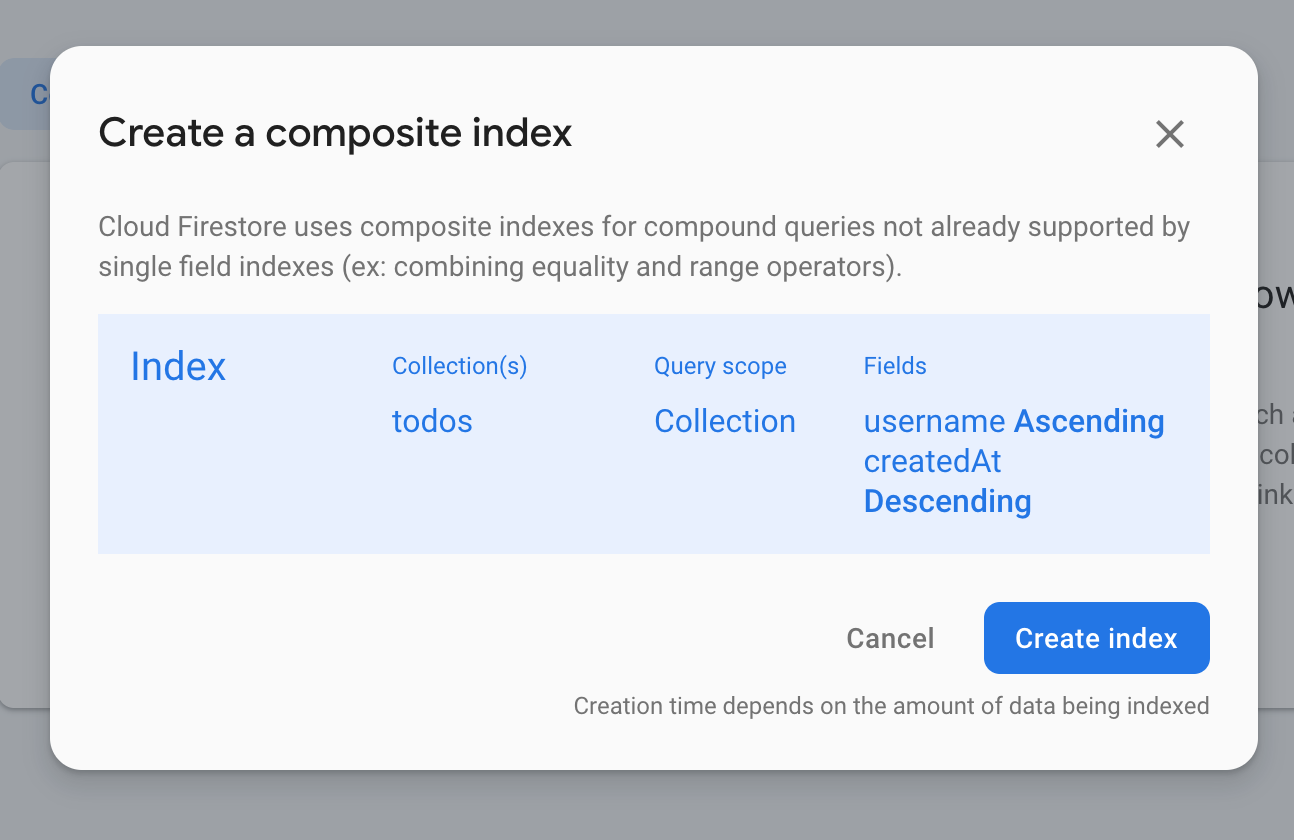
Once the index is built send the request again and you will get the following output:
[
   {
      "todoId": "......",
      "title": "......",
      "username": "......",
      "body": "......",
      "createdAt": "2020-03-30T13:01:58.478Z"
   }
]
3. Delete Todo API: Open the todos.js and under the deleteTodo method add the following condition. Add this condition inside the document.get().then() query below the !doc.exists condition.
..
if(doc.data().username !== request.user.username){
     return response.status(403).json({error:"UnAuthorized"})
}
Directory structure up to now:
+-- firebase.json
+-- functions
|   +-- API
|   +-- +-- todos.js
|   +-- +-- users.js
|   +-- util
|   +-- +-- admin.js
|   +-- +-- auth.js
|   +-- +-- validators.js
|   +-- index.js
|   +-- node_modules
|   +-- package-lock.json
|   +-- package.json
|   +-- .gitignore
With this we have completed our API backend. Take a break, have a coffee, and after that we will start building the front end of our application
Section 3: User Dashboard
In this section, we are going to develop these components:
- Configure ReactJS and Material UI.
- Building Login and SignUp Form.
- Building Account Section.
The User Dashboard code implemented in this section can be found at this commit.
1. Configure ReactJS and Material UI:
We will use the create-react-app template. It gives us a fundamental structure for developing the application. To install it, use the following command:
npm install -g create-react-appGo to the root folder of the project where the functions directory is present. Initialize our front end application using the following command:
create-react-app viewRemember to use version v16.13.1 of the ReactJS library.
Once the installation is completed then you'll see the following in your command line logs:
cd view
  npm start
Happy hacking!
With this, we have configured our React application. You’ll get the following directory structure:
+-- firebase.json
+-- functions { This Directory consists our API logic }
+-- view { This Directory consists our FrontEnd Compoenents }
+-- .firebaserc
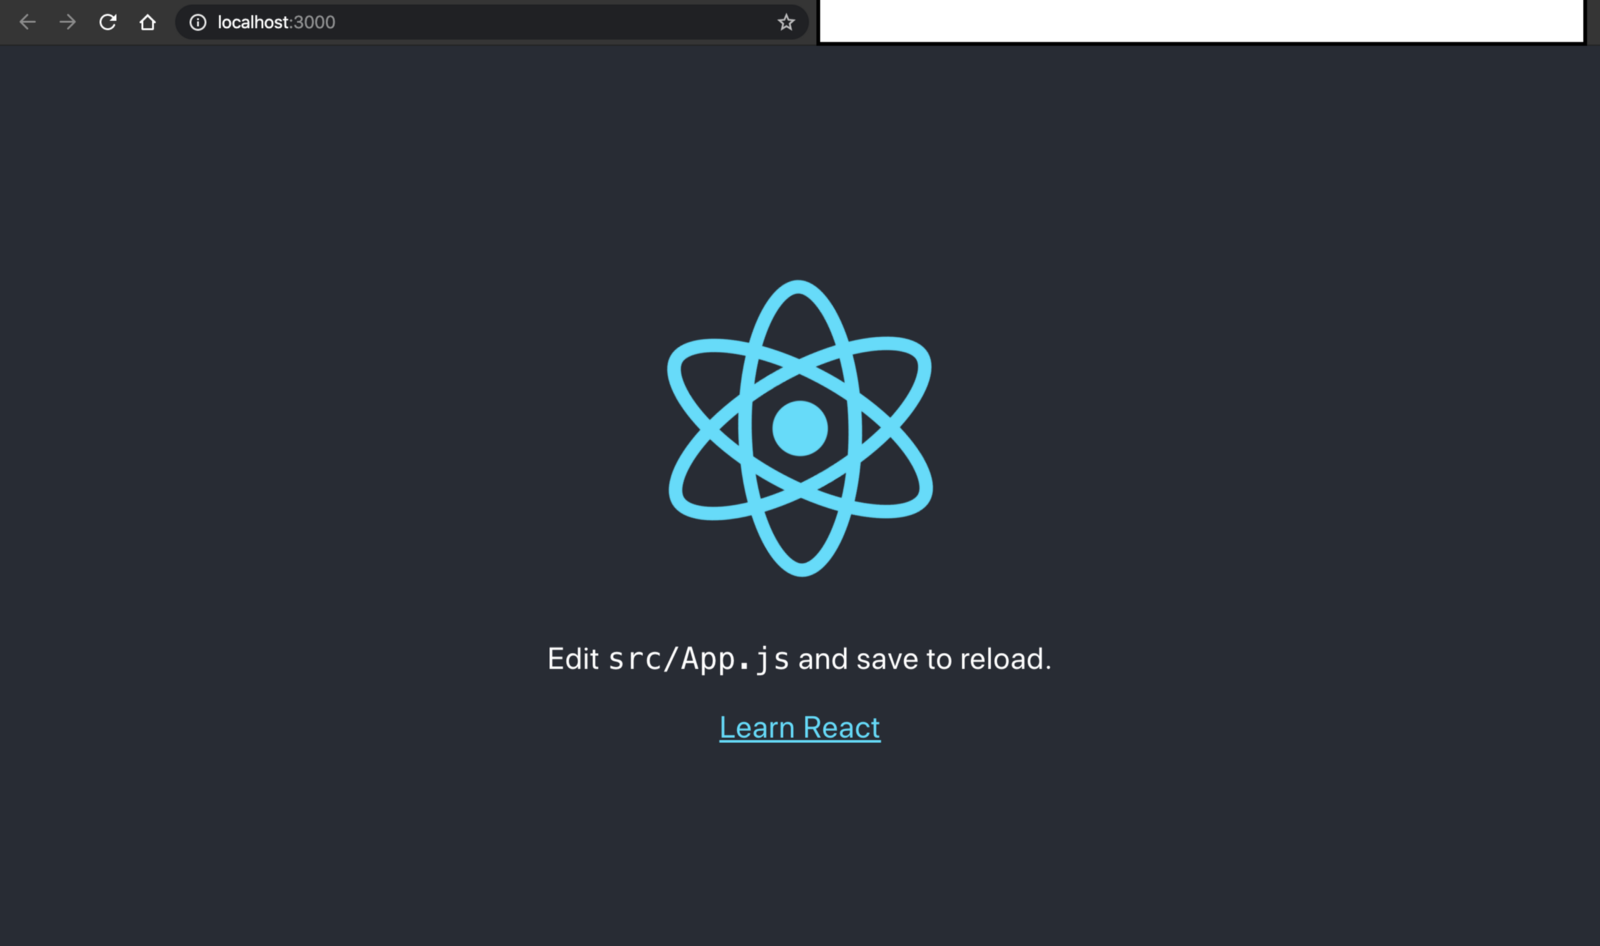
+-- .gitignoreNow run the application using the command npm start . Go to the browser on http://localhost:3000/ and you’ll see the following output:
Now we will remove all the unnecessary components. Go to the view directory and then remove all the files which have [ Remove ] in front of them. For this, refer to the directory tree structure below.
+-- README.md [ Remove ]
+-- package-lock.json
+-- package.json
+-- node_modules
+-- .gitignore
+-- public
|   +-- favicon.ico [ Remove ]
|   +-- index.html
|   +-- logo192.png [ Remove ]
|   +-- logo512.png [ Remove ]
|   +-- manifest.json
|   +-- robots.txt
+-- src
|   +-- App.css
|   +-- App.test.js
|   +-- index.js
|   +-- serviceWorker.js
|   +-- App.js
|   +-- index.css [ Remove ]
|   +-- logo.svg [ Remove ]
|   +-- setupTests.js
Go to index.html under the public directory and remove the following lines:
<link rel="icon" href="%PUBLIC_URL%/favicon.ico" />
<link rel="apple-touch-icon" href="%PUBLIC_URL%/logo192.png" />
<link rel="manifest" href="%PUBLIC_URL%/manifest.json" />
Now go to the App.js under the src directory and replace the old code with the following code:
import React from 'react';
function App() {
  return (
    <div>
    </div>
  );
}
export default App;
Go to the index.js and remove the following import:
import './index.css'I have not deleted the App.css nor I am using it in this application. But if you want to delete or use it you are free to do that.
Go to the browser on http://localhost:3000/ and you’ll get a blank screen output.
To install Material UI go to the view directory and copy-paste this command in the terminal:
npm install @material-ui/coreRemember to use version v4.9.8 of the Material UI library.
2. Login Form:
To develop the login form go to App.js. At the top of App.js add the following imports:
import { BrowserRouter as Router, Route, Switch } from 'react-router-dom';
import login from './pages/login';
We are using Switch and Route to assign routes for our TodoApp. Right now we will add only the /login route and assign a login component to it.
// App.js

<Router>
    <div>
       <Switch>
           <Route exact path="/login" component={login}/>
       </Switch>
    </div>
</Router>
Create a pages directory under the existing view directory and a file named login.js under the pages directory.
We will import Material UI components and the Axios package in the login.js:
// login.js

// Material UI components
import React, { Component } from 'react';
import Avatar from '@material-ui/core/Avatar';
import Button from '@material-ui/core/Button';
import CssBaseline from '@material-ui/core/CssBaseline';
import TextField from '@material-ui/core/TextField';
import Link from '@material-ui/core/Link';
import Grid from '@material-ui/core/Grid';
import LockOutlinedIcon from '@material-ui/icons/LockOutlined';
import Typography from '@material-ui/core/Typography';
import withStyles from '@material-ui/core/styles/withStyles';
import Container from '@material-ui/core/Container';
import CircularProgress from '@material-ui/core/CircularProgress';

import axios from 'axios';
We will add the following styles to our login page:
// login.js

const styles = (theme) => ({
	paper: {
		marginTop: theme.spacing(8),
		display: 'flex',
		flexDirection: 'column',
		alignItems: 'center'
	},
	avatar: {
		margin: theme.spacing(1),
		backgroundColor: theme.palette.secondary.main
	},
	form: {
		width: '100%',
		marginTop: theme.spacing(1)
	},
	submit: {
		margin: theme.spacing(3, 0, 2)
	},
	customError: {
		color: 'red',
		fontSize: '0.8rem',
		marginTop: 10
	},
	progess: {
		position: 'absolute'
	}
});
We will create a class named login which has a form and submit handler inside it.
// login.js

class login extends Component {
	constructor(props) {
		super(props);

		this.state = {
			email: '',
			password: '',
			errors: [],
			loading: false
		};
	}

	componentWillReceiveProps(nextProps) {
		if (nextProps.UI.errors) {
			this.setState({
				errors: nextProps.UI.errors
			});
		}
	}

	handleChange = (event) => {
		this.setState({
			[event.target.name]: event.target.value
		});
	};

	handleSubmit = (event) => {
		event.preventDefault();
		this.setState({ loading: true });
		const userData = {
			email: this.state.email,
			password: this.state.password
		};
		axios
			.post('/login', userData)
			.then((response) => {
				localStorage.setItem('AuthToken', `Bearer ${response.data.token}`);
				this.setState({
					loading: false,
				});
				this.props.history.push('/');
			})
			.catch((error) => {
				this.setState({
					errors: error.response.data,
					loading: false
				});
			});
	};

	render() {
		const { classes } = this.props;
		const { errors, loading } = this.state;
		return (
			<Container component="main" maxWidth="xs">
				<CssBaseline />
				<div className={classes.paper}>
					<Avatar className={classes.avatar}>
						<LockOutlinedIcon />
					</Avatar>
					<Typography component="h1" variant="h5">
						Login
					</Typography>
					<form className={classes.form} noValidate>
						<TextField
							variant="outlined"
							margin="normal"
							required
							fullWidth
							id="email"
							label="Email Address"
							name="email"
							autoComplete="email"
							autoFocus
							helperText={errors.email}
							error={errors.email ? true : false}
							onChange={this.handleChange}
						/>
						<TextField
							variant="outlined"
							margin="normal"
							required
							fullWidth
							name="password"
							label="Password"
							type="password"
							id="password"
							autoComplete="current-password"
							helperText={errors.password}
							error={errors.password ? true : false}
							onChange={this.handleChange}
						/>
						<Button
							type="submit"
							fullWidth
							variant="contained"
							color="primary"
							className={classes.submit}
							onClick={this.handleSubmit}
							disabled={loading || !this.state.email || !this.state.password}
						>
							Sign In
							{loading && <CircularProgress size={30} className={classes.progess} />}
						</Button>
						<Grid container>
							<Grid item>
								<Link href="signup" variant="body2">
									{"Don't have an account? Sign Up"}
								</Link>
							</Grid>
						</Grid>
						{errors.general && (
							<Typography variant="body2" className={classes.customError}>
								{errors.general}
							</Typography>
						)}
					</form>
				</div>
			</Container>
		);
	}
}
At the end of this file add the following export:
export default withStyles(styles)(login);
Add our firebase functions URL to view > package.json as follows:
Remember: Add a key named proxy below the existing browserslist JSON object
"proxy": "https://<region-name>-todoapp-<id>.cloudfunctions.net/api"Install the Axios and material icon package using the following commands:
// Axios command:
npm i axios
// Material Icons:
npm install @material-ui/icons
We have added a login route in App.js. In the login.js we have created a class component that handles the state, sends the post request to the login API using the Axios package. If the request is successful then we store the token. If we get errors in the response we simply render them on the UI.
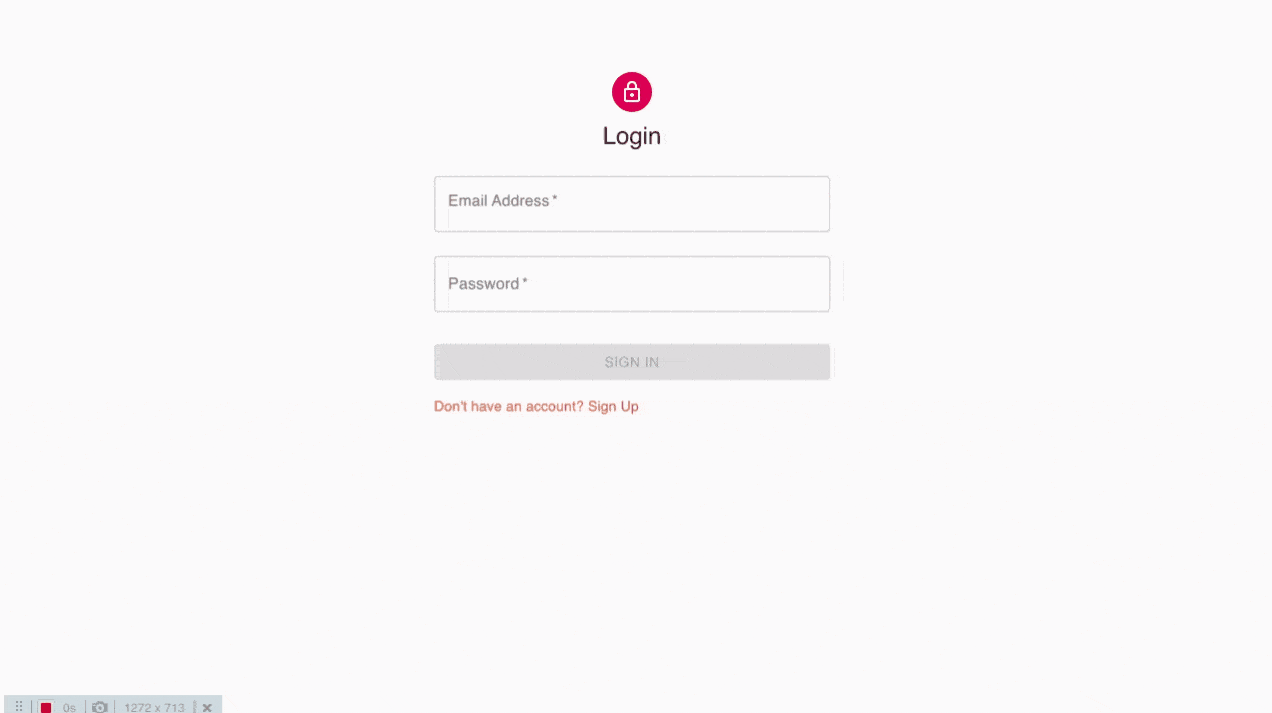
Go to the browser at http://localhost:3000/login and you’ll see the following Login UI.
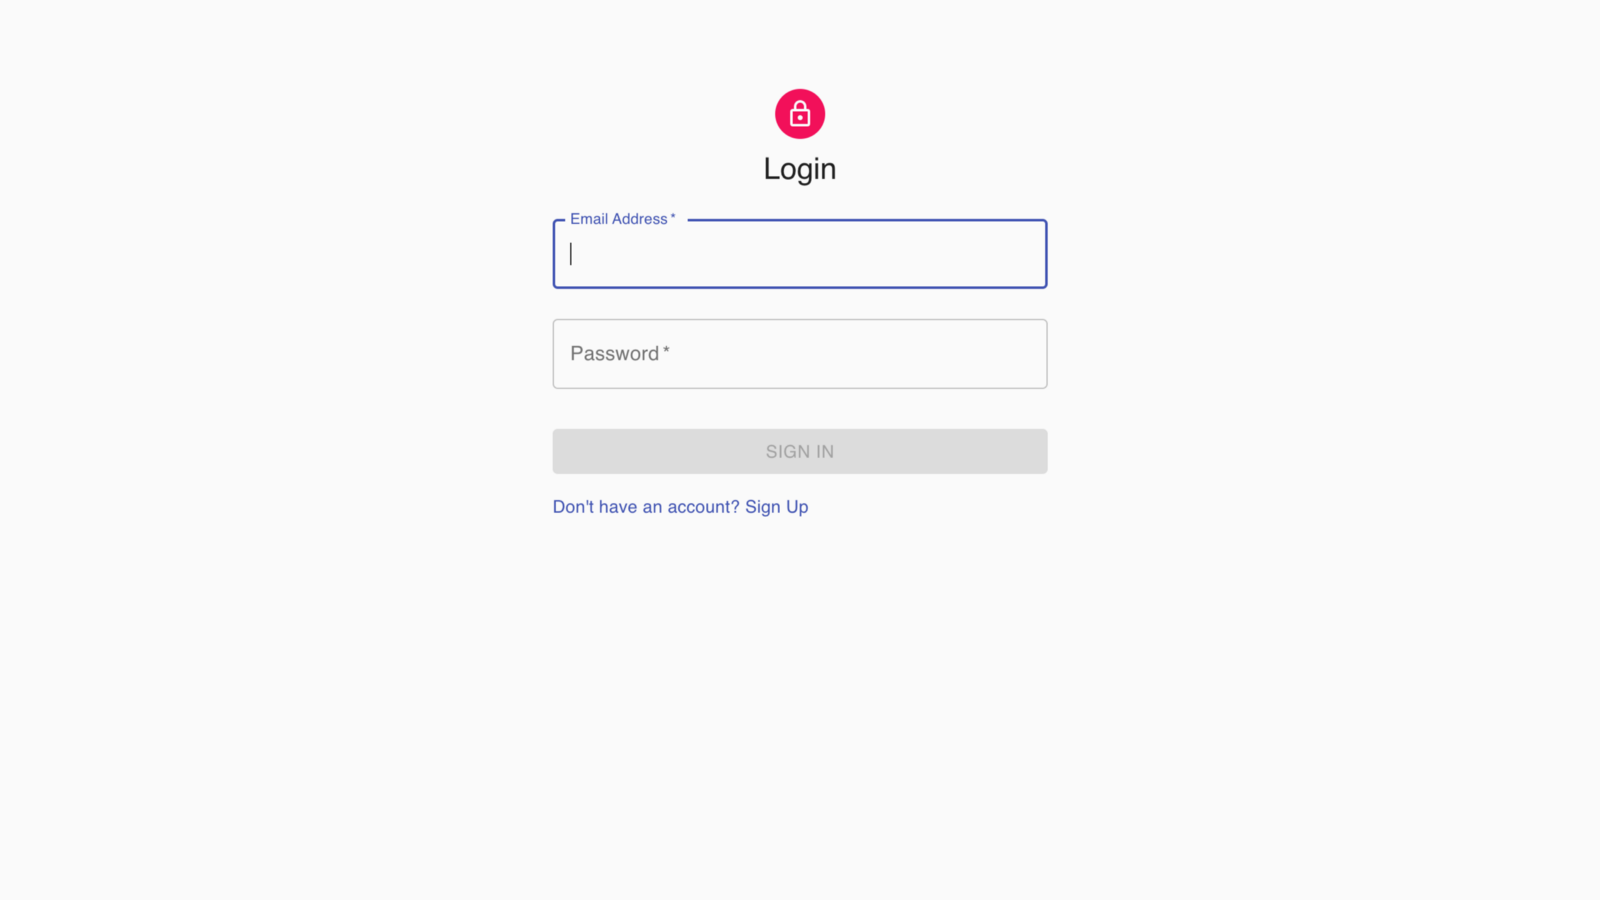
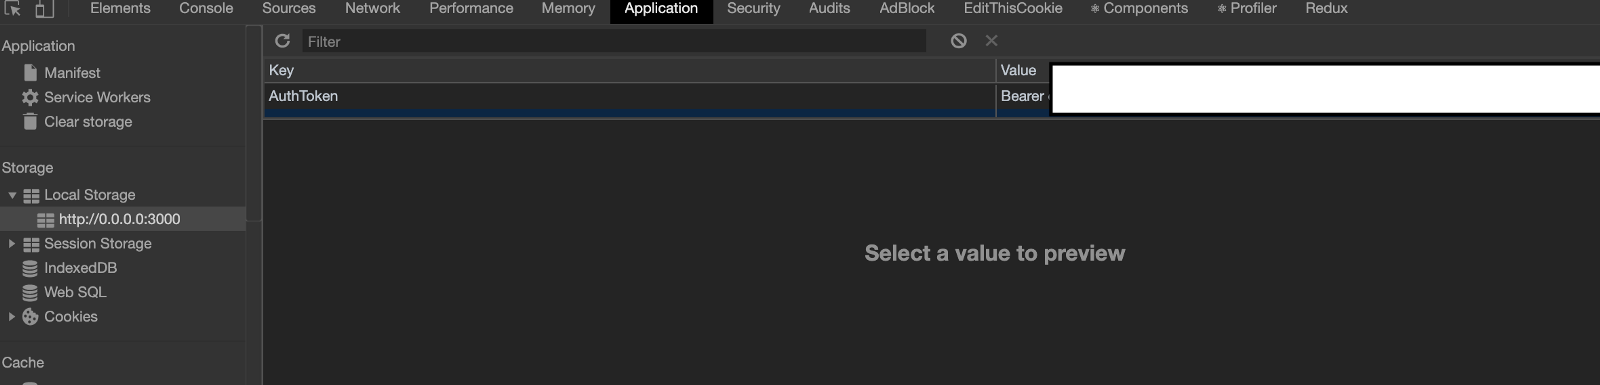
Try filling wrong credentials or sending an empty request and you will get the errors. Send a valid request. Go to the Developer console > Application. You will see that users token is store in the Local storage. Once the Login is successful we will be routed back to the Home page.
3. Signup Form:
To develop the Signup form go to App.js and update the existing Route component with the line below:
// App.js

<Route exact path="/signup" component={signup}/>
Don’t forget to import:
// App.js

import signup from './pages/signup';
Create a file named signup.js under the pages directory.
Inside the signup.js we will import the Material UI and Axios package:
// signup.js

import React, { Component } from 'react';
import Avatar from '@material-ui/core/Avatar';
import Button from '@material-ui/core/Button';
import CssBaseline from '@material-ui/core/CssBaseline';
import TextField from '@material-ui/core/TextField';
import Link from '@material-ui/core/Link';
import Grid from '@material-ui/core/Grid';
import LockOutlinedIcon from '@material-ui/icons/LockOutlined';
import Typography from '@material-ui/core/Typography';
import Container from '@material-ui/core/Container';
import withStyles from '@material-ui/core/styles/withStyles';
import CircularProgress from '@material-ui/core/CircularProgress';

import axios from 'axios';
We will add the following styles to our signup page:
// signup.js


const styles = (theme) => ({
	paper: {
		marginTop: theme.spacing(8),
		display: 'flex',
		flexDirection: 'column',
		alignItems: 'center'
	},
	avatar: {
		margin: theme.spacing(1),
		backgroundColor: theme.palette.secondary.main
	},
	form: {
		width: '100%', // Fix IE 11 issue.
		marginTop: theme.spacing(3)
	},
	submit: {
		margin: theme.spacing(3, 0, 2)
	},
	progess: {
		position: 'absolute'
	}
});
We will create a class named signup which has a form and submit handler inside it.
// signup.js

class signup extends Component {
	constructor(props) {
		super(props);

		this.state = {
			firstName: '',
			lastName: '',
			phoneNumber: '',
			country: '',
			username: '',
			email: '',
			password: '',
			confirmPassword: '',
			errors: [],
			loading: false
		};
	}

	componentWillReceiveProps(nextProps) {
		if (nextProps.UI.errors) {
			this.setState({
				errors: nextProps.UI.errors
			});
		}
	}

	handleChange = (event) => {
		this.setState({
			[event.target.name]: event.target.value
		});
	};

	handleSubmit = (event) => {
		event.preventDefault();
		this.setState({ loading: true });
		const newUserData = {
			firstName: this.state.firstName,
			lastName: this.state.lastName,
			phoneNumber: this.state.phoneNumber,
			country: this.state.country,
			username: this.state.username,
			email: this.state.email,
			password: this.state.password,
			confirmPassword: this.state.confirmPassword
		};
		axios
			.post('/signup', newUserData)
			.then((response) => {
				localStorage.setItem('AuthToken', `${response.data.token}`);
				this.setState({
					loading: false,
				});
				this.props.history.push('/');
			})
			.catch((error) => {
				this.setState({
					errors: error.response.data,
					loading: false
				});
			});
	};

	render() {
		const { classes } = this.props;
		const { errors, loading } = this.state;
		return (
			<Container component="main" maxWidth="xs">
				<CssBaseline />
				<div className={classes.paper}>
					<Avatar className={classes.avatar}>
						<LockOutlinedIcon />
					</Avatar>
					<Typography component="h1" variant="h5">
						Sign up
					</Typography>
					<form className={classes.form} noValidate>
						<Grid container spacing={2}>
							<Grid item xs={12} sm={6}>
								<TextField
									variant="outlined"
									required
									fullWidth
									id="firstName"
									label="First Name"
									name="firstName"
									autoComplete="firstName"
									helperText={errors.firstName}
									error={errors.firstName ? true : false}
									onChange={this.handleChange}
								/>
							</Grid>
							<Grid item xs={12} sm={6}>
								<TextField
									variant="outlined"
									required
									fullWidth
									id="lastName"
									label="Last Name"
									name="lastName"
									autoComplete="lastName"
									helperText={errors.lastName}
									error={errors.lastName ? true : false}
									onChange={this.handleChange}
								/>
							</Grid>

							<Grid item xs={12} sm={6}>
								<TextField
									variant="outlined"
									required
									fullWidth
									id="username"
									label="User Name"
									name="username"
									autoComplete="username"
									helperText={errors.username}
									error={errors.username ? true : false}
									onChange={this.handleChange}
								/>
							</Grid>

							<Grid item xs={12} sm={6}>
								<TextField
									variant="outlined"
									required
									fullWidth
									id="phoneNumber"
									label="Phone Number"
									name="phoneNumber"
									autoComplete="phoneNumber"
									pattern="[7-9]{1}[0-9]{9}"
									helperText={errors.phoneNumber}
									error={errors.phoneNumber ? true : false}
									onChange={this.handleChange}
								/>
							</Grid>

							<Grid item xs={12}>
								<TextField
									variant="outlined"
									required
									fullWidth
									id="email"
									label="Email Address"
									name="email"
									autoComplete="email"
									helperText={errors.email}
									error={errors.email ? true : false}
									onChange={this.handleChange}
								/>
							</Grid>

							<Grid item xs={12}>
								<TextField
									variant="outlined"
									required
									fullWidth
									id="country"
									label="Country"
									name="country"
									autoComplete="country"
									helperText={errors.country}
									error={errors.country ? true : false}
									onChange={this.handleChange}
								/>
							</Grid>

							<Grid item xs={12}>
								<TextField
									variant="outlined"
									required
									fullWidth
									name="password"
									label="Password"
									type="password"
									id="password"
									autoComplete="current-password"
									helperText={errors.password}
									error={errors.password ? true : false}
									onChange={this.handleChange}
								/>
							</Grid>
							<Grid item xs={12}>
								<TextField
									variant="outlined"
									required
									fullWidth
									name="confirmPassword"
									label="Confirm Password"
									type="password"
									id="confirmPassword"
									autoComplete="current-password"
									onChange={this.handleChange}
								/>
							</Grid>
						</Grid>
						<Button
							type="submit"
							fullWidth
							variant="contained"
							color="primary"
							className={classes.submit}
							onClick={this.handleSubmit}
                            disabled={loading ||
                                !this.state.email ||
                                !this.state.password ||
                                !this.state.firstName ||
                                !this.state.lastName ||
                                !this.state.country ||
                                !this.state.username ||
                                !this.state.phoneNumber}
						>
							Sign Up
							{loading && <CircularProgress size={30} className={classes.progess} />}
						</Button>
						<Grid container justify="flex-end">
							<Grid item>
								<Link href="login" variant="body2">
									Already have an account? Sign in
								</Link>
							</Grid>
						</Grid>
					</form>
				</div>
			</Container>
		);
	}
}
At the end of this file add the following export:
export default withStyles(styles)(signup);
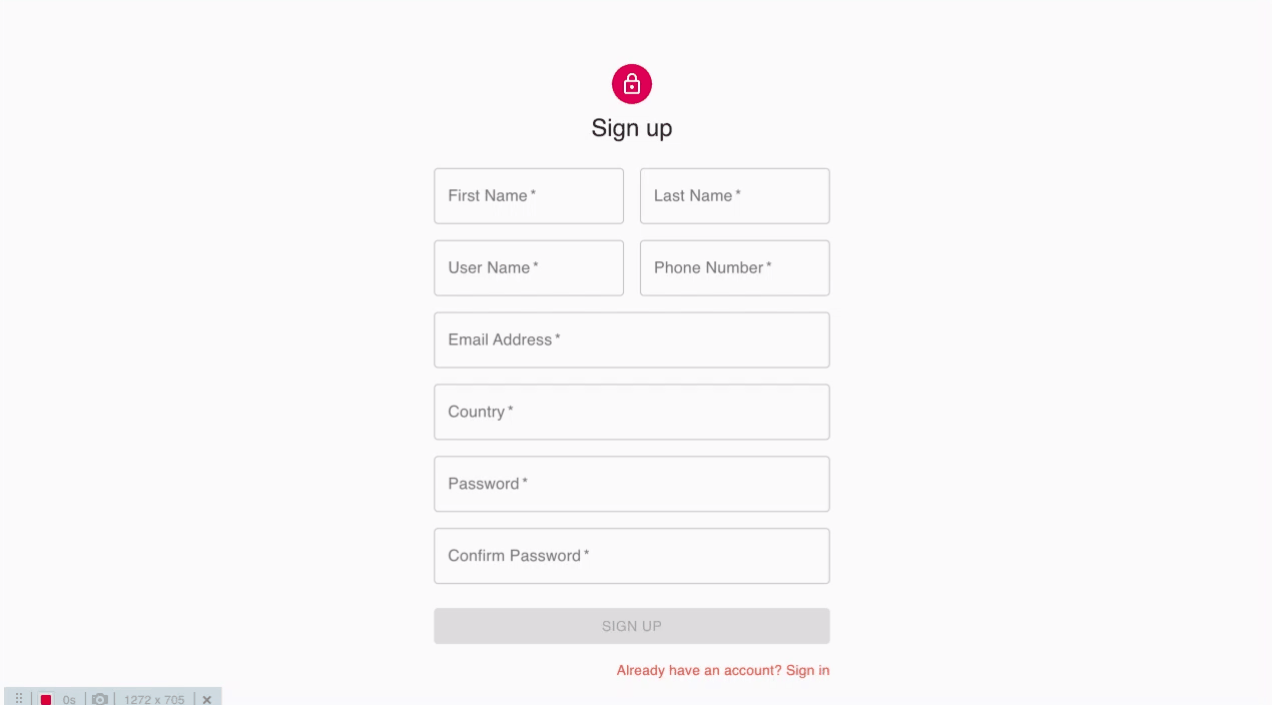
The logic for the Signup component is the same as the login component. Go to the browser at http://localhost:3000/signup and you’ll see the following Signup UI. Once the Signup is successful we will be routed back to the Home page.
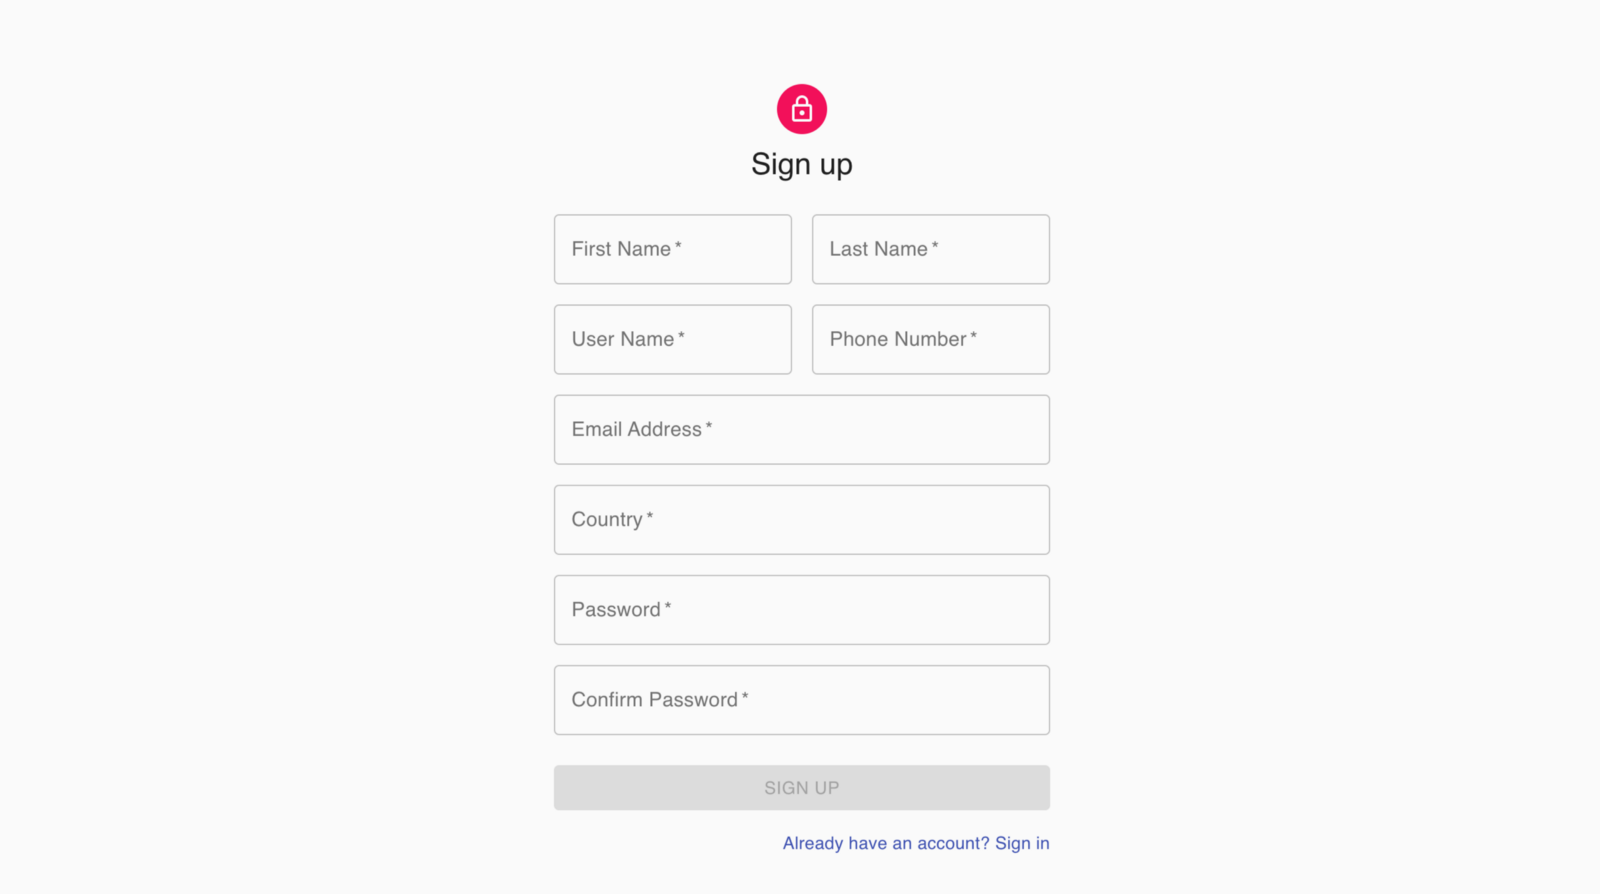
Try filling wrong credentials or sending an empty request and you will get the errors. Send a valid request. Go to the Developer console > Application. You will see that users token is store in the Local storage.

4. Account Section:
To build the account page we will need to first create our Home page from where we will load the account section. Go to the App.js and update the following route:
// App.js

<Route exact path="/" component={home}/>
Don't forget the import:
// App.js

import home from './pages/home';
Create a new file named home.js . This file will be the index of our application. The Account and Todo sections both load on this page based on the button click.
Import the Material UI packages, Axios package, our custom Account, todo components, and auth middleware.
// home.js

import React, { Component } from 'react';
import axios from 'axios';

import Account from '../components/account';
import Todo from '../components/todo';

import Drawer from '@material-ui/core/Drawer';
import AppBar from '@material-ui/core/AppBar';
import CssBaseline from '@material-ui/core/CssBaseline';
import Toolbar from '@material-ui/core/Toolbar';
import List from '@material-ui/core/List';
import Typography from '@material-ui/core/Typography';
import Divider from '@material-ui/core/Divider';
import ListItem from '@material-ui/core/ListItem';
import ListItemIcon from '@material-ui/core/ListItemIcon';
import ListItemText from '@material-ui/core/ListItemText';
import withStyles from '@material-ui/core/styles/withStyles';
import AccountBoxIcon from '@material-ui/icons/AccountBox';
import NotesIcon from '@material-ui/icons/Notes';
import Avatar from '@material-ui/core/avatar';
import ExitToAppIcon from '@material-ui/icons/ExitToApp';
import CircularProgress from '@material-ui/core/CircularProgress';

import { authMiddleWare } from '../util/auth'
We will set our drawerWidth as follows:
const drawerWidth = 240;We will add the following style to our Home page:
const styles = (theme) => ({
	root: {
		display: 'flex'
	},
	appBar: {
		zIndex: theme.zIndex.drawer + 1
	},
	drawer: {
		width: drawerWidth,
		flexShrink: 0
	},
	drawerPaper: {
		width: drawerWidth
	},
	content: {
		flexGrow: 1,
		padding: theme.spacing(3)
	},
	avatar: {
		height: 110,
		width: 100,
		flexShrink: 0,
		flexGrow: 0,
		marginTop: 20
	},
	uiProgess: {
		position: 'fixed',
		zIndex: '1000',
		height: '31px',
		width: '31px',
		left: '50%',
		top: '35%'
	},
	toolbar: theme.mixins.toolbar
});
We will create a class named home. This class will have an API call to get the User's profile picture, First name and Last name. Also it will have logic to choose which component to display, either Todo or Account:
class home extends Component {
	state = {
		render: false
	};

	loadAccountPage = (event) => {
		this.setState({ render: true });
	};

	loadTodoPage = (event) => {
		this.setState({ render: false });
	};

	logoutHandler = (event) => {
		localStorage.removeItem('AuthToken');
		this.props.history.push('/login');
	};

	constructor(props) {
		super(props);

		this.state = {
			firstName: '',
			lastName: '',
			profilePicture: '',
			uiLoading: true,
			imageLoading: false
		};
	}

	componentWillMount = () => {
		authMiddleWare(this.props.history);
		const authToken = localStorage.getItem('AuthToken');
		axios.defaults.headers.common = { Authorization: `${authToken}` };
		axios
			.get('/user')
			.then((response) => {
				console.log(response.data);
				this.setState({
					firstName: response.data.userCredentials.firstName,
					lastName: response.data.userCredentials.lastName,
					email: response.data.userCredentials.email,
					phoneNumber: response.data.userCredentials.phoneNumber,
					country: response.data.userCredentials.country,
					username: response.data.userCredentials.username,
					uiLoading: false,
					profilePicture: response.data.userCredentials.imageUrl
				});
			})
			.catch((error) => {
				if(error.response.status === 403) {
					this.props.history.push('/login')
				}
				console.log(error);
				this.setState({ errorMsg: 'Error in retrieving the data' });
			});
	};

	render() {
		const { classes } = this.props;
		if (this.state.uiLoading === true) {
			return (
				<div className={classes.root}>
					{this.state.uiLoading && <CircularProgress size={150} className={classes.uiProgess} />}
				</div>
			);
		} else {
			return (
				<div className={classes.root}>
					<CssBaseline />
					<AppBar position="fixed" className={classes.appBar}>
						<Toolbar>
							<Typography variant="h6" noWrap>
								TodoApp
							</Typography>
						</Toolbar>
					</AppBar>
					<Drawer
						className={classes.drawer}
						variant="permanent"
						classes={{
							paper: classes.drawerPaper
						}}
					>
						<div className={classes.toolbar} />
						<Divider />
						<center>
							<Avatar src={this.state.profilePicture} className={classes.avatar} />
							<p>
								{' '}
								{this.state.firstName} {this.state.lastName}
							</p>
						</center>
						<Divider />
						<List>
							<ListItem button key="Todo" onClick={this.loadTodoPage}>
								<ListItemIcon>
									{' '}
									<NotesIcon />{' '}
								</ListItemIcon>
								<ListItemText primary="Todo" />
							</ListItem>

							<ListItem button key="Account" onClick={this.loadAccountPage}>
								<ListItemIcon>
									{' '}
									<AccountBoxIcon />{' '}
								</ListItemIcon>
								<ListItemText primary="Account" />
							</ListItem>

							<ListItem button key="Logout" onClick={this.logoutHandler}>
								<ListItemIcon>
									{' '}
									<ExitToAppIcon />{' '}
								</ListItemIcon>
								<ListItemText primary="Logout" />
							</ListItem>
						</List>
					</Drawer>

					<div>{this.state.render ? <Account /> : <Todo />}</div>
				</div>
			);
		}
	}
}
Here in the code, you will see that authMiddleWare(this.props.history); is used. This middleware checks if the authToken is null. If yes then it will push the user back to the login.js. This is added so that our user cannot access the / route without Signup or log in. At the end of this file add the following export:
export default withStyles(styles)(home);
Now are you wondering what this code from home.js does?
<div>{this.state.render ? <Account /> : <Todo />}</div>It is checking the render state which we are setting on the button click. Let's create the component directory, and under that directory create two files: account.js and todo.js.
Let’s create a directory named util and file named auth.js under that directory. Copy-paste the following code under auth.js :
export const authMiddleWare = (history) => {
    const authToken = localStorage.getItem('AuthToken');
    if(authToken === null){
        history.push('/login')
    }
}
For time being inside the todo.js file we will just write a class which renders the text Hello I am todo. We will be working on our todos in the next section:
import React, { Component } from 'react'

import withStyles from '@material-ui/core/styles/withStyles';
import Typography from '@material-ui/core/Typography';

const styles = ((theme) => ({
    content: {
        flexGrow: 1,
        padding: theme.spacing(3),
    },
    toolbar: theme.mixins.toolbar,
    })
);

class todo extends Component {
    render() {
        const { classes } = this.props;
        return (
            <main className={classes.content}>
            <div className={classes.toolbar} />
            <Typography paragraph>
                Hello I am todo
            </Typography>
            </main>
        )
    }
}

export default (withStyles(styles)(todo));
Now it's time for the account section. Import the Material UI, clsx, axios and authmiddleWare utility in our account.js.
// account.js

import React, { Component } from 'react';

import withStyles from '@material-ui/core/styles/withStyles';
import Typography from '@material-ui/core/Typography';
import CircularProgress from '@material-ui/core/CircularProgress';
import CloudUploadIcon from '@material-ui/icons/CloudUpload';
import { Card, CardActions, CardContent, Divider, Button, Grid, TextField } from '@material-ui/core';

import clsx from 'clsx';

import axios from 'axios';
import { authMiddleWare } from '../util/auth';
We will add the following styling to our Account page:
// account.js

const styles = (theme) => ({
	content: {
		flexGrow: 1,
		padding: theme.spacing(3)
	},
	toolbar: theme.mixins.toolbar,
	root: {},
	details: {
		display: 'flex'
	},
	avatar: {
		height: 110,
		width: 100,
		flexShrink: 0,
		flexGrow: 0
	},
	locationText: {
		paddingLeft: '15px'
	},
	buttonProperty: {
		position: 'absolute',
		top: '50%'
	},
	uiProgess: {
		position: 'fixed',
		zIndex: '1000',
		height: '31px',
		width: '31px',
		left: '50%',
		top: '35%'
	},
	progess: {
		position: 'absolute'
	},
	uploadButton: {
		marginLeft: '8px',
		margin: theme.spacing(1)
	},
	customError: {
		color: 'red',
		fontSize: '0.8rem',
		marginTop: 10
	},
	submitButton: {
		marginTop: '10px'
	}
});
We will create a class component named account. For the time being just copy-paste the following code:
// account.js

class account extends Component {
	constructor(props) {
		super(props);

		this.state = {
			firstName: '',
			lastName: '',
			email: '',
			phoneNumber: '',
			username: '',
			country: '',
			profilePicture: '',
			uiLoading: true,
			buttonLoading: false,
			imageError: ''
		};
	}

	componentWillMount = () => {
		authMiddleWare(this.props.history);
		const authToken = localStorage.getItem('AuthToken');
		axios.defaults.headers.common = { Authorization: `${authToken}` };
		axios
			.get('/user')
			.then((response) => {
				console.log(response.data);
				this.setState({
					firstName: response.data.userCredentials.firstName,
					lastName: response.data.userCredentials.lastName,
					email: response.data.userCredentials.email,
					phoneNumber: response.data.userCredentials.phoneNumber,
					country: response.data.userCredentials.country,
					username: response.data.userCredentials.username,
					uiLoading: false
				});
			})
			.catch((error) => {
				if (error.response.status === 403) {
					this.props.history.push('/login');
				}
				console.log(error);
				this.setState({ errorMsg: 'Error in retrieving the data' });
			});
	};

	handleChange = (event) => {
		this.setState({
			[event.target.name]: event.target.value
		});
	};

	handleImageChange = (event) => {
		this.setState({
			image: event.target.files[0]
		});
	};

	profilePictureHandler = (event) => {
		event.preventDefault();
		this.setState({
			uiLoading: true
		});
		authMiddleWare(this.props.history);
		const authToken = localStorage.getItem('AuthToken');
		let form_data = new FormData();
		form_data.append('image', this.state.image);
		form_data.append('content', this.state.content);
		axios.defaults.headers.common = { Authorization: `${authToken}` };
		axios
			.post('/user/image', form_data, {
				headers: {
					'content-type': 'multipart/form-data'
				}
			})
			.then(() => {
				window.location.reload();
			})
			.catch((error) => {
				if (error.response.status === 403) {
					this.props.history.push('/login');
				}
				console.log(error);
				this.setState({
					uiLoading: false,
					imageError: 'Error in posting the data'
				});
			});
	};

	updateFormValues = (event) => {
		event.preventDefault();
		this.setState({ buttonLoading: true });
		authMiddleWare(this.props.history);
		const authToken = localStorage.getItem('AuthToken');
		axios.defaults.headers.common = { Authorization: `${authToken}` };
		const formRequest = {
			firstName: this.state.firstName,
			lastName: this.state.lastName,
			country: this.state.country
		};
		axios
			.post('/user', formRequest)
			.then(() => {
				this.setState({ buttonLoading: false });
			})
			.catch((error) => {
				if (error.response.status === 403) {
					this.props.history.push('/login');
				}
				console.log(error);
				this.setState({
					buttonLoading: false
				});
			});
	};

	render() {
		const { classes, ...rest } = this.props;
		if (this.state.uiLoading === true) {
			return (
				<main className={classes.content}>
					<div className={classes.toolbar} />
					{this.state.uiLoading && <CircularProgress size={150} className={classes.uiProgess} />}
				</main>
			);
		} else {
			return (
				<main className={classes.content}>
					<div className={classes.toolbar} />
					<Card {...rest} className={clsx(classes.root, classes)}>
						<CardContent>
							<div className={classes.details}>
								<div>
									<Typography className={classes.locationText} gutterBottom variant="h4">
										{this.state.firstName} {this.state.lastName}
									</Typography>
									<Button
										variant="outlined"
										color="primary"
										type="submit"
										size="small"
										startIcon={<CloudUploadIcon />}
										className={classes.uploadButton}
										onClick={this.profilePictureHandler}
									>
										Upload Photo
									</Button>
									<input type="file" onChange={this.handleImageChange} />

									{this.state.imageError ? (
										<div className={classes.customError}>
											{' '}
											Wrong Image Format || Supported Format are PNG and JPG
										</div>
									) : (
										false
									)}
								</div>
							</div>
							<div className={classes.progress} />
						</CardContent>
						<Divider />
					</Card>

					<br />
					<Card {...rest} className={clsx(classes.root, classes)}>
						<form autoComplete="off" noValidate>
							<Divider />
							<CardContent>
								<Grid container spacing={3}>
									<Grid item md={6} xs={12}>
										<TextField
											fullWidth
											label="First name"
											margin="dense"
											name="firstName"
											variant="outlined"
											value={this.state.firstName}
											onChange={this.handleChange}
										/>
									</Grid>
									<Grid item md={6} xs={12}>
										<TextField
											fullWidth
											label="Last name"
											margin="dense"
											name="lastName"
											variant="outlined"
											value={this.state.lastName}
											onChange={this.handleChange}
										/>
									</Grid>
									<Grid item md={6} xs={12}>
										<TextField
											fullWidth
											label="Email"
											margin="dense"
											name="email"
											variant="outlined"
											disabled={true}
											value={this.state.email}
											onChange={this.handleChange}
										/>
									</Grid>
									<Grid item md={6} xs={12}>
										<TextField
											fullWidth
											label="Phone Number"
											margin="dense"
											name="phone"
											type="number"
											variant="outlined"
											disabled={true}
											value={this.state.phoneNumber}
											onChange={this.handleChange}
										/>
									</Grid>
									<Grid item md={6} xs={12}>
										<TextField
											fullWidth
											label="User Name"
											margin="dense"
											name="userHandle"
											disabled={true}
											variant="outlined"
											value={this.state.username}
											onChange={this.handleChange}
										/>
									</Grid>
									<Grid item md={6} xs={12}>
										<TextField
											fullWidth
											label="Country"
											margin="dense"
											name="country"
											variant="outlined"
											value={this.state.country}
											onChange={this.handleChange}
										/>
									</Grid>
								</Grid>
							</CardContent>
							<Divider />
							<CardActions />
						</form>
					</Card>
					<Button
						color="primary"
						variant="contained"
						type="submit"
						className={classes.submitButton}
						onClick={this.updateFormValues}
						disabled={
							this.state.buttonLoading ||
							!this.state.firstName ||
							!this.state.lastName ||
							!this.state.country
						}
					>
						Save details
						{this.state.buttonLoading && <CircularProgress size={30} className={classes.progess} />}
					</Button>
				</main>
			);
		}
	}
}
At the end of this file add the following export:
export default withStyles(styles)(account);
In account.js there are lot of components used. First let's see how our application looks. After that I'll explain all the components that are used and why they are used.
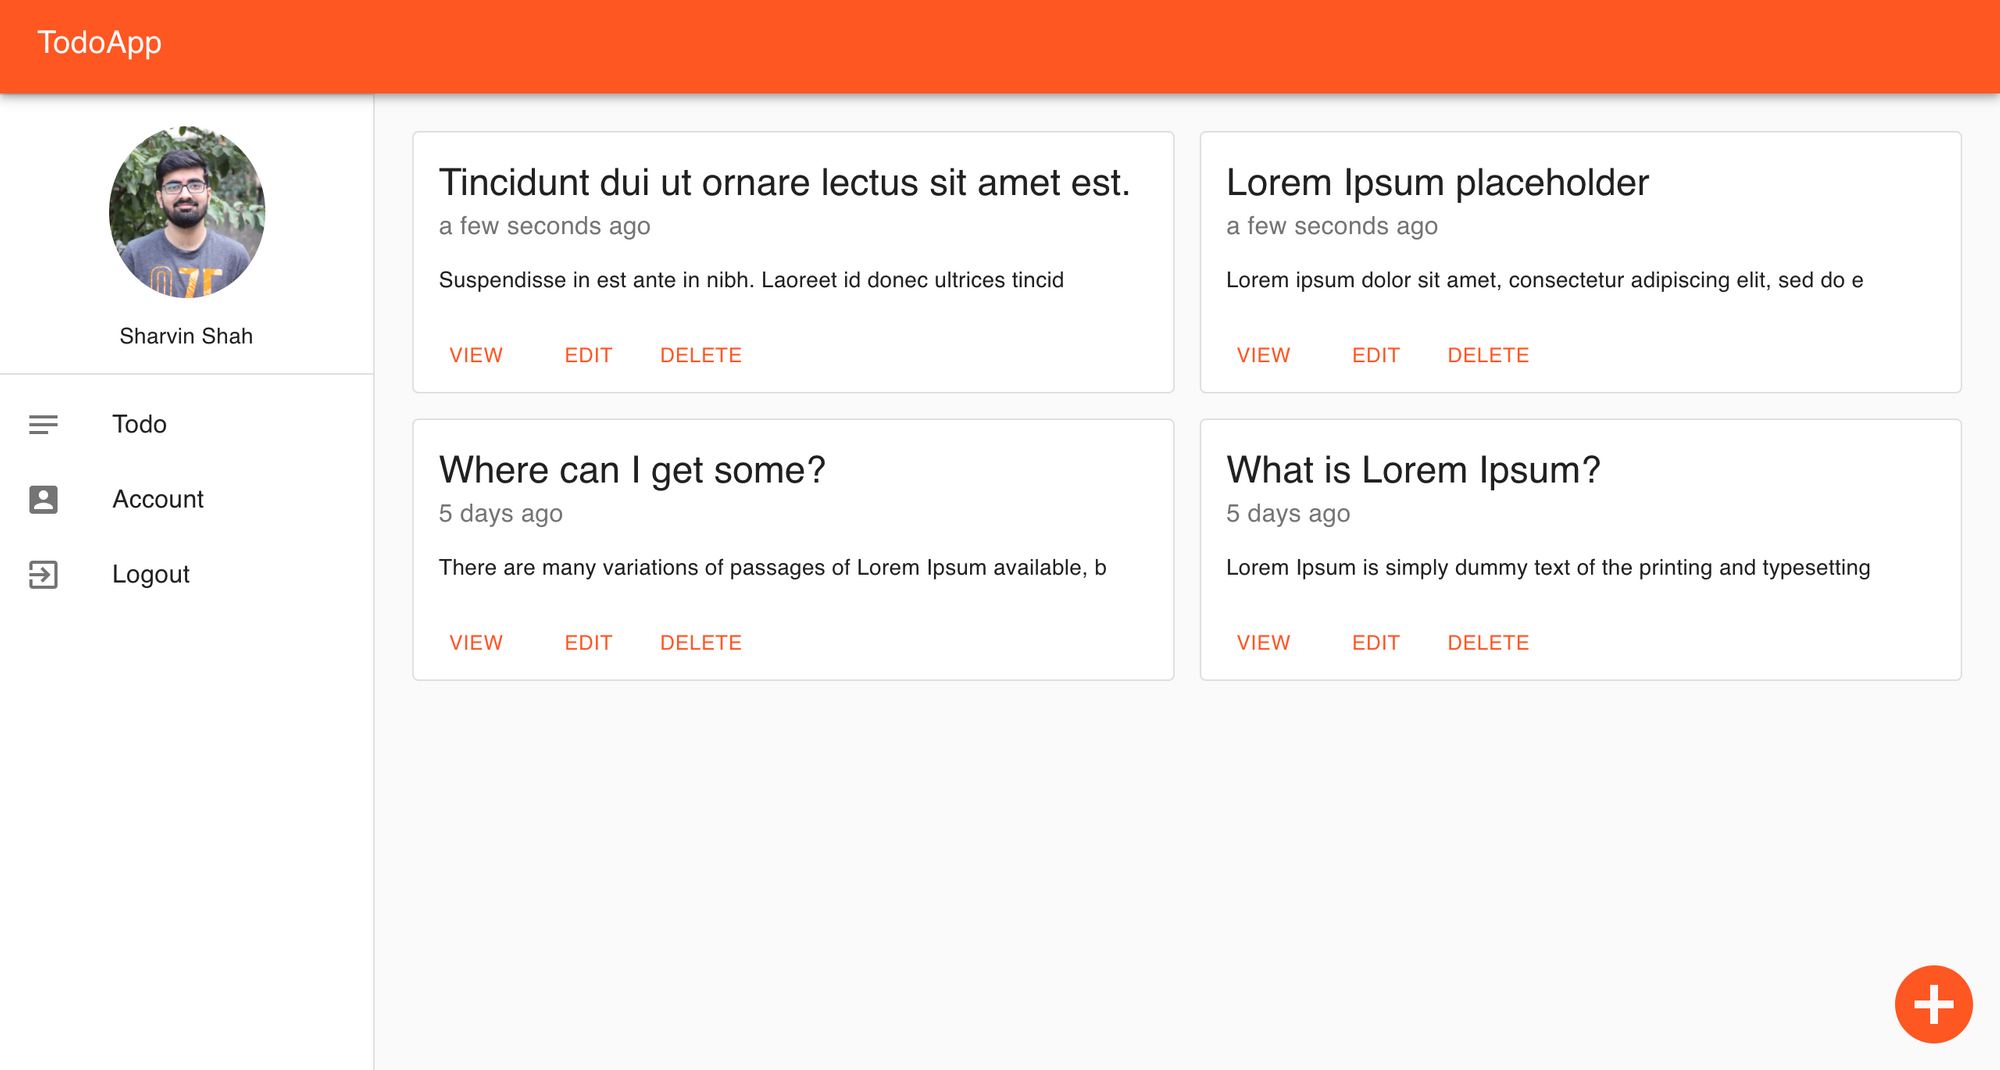
Go to the browser, and if your token is expired it will redirect you to the login page. Add your details and log in again. Once you've done that, go to the Account tab and you will find the following UI:

There are 3 handlers in the Account Section:
- componentWillMount: This is React's inbuilt lifecycle method. We are using it to load the data before the render lifecycle and update our state values.
- ProfilePictureUpdate: This is our custom handler that we are using so that when our user clicks on the Upload Photo button then it will send the data to a server and reload the page to show the user's new Profile Picture.
- updateFormValues: This is also our custom handler to update the User's details. Here, the user can update their first name, last name, and country. We are not allowing email and username updates because our backend logic depends on those keys.
Other than these 3 handlers it is a form page with styling on top of it. Here is the directory structure up to this point inside the view folder:
+-- public
+-- src
|   +-- components
|   +-- +-- todo.js
|   +-- +-- account.js
|   +-- pages
|   +-- +-- home.js
|   +-- +-- login.js
|   +-- +-- signup.js
|   +-- util
|   +-- +-- auth.js
|   +-- README.md
|   +-- package-lock.json
|   +-- package.json
|   +-- .gitignore
With this we have completed our Account Dashboard. Now go have a coffee, take a break and in the next section, we will build the Todo Dashboard.
Section 4: Todo Dashboard
In this section, we are going to develop the UI for these features of the Todos Dashboard:
- Add a Todo:
- Get all todos:
- Delete a todo
- Edit a todo
- Get a todo
- Applying Theme
The Todo Dashboard code implemented in this section can be found at this commit.
Go to todos.js under the components directory. Add the following imports to the existing imports:
import Button from '@material-ui/core/Button';
import Dialog from '@material-ui/core/Dialog';
import AddCircleIcon from '@material-ui/icons/AddCircle';
import AppBar from '@material-ui/core/AppBar';
import Toolbar from '@material-ui/core/Toolbar';
import IconButton from '@material-ui/core/IconButton';
import CloseIcon from '@material-ui/icons/Close';
import Slide from '@material-ui/core/Slide';
import TextField from '@material-ui/core/TextField';
import Grid from '@material-ui/core/Grid';
import Card from '@material-ui/core/Card';
import CardActions from '@material-ui/core/CardActions';
import CircularProgress from '@material-ui/core/CircularProgress';
import CardContent from '@material-ui/core/CardContent';
import MuiDialogTitle from '@material-ui/core/DialogTitle';
import MuiDialogContent from '@material-ui/core/DialogContent';

import axios from 'axios';
import dayjs from 'dayjs';
import relativeTime from 'dayjs/plugin/relativeTime';
import { authMiddleWare } from '../util/auth';
We also need to add the following CSS elements in the existing style components:
const styles = (theme) => ({
	.., // Existing CSS elements
	title: {
		marginLeft: theme.spacing(2),
		flex: 1
	},
	submitButton: {
		display: 'block',
		color: 'white',
		textAlign: 'center',
		position: 'absolute',
		top: 14,
		right: 10
	},
	floatingButton: {
		position: 'fixed',
		bottom: 0,
		right: 0
	},
	form: {
		width: '98%',
		marginLeft: 13,
		marginTop: theme.spacing(3)
	},
	toolbar: theme.mixins.toolbar,
	root: {
		minWidth: 470
	},
	bullet: {
		display: 'inline-block',
		margin: '0 2px',
		transform: 'scale(0.8)'
	},
	pos: {
		marginBottom: 12
	},
	uiProgess: {
		position: 'fixed',
		zIndex: '1000',
		height: '31px',
		width: '31px',
		left: '50%',
		top: '35%'
	},
	dialogeStyle: {
		maxWidth: '50%'
	},
	viewRoot: {
		margin: 0,
		padding: theme.spacing(2)
	},
	closeButton: {
		position: 'absolute',
		right: theme.spacing(1),
		top: theme.spacing(1),
		color: theme.palette.grey[500]
	}
});
We will add the transition for the pop up dialogue box:
const Transition = React.forwardRef(function Transition(props, ref) {
	return <Slide direction="up" ref={ref} {...props} />;
});
Remove the existing todo class and copy-paste the following class:
class todo extends Component {
	constructor(props) {
		super(props);

		this.state = {
			todos: '',
			title: '',
			body: '',
			todoId: '',
			errors: [],
			open: false,
			uiLoading: true,
			buttonType: '',
			viewOpen: false
		};

		this.deleteTodoHandler = this.deleteTodoHandler.bind(this);
		this.handleEditClickOpen = this.handleEditClickOpen.bind(this);
		this.handleViewOpen = this.handleViewOpen.bind(this);
	}

	handleChange = (event) => {
		this.setState({
			[event.target.name]: event.target.value
		});
	};

	componentWillMount = () => {
		authMiddleWare(this.props.history);
		const authToken = localStorage.getItem('AuthToken');
		axios.defaults.headers.common = { Authorization: `${authToken}` };
		axios
			.get('/todos')
			.then((response) => {
				this.setState({
					todos: response.data,
					uiLoading: false
				});
			})
			.catch((err) => {
				console.log(err);
			});
	};

	deleteTodoHandler(data) {
		authMiddleWare(this.props.history);
		const authToken = localStorage.getItem('AuthToken');
		axios.defaults.headers.common = { Authorization: `${authToken}` };
		let todoId = data.todo.todoId;
		axios
			.delete(`todo/${todoId}`)
			.then(() => {
				window.location.reload();
			})
			.catch((err) => {
				console.log(err);
			});
	}

	handleEditClickOpen(data) {
		this.setState({
			title: data.todo.title,
			body: data.todo.body,
			todoId: data.todo.todoId,
			buttonType: 'Edit',
			open: true
		});
	}

	handleViewOpen(data) {
		this.setState({
			title: data.todo.title,
			body: data.todo.body,
			viewOpen: true
		});
	}

	render() {
		const DialogTitle = withStyles(styles)((props) => {
			const { children, classes, onClose, ...other } = props;
			return (
				<MuiDialogTitle disableTypography className={classes.root} {...other}>
					<Typography variant="h6">{children}</Typography>
					{onClose ? (
						<IconButton aria-label="close" className={classes.closeButton} onClick={onClose}>
							<CloseIcon />
						</IconButton>
					) : null}
				</MuiDialogTitle>
			);
		});

		const DialogContent = withStyles((theme) => ({
			viewRoot: {
				padding: theme.spacing(2)
			}
		}))(MuiDialogContent);

		dayjs.extend(relativeTime);
		const { classes } = this.props;
		const { open, errors, viewOpen } = this.state;

		const handleClickOpen = () => {
			this.setState({
				todoId: '',
				title: '',
				body: '',
				buttonType: '',
				open: true
			});
		};

		const handleSubmit = (event) => {
			authMiddleWare(this.props.history);
			event.preventDefault();
			const userTodo = {
				title: this.state.title,
				body: this.state.body
			};
			let options = {};
			if (this.state.buttonType === 'Edit') {
				options = {
					url: `/todo/${this.state.todoId}`,
					method: 'put',
					data: userTodo
				};
			} else {
				options = {
					url: '/todo',
					method: 'post',
					data: userTodo
				};
			}
			const authToken = localStorage.getItem('AuthToken');
			axios.defaults.headers.common = { Authorization: `${authToken}` };
			axios(options)
				.then(() => {
					this.setState({ open: false });
					window.location.reload();
				})
				.catch((error) => {
					this.setState({ open: true, errors: error.response.data });
					console.log(error);
				});
		};

		const handleViewClose = () => {
			this.setState({ viewOpen: false });
		};

		const handleClose = (event) => {
			this.setState({ open: false });
		};

		if (this.state.uiLoading === true) {
			return (
				<main className={classes.content}>
					<div className={classes.toolbar} />
					{this.state.uiLoading && <CircularProgress size={150} className={classes.uiProgess} />}
				</main>
			);
		} else {
			return (
				<main className={classes.content}>
					<div className={classes.toolbar} />

					<IconButton
						className={classes.floatingButton}
						color="primary"
						aria-label="Add Todo"
						onClick={handleClickOpen}
					>
						<AddCircleIcon style={{ fontSize: 60 }} />
					</IconButton>
					<Dialog fullScreen open={open} onClose={handleClose} TransitionComponent={Transition}>
						<AppBar className={classes.appBar}>
							<Toolbar>
								<IconButton edge="start" color="inherit" onClick={handleClose} aria-label="close">
									<CloseIcon />
								</IconButton>
								<Typography variant="h6" className={classes.title}>
									{this.state.buttonType === 'Edit' ? 'Edit Todo' : 'Create a new Todo'}
								</Typography>
								<Button
									autoFocus
									color="inherit"
									onClick={handleSubmit}
									className={classes.submitButton}
								>
									{this.state.buttonType === 'Edit' ? 'Save' : 'Submit'}
								</Button>
							</Toolbar>
						</AppBar>

						<form className={classes.form} noValidate>
							<Grid container spacing={2}>
								<Grid item xs={12}>
									<TextField
										variant="outlined"
										required
										fullWidth
										id="todoTitle"
										label="Todo Title"
										name="title"
										autoComplete="todoTitle"
										helperText={errors.title}
										value={this.state.title}
										error={errors.title ? true : false}
										onChange={this.handleChange}
									/>
								</Grid>
								<Grid item xs={12}>
									<TextField
										variant="outlined"
										required
										fullWidth
										id="todoDetails"
										label="Todo Details"
										name="body"
										autoComplete="todoDetails"
										multiline
										rows={25}
										rowsMax={25}
										helperText={errors.body}
										error={errors.body ? true : false}
										onChange={this.handleChange}
										value={this.state.body}
									/>
								</Grid>
							</Grid>
						</form>
					</Dialog>

					<Grid container spacing={2}>
						{this.state.todos.map((todo) => (
							<Grid item xs={12} sm={6}>
								<Card className={classes.root} variant="outlined">
									<CardContent>
										<Typography variant="h5" component="h2">
											{todo.title}
										</Typography>
										<Typography className={classes.pos} color="textSecondary">
											{dayjs(todo.createdAt).fromNow()}
										</Typography>
										<Typography variant="body2" component="p">
											{`${todo.body.substring(0, 65)}`}
										</Typography>
									</CardContent>
									<CardActions>
										<Button size="small" color="primary" onClick={() => this.handleViewOpen({ todo })}>
											{' '}
											View{' '}
										</Button>
										<Button size="small" color="primary" onClick={() => this.handleEditClickOpen({ todo })}>
											Edit
										</Button>
										<Button size="small" color="primary" onClick={() => this.deleteTodoHandler({ todo })}>
											Delete
										</Button>
									</CardActions>
								</Card>
							</Grid>
						))}
					</Grid>

					<Dialog
						onClose={handleViewClose}
						aria-labelledby="customized-dialog-title"
						open={viewOpen}
						fullWidth
						classes={{ paperFullWidth: classes.dialogeStyle }}
					>
						<DialogTitle id="customized-dialog-title" onClose={handleViewClose}>
							{this.state.title}
						</DialogTitle>
						<DialogContent dividers>
							<TextField
								fullWidth
								id="todoDetails"
								name="body"
								multiline
								readonly
								rows={1}
								rowsMax={25}
								value={this.state.body}
								InputProps={{
									disableUnderline: true
								}}
							/>
						</DialogContent>
					</Dialog>
				</main>
			);
		}
	}
}
At the end of this file add the following export:
export default withStyles(styles)(todo);
First we will understand how our UI works and after that we will understand the code. Go to the browser and you'll get the following UI:

Click on the Add button at the bottom right corner and you’ll get the following screen:
Add the Todo title and details and press the submit button. You’ll get the following screen:
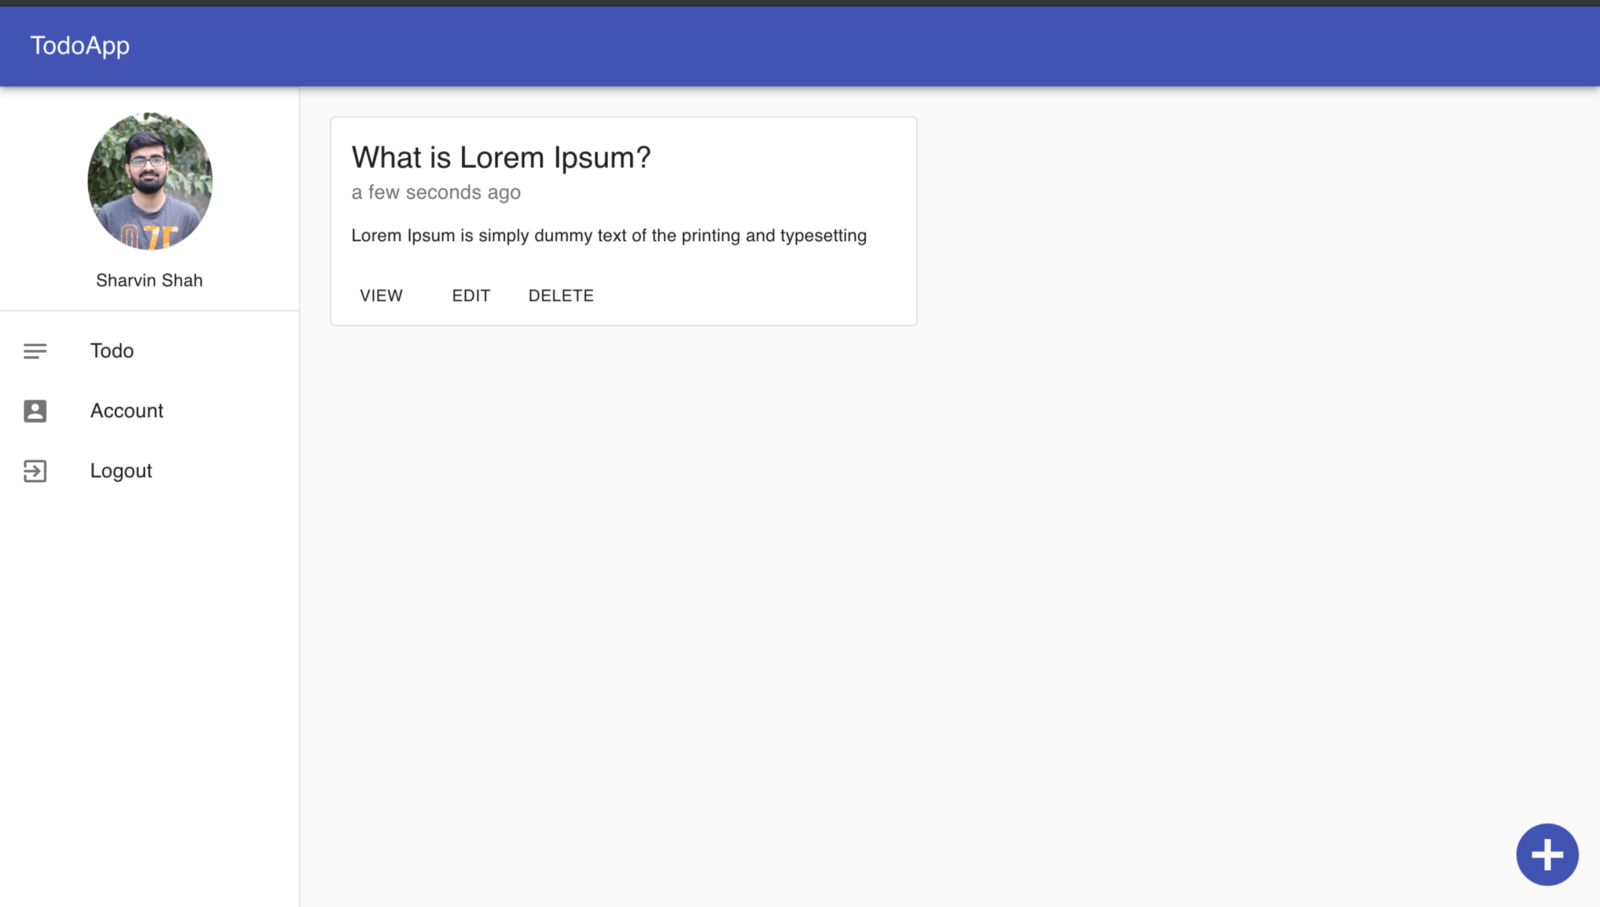
After this click on the view button and you’ll be able to see the full details of the Todo:
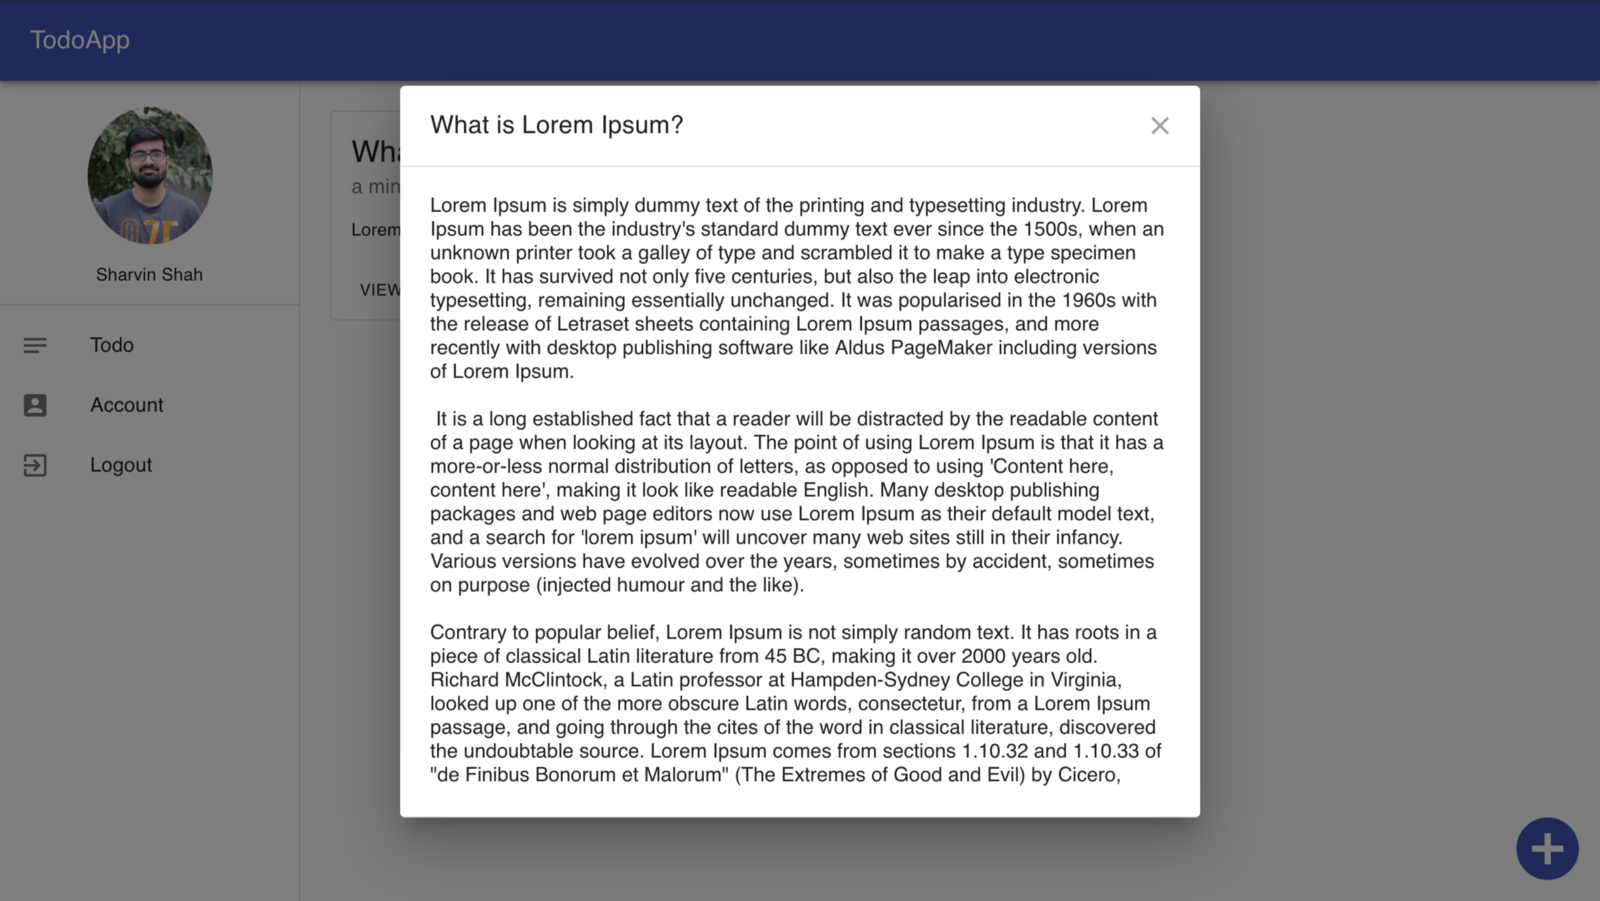
Click on the Edit button and you’ll be able to edit the todo:

Click the delete button and you’ll be able to delete the Todo. Now as we are aware of how Dashboard works, we will understand the components used in it.
1. Add Todo: For implementing the add todo we will use the Dialogue component of Material UI. This component implements a hook functionality. We are using the classes so we will remove that functionality.
// This sets the state to open and buttonType flag to add:
const handleClickOpen = () => {
      this.setState({
           todoId: '',
           title: '',
           body: '',
           buttonType: '',
           open: true
     });
};

// This sets the state to close:
const handleClose = (event) => {
      this.setState({ open: false });
};
Other than this we will also change the placement of the Add Todo Button.
// Position our button
floatingButton: {
    position: 'fixed',
    bottom: 0,
    right: 0
},

<IconButton className={classes.floatingButton} ... >
Now we will replace the list tag with a form inside this Dialogue. It will help us in adding the new todo.
// Show Edit or Save depending on buttonType state
{this.state.buttonType === 'Edit' ? 'Save' : 'Submit'}

// Our Form to add a todo
<form className={classes.form} noValidate>
	<Grid container spacing={2}>
		<Grid item xs={12}>
        // TextField here
        </Grid>
        <Grid item xs={12}>
        // TextField here
        </Grid>
    </Grid>
</form>
The handleSubmit consists of logic to read the buttonType state. If the state is an empty string (“”) then it will post on the Add Todo API. If the state is an Edit then in that scenario it will update the Edit Todo.
2. Get Todos: To display the todos we will use the Grid container and inside it, we place the Grid item . Inside that, we will use a Card component to display the data.
<Grid container spacing={2}>
    {this.state.todos.map((todo) => (
	<Grid item xs={12} sm={6}>
	<Card className={classes.root} variant="outlined">
	    <CardContent>
        // Here will show Todo with view, edit and delete button
        </CardContent>
    </Card>
    </Grid>))}
</Grid>
We use the map to display the todo item as the API sends them in a list. We will use the componentWillMount lifecycle to get and set the state before the render is executed. There are 3 buttons ( view, edit, and delete ) so we will need 3 Handlers to handle the operation when the button is clicked. We will learn about these buttons in their respective subsections.
3. Edit Todo: For the edit todo, we are reusing the dialogue pop up code that is used in add todo. To differentiate between the button clicks we are using a buttonType state. For Add Todo the buttonType state is (“”) while for edit todo it is Edit.
handleEditClickOpen(data) {
	this.setState({
		..,
		buttonType: 'Edit',
		..
	});
}
In the handleSubmit method we read the buttonType state and then send the request accordingly.
4. Delete Todo: When this button is clicked we send the todo object to our deleteTodoHandler and then it sends the request further to the backend.
<Button size="small" onClick={() => this.deleteTodoHandler({ todo })}>Delete</Button>5. View Todo: When showing the data we have truncated it so that the user will get a glimpse of what the todo is about. But if a user wants to know more about it then they need to click on the view button.
For this, we will use the Customised dialogue. Inside that, we use DialogTitle and DialogContent. It displays our title and content. In DialougeContent we will use the form to display the content that the user has posted. (This is one solution that I found there are many and you are free to try other.)
// This is used to remove the underline of the Form
InputProps={{
       disableUnderline: true
}}

// This is used so that user cannot edit the data
readonly
6. Applying Theme: This is the last step of our application. We will apply a theme on our application. For this we are using createMuiTheme and ThemeProvider from material UI. Copy-paste the following code in App.js:
import { ThemeProvider as MuiThemeProvider } from '@material-ui/core/styles';
import createMuiTheme from '@material-ui/core/styles/createMuiTheme';

const theme = createMuiTheme({
	palette: {
		primary: {
			light: '#33c9dc',
			main: '#FF5722',
			dark: '#d50000',
			contrastText: '#fff'
		}
	}
});

function App() {
	return (
        <MuiThemeProvider theme={theme}>
        // Router and switch will be here.
        </MuiThemeProvider>
    );
}
We missed applying a theme to our button in todo.js in the CardActions . Add the color tag for the view, edit, and delete button.
<Button size="small" color="primary" ...>Go to the browser and you will find that everything is the same except that the app is a different color.
And we're done! We have built a TodoApp using ReactJS and Firebase. If you have built it all the way to this point then a very big congratulations to you on this achievement.
Feel free to connect with me on Twitter and Github.