

Get ready for the summer by building your own road trip mapping app with this step-by-step guide!
- What are we going to build?
- What do we need before we get started?
- Step 1: Cleaning up some unneeded code
- Step 2: Create our road trip locations
- Step 3: Prepare our app with some functions
- Step 4: Building our trip path
- Step 5: Styling our map components
- Want to learn more about maps?
Author’s Note: Even though we’re going through some challenging times, we can still be optimistic that we’ll get through this together and be able to enjoy our summer. Stay safe and wash your hands. ❤️
What are we going to build?
We’ll be walking through building a new mapping app that shows a route representing the trip. Each location will have a little card where we can add a picture and some things we did.

To get started, we’re going to use this Leaflet Gatsby Starter I created to make the initial setup a little smoother. With our app bootstrapped, we’ll create our list of locations and use Leaflet’s API to draw our route on the map.
Woah, a mapping app?
Yup. If you haven’t played with maps before, don’t be discouraged! It's not as bad as you probably think. If you’d rather start with mapping basics, you can read more about how mapping works first.
What do we need before we get started?
If you followed along with my last tutorial for building a Santa Tracker, you can follow the same steps to get started. If not, we’ll want to make sure we have the following set up:
- node or yarn - I'll be using yarn, but you can substitute with npm where appropriate
- Gatsby’s CLI -
yarn global add gatsby-cli
If you’re not sure about one of the above items, you can try checking out the beginning of my previous tutorial.
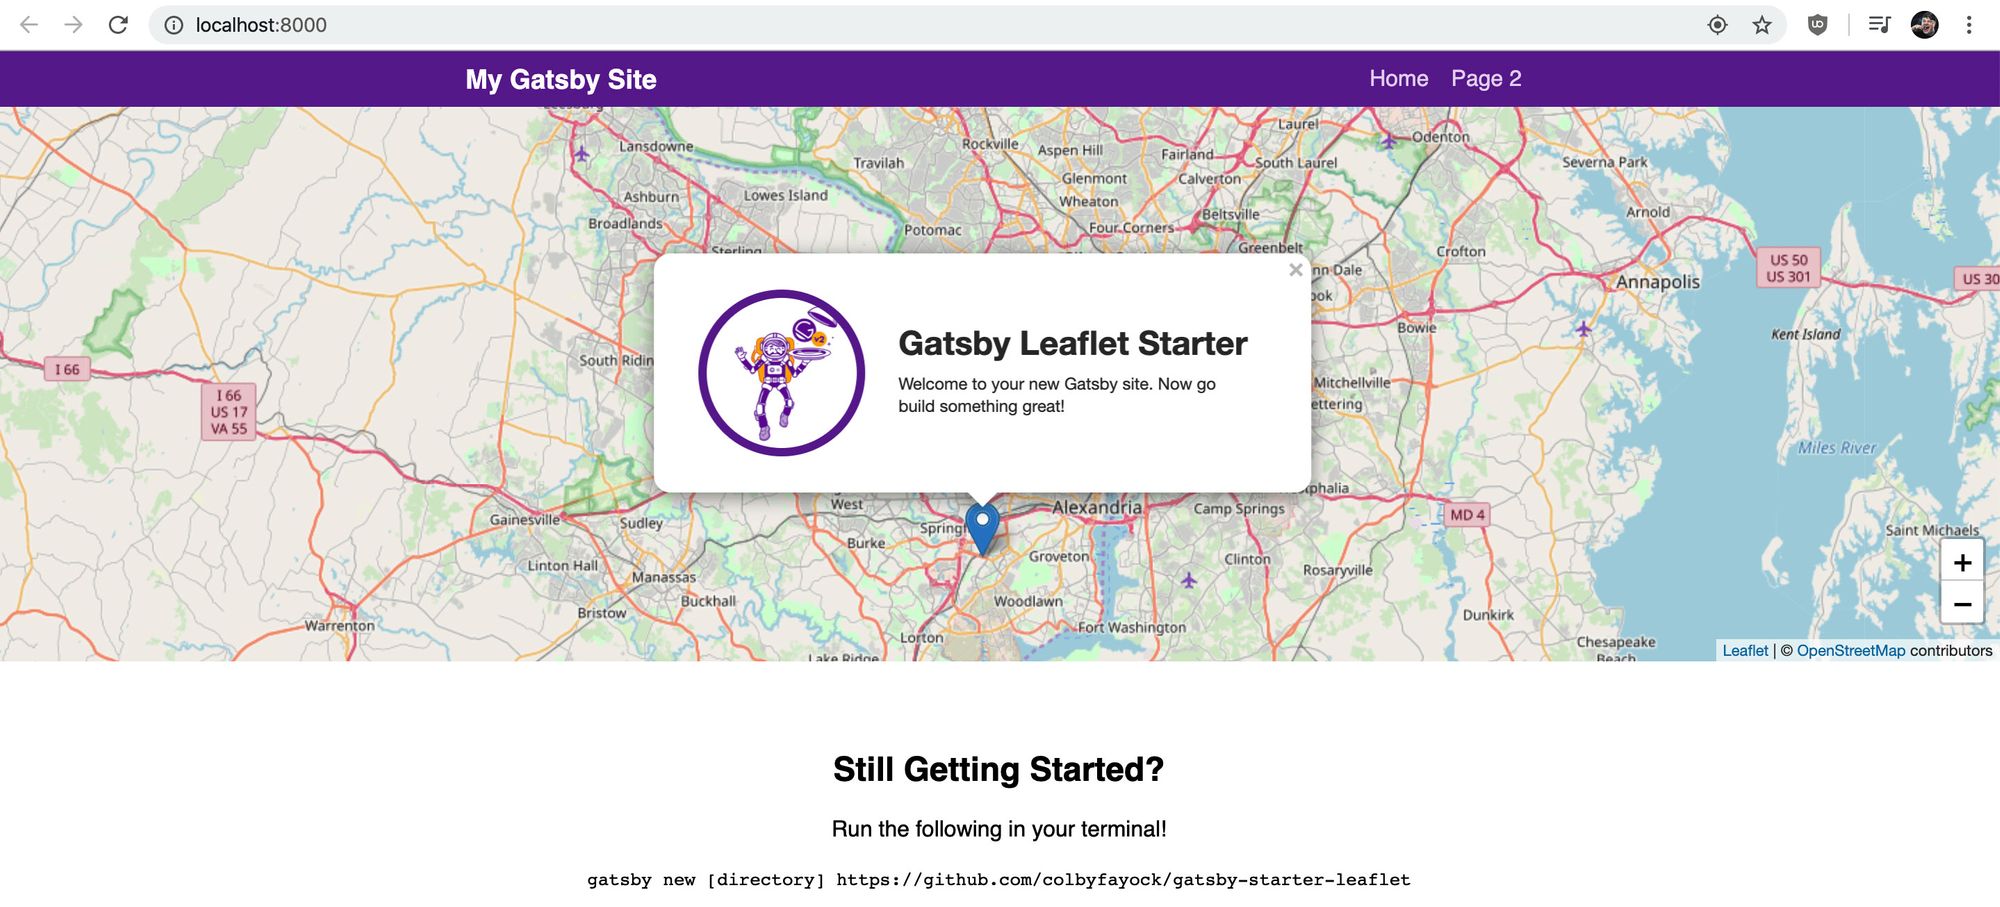
We’ll also want to set up a foundation for our map. We can do this by utilizing the Leaflet Gatsby Starter I put together that provides us a basic setup with Leaflet and React Leaflet.
gatsby new my-road-trip https://github.com/colbyfayock/gatsby-starter-leaflet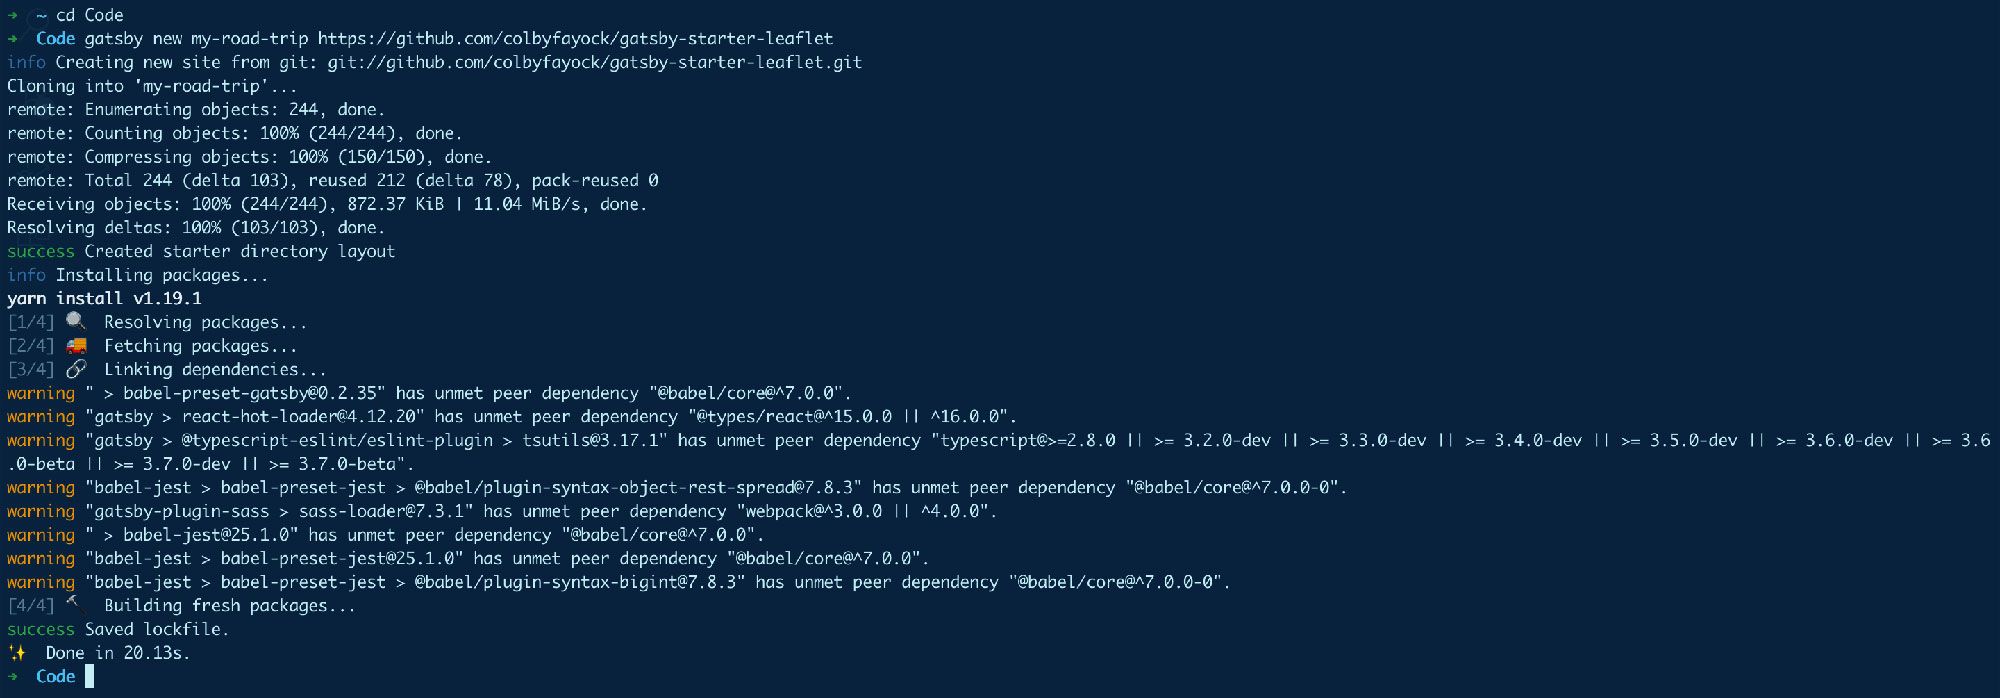
After that’s finished running, you can navigate to the newly created project directory and start your local development server:
cd my-road-trip
yarn develop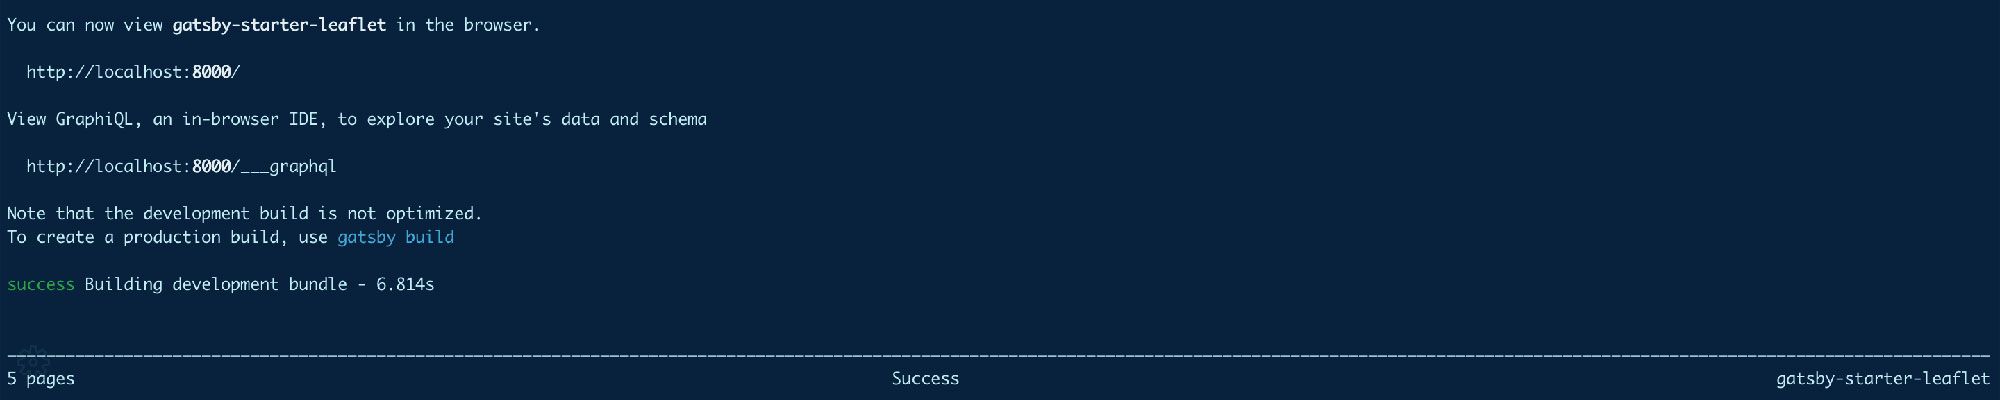
If all goes as planned, your server should start and you should now be able to see your basic mapping app in your browser!
Step 1: Cleaning up some unneeded code
The Gatsby Starter we're using to spin up this app comes with some demo code that we don’t need here. We’ll want to make all of the changes below in the file src/pages/index.js, which is the homepage of our app.
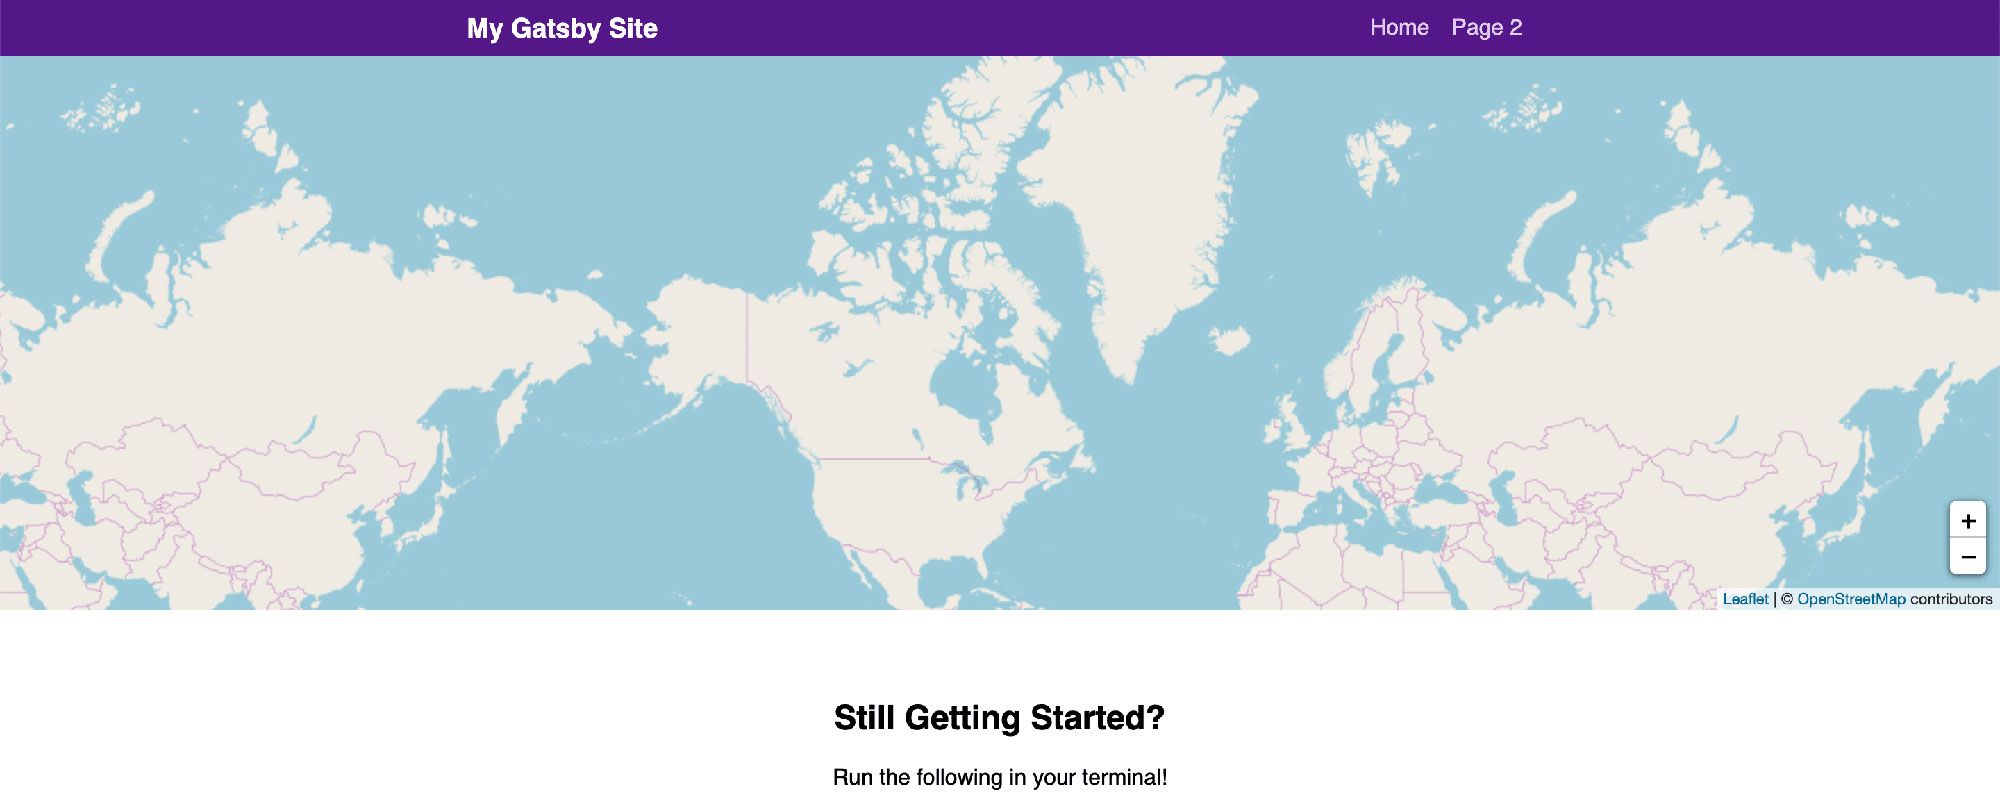
First, let’s remove everything from the mapEffect function. This function is used to run code that fires when the map renders.
// In src/pages/index.js

async function mapEffect({ leafletElement } = {}) {
  // Get rid of everything in here
}
Next, we don’t want a marker this time, so let’s remove the <Marker component from our <Map component:
<Map {…mapSettings} />Now that we have those pieces cleared out, we can remove all of the following imports and variables from the top of our file:
- useRef
- Marker
- promiseToFlyTo
- getCurrentLocation
- gatsby_astronaut
- timeToZoom
- timeToOpenPopupAfterZoom
- timeToUpdatePopupAfterZoom
- ZOOM
- popupContentHello
- popupContentGatsby
- markerRef
After, our map should still work, but not do anything.
Step 2: Create our road trip locations
This step will involve preparing our location data that will populate our road trip app. Our locations will include properties like a name, date, things we did, and a picture if we want.
First, create a new file in the src/data directory called locations.js. Inside of that file, we want to create and export a new array.
export const locations = [
  {
    placename: ‘Herndon, VA’,
    date: ‘August 1, 2015’,
    location: {
      lat: 38.958988,
      lng: -77.417320
    },
    todo: [
      ‘Where we start! ?’
    ]
  },
  {
    placename: ‘Middlesboro, KY',
    date: ‘August 1, 2015’,
    location: {
      lat: 36.627517,
      lng: -83.621635
    },
    todo: [
      ‘Cumberland Gap ?’
    ]
  }
];
You can use the above to get started, but you’ll eventually want to change the details to something of your choosing.
If you want to add an image to your location, you can do so by including an image property to the object. You can use either a URL string or you can import a local file if you have one available, like I’m doing in this example:
import imgHerndonStart from 'assets/images/herndon-start.jpg’;

export const locations = [
  {
    placename: ‘Herndon, VA’,
    date: ‘August 1, 2015’,
    image: imgHerndonStart,
    location: {
      lat: 38.958988,
      lng: -77.417320
    },
    todo: [
      ‘Where we start! ?’
    ]
  }
]
Once we have that file created, we can now import our locations into our src/pages/index.js file so we can use it in our next step:
import { locations } from 'data/locations’;
If you add a console.log(locations) inside of your page, you should now see all of your location data in an array!
Step 3: Prepare our app with some functions
To try to keep things simple and focused, I grouped together 3 important components of creating our map into functions. Though it’s available to copy and paste, we’ll walk through what’s happening in each function.
You can place each of these functions at the bottom of the src/pages/index.js file so they’re ready to use in our next step.
createTripPointsGeoJson
Our first function is going to take the array of our locations and return a GeoJSON document, with our locations mapped into an individual Feature. We’ll use this function to create the individual points on our map.
What is a GeoJSON document? It's essentially a JavaScript object or JSON document with a specific structure that creates consistency with geographical data.
function createTripPointsGeoJson({ locations } = {}) {
  return {
    “type”: “FeatureCollection”,
    “features”: locations.map(({ placename, location = {}, image, date, todo = [] } = {}) => {
      const { lat, lng } = location;
      return {
        “type”: “Feature”,
        “properties”: {
          placename,
          todo,
          date,
          image
        },
        “geometry”: {
          “type”: “Point”,
          “coordinates”: [ lng, lat ]
        }
      }
    })
  }
}
So what’s happening in the above?
- We take an argument of locations, which will be our array of destinations
- We return an object with some dynamic properties associated with it
- Within the object, we map our locations to individual
Featureobjects - Each object includes a
Pointshape using our coordinates - It additionally includes our properties that store our metadata
When this function is invoked, we will have a newly created JavaScript object that includes an array of Points representing the locations we are stopping at on our road trip.
createTripLinesGeoJson
We’re going to create another function that’s similar to the previous one. This time however, instead of points, we want to create lines that represent going from one point to the next.
function createTripLinesGeoJson({ locations } = {}) {
  return {
    “type”: “FeatureCollection”,
    “features”: locations.map((stop = {}, index) => {
      const prevStop = locations[index - 1];

      if ( !prevStop ) return [];

      const { placename, location = {}, date, todo = [] } = stop;
      const { lat, lng } = location;
      const properties = {
        placename,
        todo,
        date
      };

      const { location: prevLocation = {} } = prevStop;
      const { lat: prevLat, lng: prevLng } = prevLocation;

      return {
        type: ‘Feature’,
        properties,
        geometry: {
          type: ‘LineString’,
          coordinates: [
            [ prevLng, prevLat ],
            [ lng, lat ]
          ]
        }
      }
    })
  }
}
So you’ll immediately notice that this is very similar to our last function. We’re returning an object and setting our metadata properties on a list of Features.
The big difference, however, is that we're creating a Line. To do this, we're looking up and referring to prevStop which will be the previous stop. We’ll use both the previous stop and our current stop in order to have 2 points which we can use to draw the line.
If we don’t have a previous stop, we return an empty array, which basically means we’re at the beginning of our journey with no line before it.
With the previous stop and current stop, we create a LineString type of Feature with our 2 points.
tripStopPointToLayer
Our last function is going to allow us to create custom content for each of the points that we will be adding to our map. We’ll actually be utilizing this function within a Leaflet property, so we’ll be conforming our arguments to that specification.
function tripStopPointToLayer( feature = {}, latlng ) {
  const { properties = {} } = feature;
  const { placename, todo = [], image, date } = properties;

  const list = todo.map(what => `<li>${ what }</li>`);
  let listString = ‘’;
  let imageString = ‘’;

  if ( Array.isArray(list) && list.length > 0 ) {
    listString = list.join(‘’);
    listString = `
      <p>Things we will or have done…</p>
      <ul>${listString}</ul>
    `
  }

  if ( image ) {
    imageString = `
      <span class=“trip-stop-image” style=“background-image: url(${image})”>${placename}</span>
    `;
  }

  const text = `
    <div class=“trip-stop”>
      ${ imageString }
      <div class=“trip-stop-content”>
        <h2>${placename}</h2>
        <p class=“trip-stop-date”>${date}</p>
        ${ listString }
      </div>
    </div>
  `;

  const popup = L.popup({
    maxWidth: 400
  }).setContent(text);

  const layer = L.marker( latlng, {
    icon: L.divIcon({
      className: ‘icon’,
      html: `<span class=“icon-trip-stop”></span>`,
      iconSize: 20
    }),
    riseOnHover: true
  }).bindPopup(popup);

  return layer;
}
One thing you’ll notice as we work through this function is that we create strings of HTML text. Given that the Leaflet API we’re utilizing for this doesn’t interface directly with React, we have to build out HTML manually to pass it in to our functions.
Starting from the top:
- We take in 2 arguments,
featureandlatlng. Leaflet passes these 2 values in for us to use in our function. - We destructure our feature, allowing us to assign our metadata into variables
- 2 string variables are initialized that we’ll use for our HTML
- If we include a
todoproperty as an array, we add a new list with each item inside. - If we include an image, we create an image tag.
- With our newly created HTML strings, we construct the entirety of what will be our popup card for each strop
- With our popup HTML, we create a Leaflet
popupinstance - With the latlng argument and our popup, we create a new Leaflet
markerinstance. This will represent the point on the map. - Inside of the Marker creation, we create a basic HTML tag that well use to style the marker
- We then bind our popup to this new Marker instance. This will allow the popup to be associated with that individual Marker
- Finally, we return our newly created layer
Remember to make sure you put all of the functions above at the bottom of your src/pages/index.js page.
Once all of those functions are added, our map should still be the same thing, basically nothing happening.
Step 4: Building our trip path
This is where things get interesting. We’ll now utilize the functions we created to build our road trip path. All of our work here will be within the mapEffect function inside of the src/pages/index.js file.
For context, our mapEffect function includes an argument called leafletElement. This value refers to the Map instance that Leaflet recognizes. This Map instance includes our map state as well as many utility functions to work with our map.
First, at the top of the function, we want to make sure we have a map. If not, we can return to bail out of the function.
if ( !leafletElement ) return;
Next, we want to use the eachLayer utility function and remove each layer from our map element. We do this to make sure we always have the correct map layer state.
leafletElement.eachLayer((layer) => leafletElement.removeLayer(layer));With our cleaned up map, we can utilize 2 of the functions we created to create new GeoJSON objects.
const tripPoints = createTripPointsGeoJson({ locations });
const tripLines = createTripLinesGeoJson({ locations });
With our GeoJSON objects, we need to convert those to Leaflet GeoJSON instances, which we’ll use to add to the map.
const tripPointsGeoJsonLayers = new L.geoJson(tripPoints, {
  pointToLayer: tripStopPointToLayer
});

const tripLinesGeoJsonLayers = new L.geoJson(tripLines);
If you notice in the above, we're using our tripStopPointToLayer function. As I alluded to before, the geoJson instance we’re creating includes a property that allows us to pass in a function, giving us the ability to manipulate the layer creation. This is how we create our point and popup content.
We can proceed to adding both of those new layers to our map using the addTo .
tripPointsGeoJsonLayers.addTo(leafletElement);
tripLinesGeoJsonLayers.addTo(leafletElement);
Next, to make sure we zoom and center on the right location, we want to grab the bounds of the map using the getBounds function on our GeoJSON layer instance.
const bounds = tripPointsGeoJsonLayers.getBounds();
Finally, we fit our map's view to those bounds using the fitBounds function on our Map instance.
leafletElement.fitBounds(bounds);
Once you save and reload the page, you should now see a blue path representing the jump from each of our locations on the map!
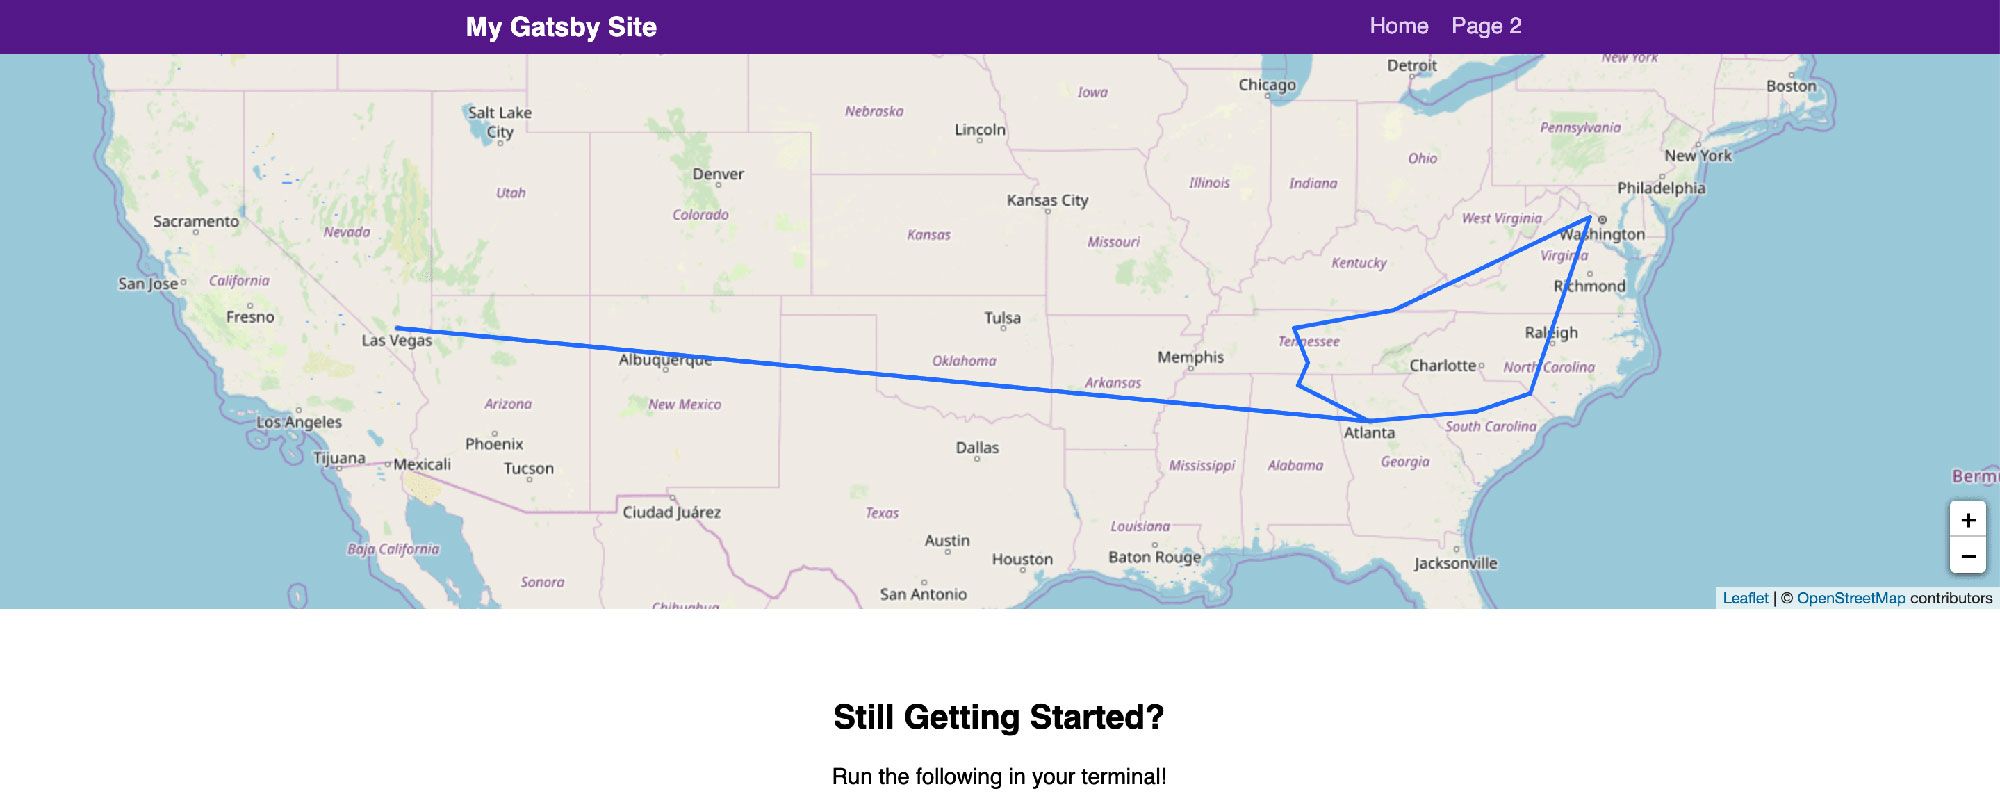
One issue though. If you notice, we only see the path. This is because we need to add some CSS which we’ll get to in the next step.
Step 5: Styling our map components
Our last step will be adding some styles that will allow our markers to show and our popups to look just right.
In this step, we’ll be working inside of the _home.scss file, which you can find in src/assets/stylesheets/pages.
We can get started by copy and pasting this block of styles into the bottom of that file. With that done, we can walk through what’s happening.
.trip-stop {

  width: 400px;
  overflow: hidden;

  h2 {
    font-size: 1.4em;
    margin-top: 0;
    margin-bottom: .2em;
  }

  p,
  ul,
  h3 {
    font-size: 1.2em;
    font-weight: normal;
  }

  p {
    margin: .2em 0;
  }

  .trip-stop-date {
    color: $grey-600;
    font-size: 1em;
  }

  ul {
    padding: 0 0 0 1.4em;
    margin: 0;
  }

}

.trip-stop-image {
  display: block;
  float: left;
  overflow: hidden;
  width: 150px;
  height: 150px;
  text-indent: 100%;
  color: transparent;
  background-position: center;
  background-size: cover;
}

.trip-stop-content {
  float: left;
  width: 250px;
  padding-left: 1em;
}

.icon-trip-stop {

  display: block;
  width: 1.5em;
  height: 1.5em;
  background-color: $orange-500;
  border-radius: 100%;
  box-shadow: 0 2px 5px rgba(0,0,0,.5);

  &:hover {
    background-color: $deep-orange-400;
  }

}
There’s three components to our styles above:
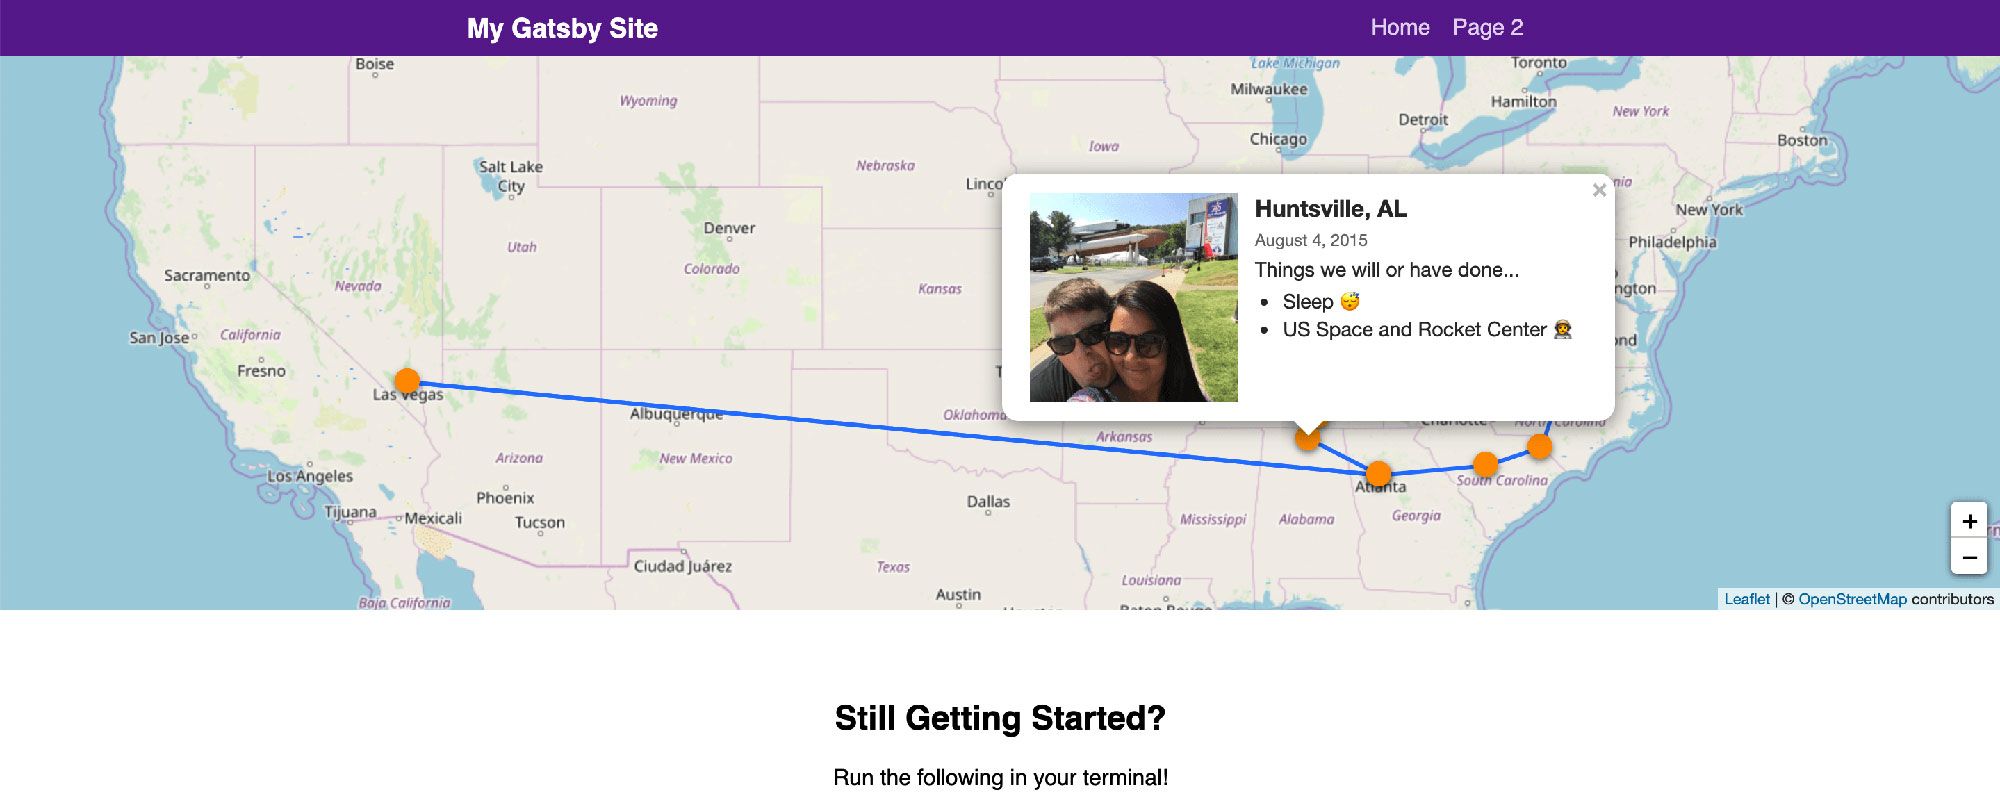
.trip-stop-images: Inside of the marker popup, we optionally can include an image. These styles set the size, make the text transparent, (it’s there for accessibility), and float it to the left so that our popup content can align correctly side by side..trip-stop-content: This refers to the other half of our popup content. All we need to do here is make sure our size is appropriate and that it floats next to our image..icon-trip-stop: The HTML tag that we’re using as our icon designation gets styled here. We size it up, set a color using a predetermined Scss variable, and we’re good to go.
Once those styles are saved, you should now see the points on the map representing each location. Additionally, you should be able to click each of these points to open up a popup containing information about the stop.
Optional Last Step: Style Tweaks
The last thing that's completely optional is to make a few style tweaks to give your site a little personality. I’m not going to go over this in details, but if you’d like to follow along and dress things up a little bit, you can follow along with this commit which shows each code change I made.
Yay, we did it!
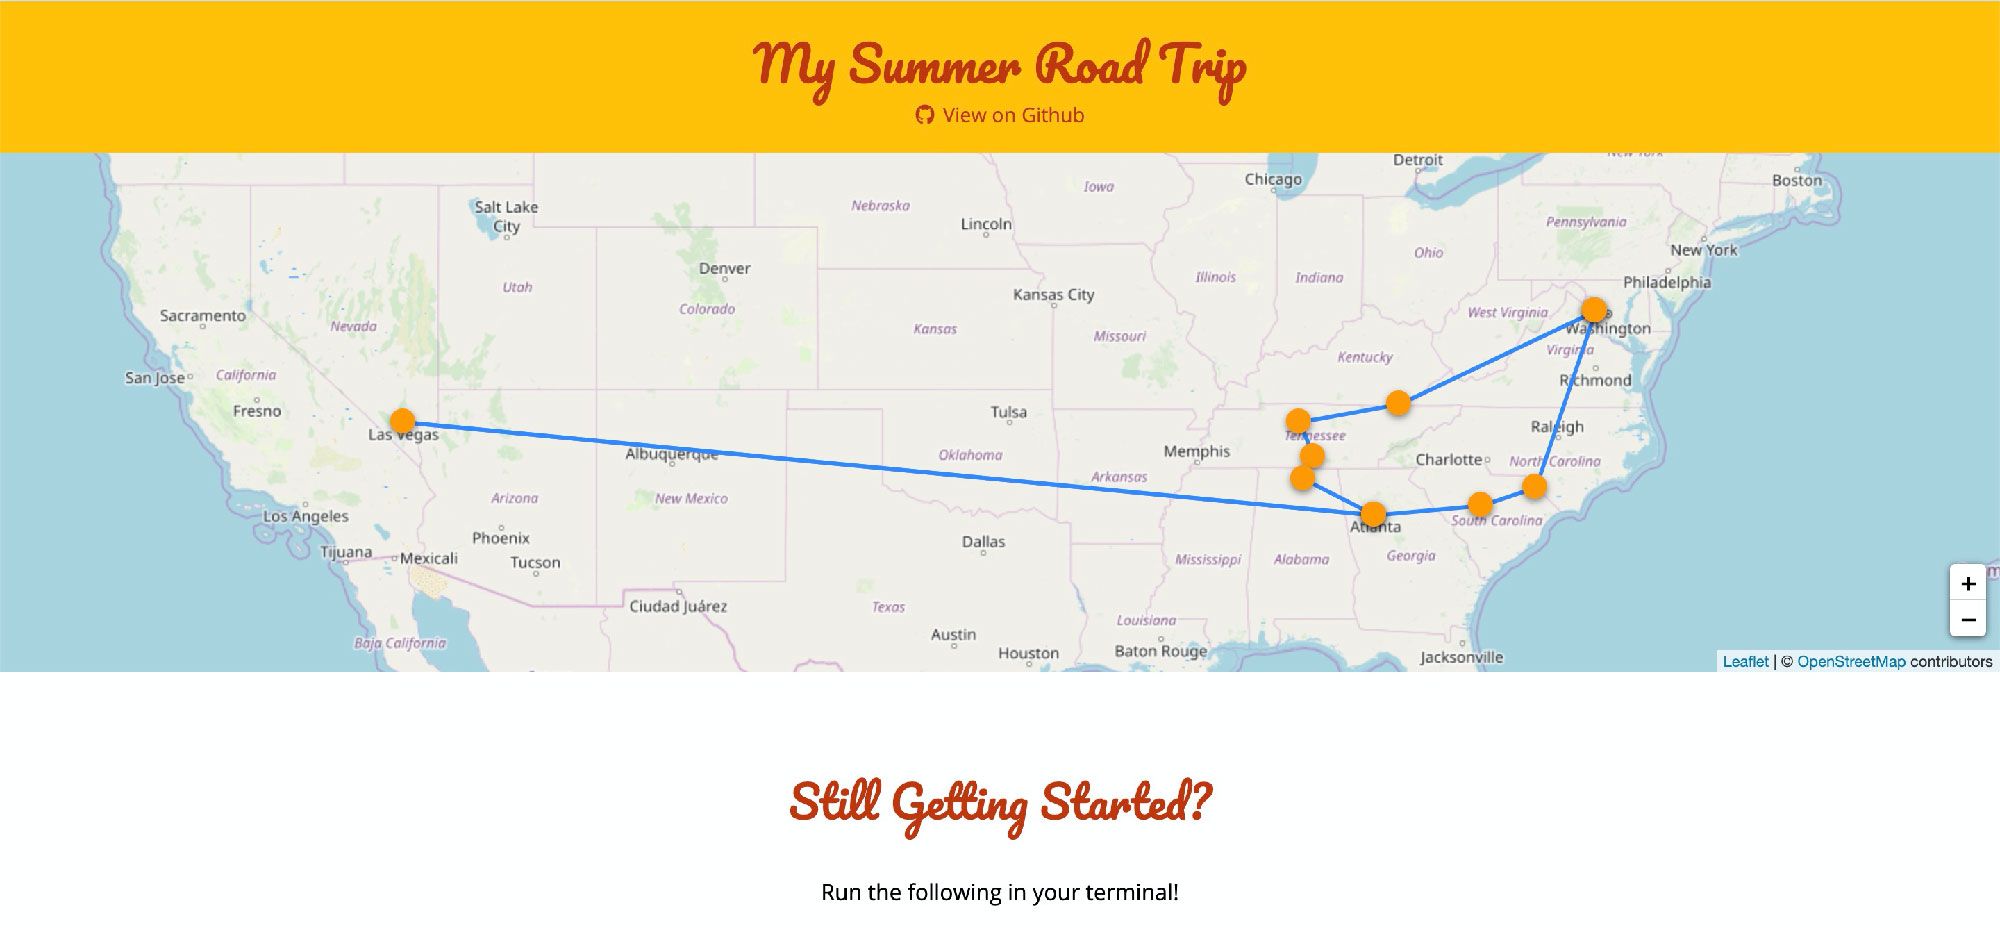
If you followed along with me, or skipped right to the starter, you should now have a mapping app that you can use for your next road trip.
The good news is this project can apply to anything! Want to map out your favorite restaurants in Washington, DC? Add your locations and remove the lines. Want to create line drawings over the map? That's certainly an option.
Whatever it is, if you enjoyed getting this map spun up, get creative and apply it to your next project!
Want to learn more about maps?
You can check out a few of my other resources to get started:
- How to create a Coronavirus (COVID-19) Dashboard & Map App in React with Gatsby and Leaflet
- How to set up a custom Mapbox basemap style with React Leaflet and Leaflet Gatsby Starter
- Anyone Can Map! Inspiration and an introduction to the world of mapping
- How to Create your own Santa Tracker with Gatsby and React Leaflet
- How to build a mapping app in React the easy way with Leaflet
