- When We Need a Database
- Options in React Native
- Prerequisites
- App Requirements
- Why We Chose WatermelonDB (features)
- Dev Env and WatermelonDB Setup (v0.0)
- Tutorial
- Initialize DB Schema and WatermelonDB (v0.1)
- Add Actions and Dummy Data Generator (v0.2)
- Add All CRUD Operations (v1)
- Exercise
- Useful links
- Conclusion
- Frequently Asked Questions (FAQs) about Creating an Offline-First React Native App Using WatermelonDB
React Native has different database storage mechanisms for different mobile app purposes. Simple structures — such as user settings, app settings, and other key-value pair data — can be handled easily using async storage or secure storage.
Other applications — such as Twitter clones — fetch data from the server and directly show it to the user. They maintain a cache of data, and if a user needs to interact with any document, they call the APIs directly.
So not all the applications require a database.
Want to learn React Native from the ground up? This article is an extract from our Premium library. Get an entire collection of React Native books covering fundamentals, projects, tips and tools & more with SitePoint Premium. Join now for just $9/month.
When We Need a Database
Applications such as the Nozbe (a to-do app), Expense (a tracker), and SplitWise (for in-app purchases), need to work offline. And to do so, they need a way to store data locally and sync it up with the server. This type of application is called an offline first app. Over time, these apps collect a lot of data, and it becomes harder to manage that data directly — so a database is needed to manage it efficiently.
Options in React Native
When developing an app, choose the database that best fits your requirements. If two options are available, then go with the one that has better documentation and quicker response to issues. Below are some of the best known options available for React Native:
- WatermelonDB: an open-source reactive database that can be used with any underlying database. By default, it uses SQLite as the underlying database in React Native.
- SQLite (React Native, Expo): the oldest, most used, battle-tested and well-known solution. It’s available for most of the platforms, so if you’ve developed an application in another mobile app development framework, you might already be familiar with it.
- Realm (React Native): an open-source solution, but it also has an enterprise edition with lots of other features. They have done a great job and many well-known companies use it.
- FireBase (React Native, Expo): a Google service specifically for the mobile development platform. It offers lots of functionality, storage being just one of them. But it does require you to stay within their ecosystem to utilize it.
- RxDB: a real-time database for the Web. It has good documentation, a good rating on GitHub (> 9K stars), and is also reactive.
Prerequisites
I assume you have knowledge about basic React Native and its build process. We’re going to use react-native-cli to create our application.
I’d also suggest setting up an Android or iOS development environment while setting up the project, as you may face many issues, and the first step in debugging is keeping the IDE (Android Studio or Xcode) opened to see the logs.
Note: you can check out the official guide for installing dependencies here for more information. As the official guidelines are very concise and clear, we won’t be covering that topic here.
To set up a virtual device or physical device, follow these guides:
Note: there’s a more JavaScript-friendly toolchain named Expo. The React Native community has also started promoting it, but I haven’t come across a large-scale, production-ready application that uses Expo yet, and Expo port isn’t currently available for those using a database such as Realm — or in our case, WatermelonDB.
App Requirements
We’ll create a movie search application with a title, poster image, genre, and release date. Each movie will have many reviews.
The application will have three screens.
Home will show two buttons — one to generate dummy records, and a second to add new movie. Below it, there will be one search input that can be used to query movie titles from the database. It will show the list of movies below the search bar. If any name is searched, the list will only show the searched movies.
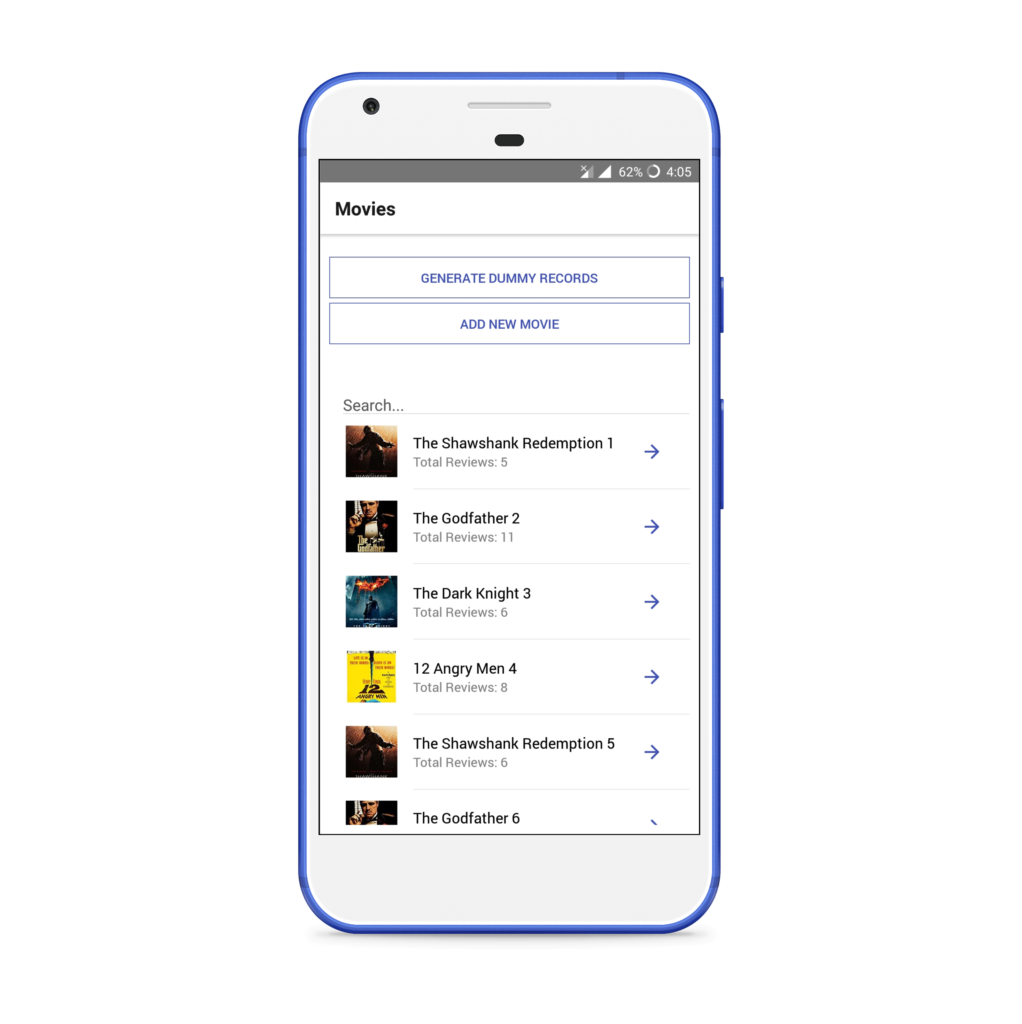
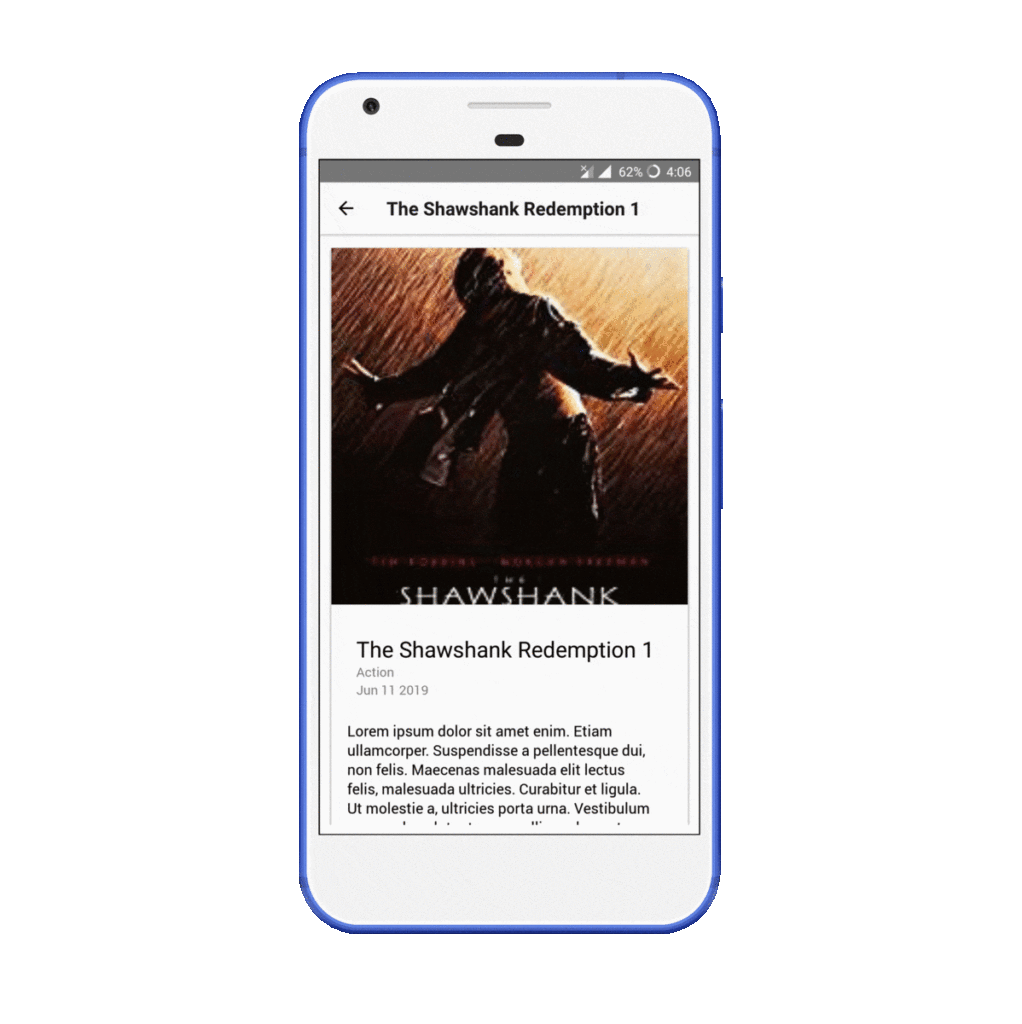
Clicking on any movie will open a Movie Dashboard, from where all its reviews can be checked. A movie can be edited or deleted, or a new review can be added from this screen.
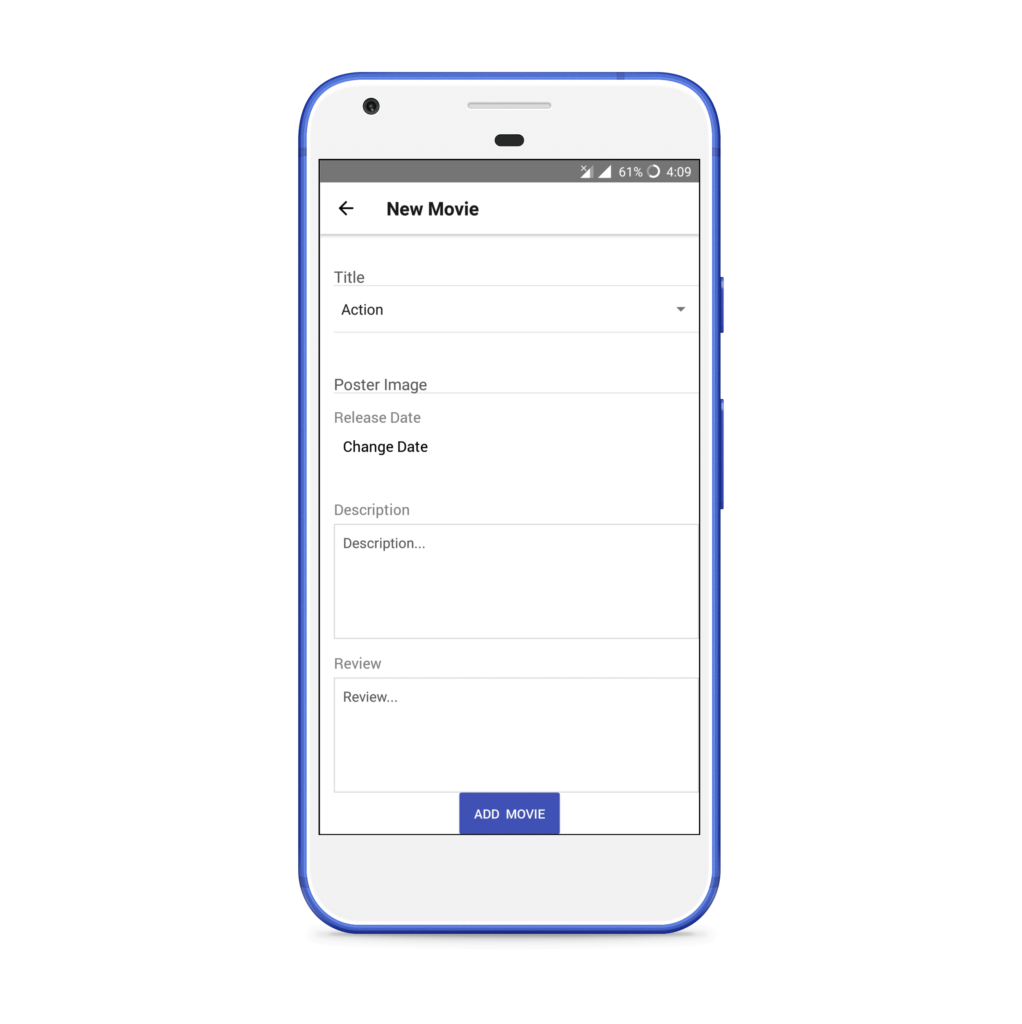
The third screen will be Movie Form, which is used to create/update a movie.
The source code is available on GitHub.
Why We Chose WatermelonDB (features)
We need to create an offline-first application, so a database is a must.
Features of WatermelonDB
Let’s look at some of the features of WatermelonDB.
Fully observable
A great feature of WatermelonDB is its reactive nature. Any object can be observed using observables, and it will automatically rerender our components whenever the data changes. We don’t have to make any extra efforts to use WatermelonDB. We wrap the simple React components and enhance them to make them reactive. In my experience, it just works seamlessly, and we don’t have to care about anything else. We make the changes in the object and our job’s done! It’s persisted and updated at all the places in the application.
SQLite under the hood for React Native
In a modern browser, just-in-time compilation is used to improve speed, but it’s not available in mobile devices. Also, the hardware in mobile devices is slower than in computers. Due to all these factors, JavaScript apps run slower in a mobile application. To overcome this, WatermelonDB doesn’t fetch anything until it’s needed. It uses lazy loading and SQLite as an underlying database on a separate thread to provide a fast response.
Sync primitives and sync adapter
Although WatermelonDB is just a local database, it also provides sync primitives and sync adapters. It makes it pretty easy to use with any of our own back-end databases. We just need to conform to the WatermelonDB sync protocol on the back end and provide the endpoints.
Further features include:
- Statically typed using Flow
- Available for all platforms
Dev Env and WatermelonDB Setup (v0.0)
We’re going to use react-native-cli to create our application.
Note: you may be able to use it with ExpoKit or Ejecting from Expo.
If you want to skip this part then clone the source repo and checkout the v0.0 branch.
Start a new project:
react-native init MovieDirectory
cd MovieDirectory
Install dependencies:
npm i @nozbe/watermelondb @nozbe/with-observables react-navigation react-native-gesture-handler react-native-fullwidth-image native-base rambdax
Below is the list of installed dependencies and their uses:
native-base: a UI library that will be used for look and feel of our app.react-native-fullwidth-image: for showing full-screen responsive images. (Sometimes it can be a pain to calculate the width, height and also maintain aspect ratio. So it’s better to use an existing community solution.)@nozbe/watermelondb: the database we’ll be using.@nozbe/with-observables: contains the decorators (@) that will be used in our models.react-navigation: used for Managing routes/screensreact-native-gesture-handler: the dependency forreact-navigation.rambdax: used to generate a random number while creating dummy data.
Open your package.json and replace the scripts with the following code:
"scripts": {
    "start": "node node_modules/react-native/local-cli/cli.js start",
    "start:ios": "react-native run-ios",
    "start:android": "react-native run-android",
    "test": "jest"
}
This will be used to run our application in the respective device.
Set Up WatermelonDB
We need to add a Babel plugin to convert our decorators, so install it as a dev dependency:
npm install -D @babel/plugin-proposal-decorators
Create a new file .babelrc in the root of the project:
// .babelrc
{
  "presets": ["module:metro-react-native-babel-preset"],
  "plugins": [["@babel/plugin-proposal-decorators", { "legacy": true }]]
}
Now use the following guides for your target environment:
- iOS
- Android
Open the android folder in Android Studio and sync the project. Otherwise, it will give you an error when running the application for the first time. Do the same if you’re targeting iOS.
Before we run the application, we need to link the react-native-gesture handler package, a dependency of react-navigation, and react-native-vector-icons, a dependency of native-base. By default, to keep the binary size of the application small, React Native doesn’t contain all the code to support native features. So whenever we need to use a particular feature, we can use the link command to add the native dependencies. So let’s link our dependencies:
react-native link react-native-gesture-handler
react-native link react-native-vector-icons
Run the application:
npm run start:android
# or
npm run start:ios
If you get an error for missing dependencies, run npm i.
The code up to here is available under the v0.0 branch.
Tutorial
As we’ll be creating a database application, a lot of the code will be back-end only, and we won’t be able to see much on the front end. It might seem a long, but have patience and follow the tutorial till the end. You won’t regret it!
The WatermelonDB workflow can be categorized into three main parts:
- Schema: used to define the database table schema.
- Models: the ORM mapped object. We’ll interact with these throughout our application.
- Actions: used to perform various CRUD operations on our object/row. We can directly perform an action using a database object or we can define functions in our model to perform these actions. Defining them in models is the better practice, and we’re going to use that only.
Let’s get started with our application.
Initialize DB Schema and WatermelonDB (v0.1)
We’ll define our schema, models and database object in our application. We won’t able to see much in the application, but this is the most important step. Here we’ll check that our application works correctly after defining everything. If anything goes wrong, it will be easy to debug it at this stage.
Project Structure
Create a new src folder in the root. This will be the root folder for all of our React Native code. The models folder is used for all of our database-related files. It will behave as our DAO (Data Access Object) folder. This is a term used for an interface to some type of database or other persistence mechanism. The components folder will have all of our React components. The screens folder will have all the screens of our application.
mkdir src && cd src
mkdir models
mkdir components
mkdir screens
Schema
Go to the models folder, create a new file schema.js, and use the following code:
// schema.js
import { appSchema, tableSchema } from "@nozbe/watermelondb";

export const mySchema = appSchema({
  version: 2,
  tables: [
    tableSchema({
      name: "movies",
      columns: [
        { name: "title", type: "string" },
        { name: "poster_image", type: "string" },
        { name: "genre", type: "string" },
        { name: "description", type: "string" },
        { name: "release_date_at", type: "number" }
      ]
    }),
    tableSchema({
      name: "reviews",
      columns: [
        { name: "body", type: "string" },
        { name: "movie_id", type: "string", isIndexed: true }
      ]
    })
  ]
});
We’ve defined two tables — one for movies, and another for its reviews. The code itself self-explanatory. Both tables have related columns.
Note that, as per WatermelonDB’s naming convention, all the IDs end with an _id suffix, and the date field ends with the _at suffix.
isIndexed is used to add an index to a column. Indexing makes querying by a column faster, at the slight expense of create/update speed and database size. We’ll be querying all the reviews by movie_id, so we should mark it as indexed. If you want to make frequent queries on any boolean column, you should index it as well. However, you should never index date (_at) columns.
Models
Create a new file models/Movie.js and paste in this code:
// models/Movie.js
import { Model } from "@nozbe/watermelondb";
import { field, date, children } from "@nozbe/watermelondb/decorators";

export default class Movie extends Model {
  static table = "movies";

  static associations = {
    reviews: { type: "has_many", foreignKey: "movie_id" }
  };

  @field("title") title;
  @field("poster_image") posterImage;
  @field("genre") genre;
  @field("description") description;

  @date("release_date_at") releaseDateAt;

  @children("reviews") reviews;
}
Here we’ve mapped each column of the movies table with each variable. Note how we’ve mapped reviews with a movie. We’ve defined it in associations and also used @children instead of @field. Each review will have a movie_id foreign key. These review foreign key values are matched with id in the movie table to link the reviews model to the movie model.
For date also, we need to use the @date decorator so that WatermelonDB will give us the Date object instead of a simple number.
Now create a new file models/Review.js. This will be used to map each review of a movie.
// models/Review.js
import { Model } from "@nozbe/watermelondb";
import { field, relation } from "@nozbe/watermelondb/decorators";

export default class Review extends Model {
  static table = "reviews";

  static associations = {
    movie: { type: "belongs_to", key: "movie_id" }
  };

  @field("body") body;

  @relation("movies", "movie_id") movie;
}
We have created all of our required models. We can directly use them to initialize our database, but if we want to add a new model, we again have to make a change where we initialize the database. So to overcome this, create a new file models/index.js and add the following code:
// models/index.js
import Movie from "./Movie";
import Review from "./Review";

export const dbModels = [Movie, Review];
Thus we only have to make changes in our models folder. This makes our DAO folder more organized.
Initialize the Database
Now to use our schema and models to initialize our database, open index.js, which should be in the root of our application. Add the code below:
// index.js
import { AppRegistry } from "react-native";
import App from "./App";
import { name as appName } from "./app.json";

import { Database } from "@nozbe/watermelondb";
import SQLiteAdapter from "@nozbe/watermelondb/adapters/sqlite";
import { mySchema } from "./src/models/schema";
import { dbModels } from "./src/models/index.js";

// First, create the adapter to the underlying database:
const adapter = new SQLiteAdapter({
  dbName: "WatermelonDemo",
  schema: mySchema
});

// Then, make a Watermelon database from it!
const database = new Database({
  adapter,
  modelClasses: dbModels
});

AppRegistry.registerComponent(appName, () => App);
We create an adapter using our schema for the underlying database. Then we pass this adapter and our dbModels to create a new database instance.
It’s better at this point in time to check whether our application is working fine or not. So run your application and check:
npm run start:android
# or
npm run start:ios
We haven’t made any changes in the UI, so the screen will look similar to before if everything worked out.
All the code up to this part is under the v0.1 branch.
Add Actions and Dummy Data Generator (v0.2)
Let’s add some dummy data to our application.
Actions
To perform CRUD operations, we’re going to create some actions. Open models/Movie.js and models/Review.js and update them as below:
// models/Movie.js
import { Model } from "@nozbe/watermelondb";
import { field, date, children } from "@nozbe/watermelondb/decorators";

export default class Movie extends Model {
  static table = "movies";

  static associations = {
    reviews: { type: "has_many", foreignKey: "movie_id" }
  };

  @field("title") title;
  @field("poster_image") posterImage;
  @field("genre") genre;
  @field("description") description;

  @date("release_date_at") releaseDateAt;

  @children("reviews") reviews;

  // add these:

  getMovie() {
    return {
      title: this.title,
      posterImage: this.posterImage,
      genre: this.genre,
      description: this.description,
      releaseDateAt: this.releaseDateAt
    };
  }

  async addReview(body) {
    return this.collections.get("reviews").create(review => {
      review.movie.set(this);
      review.body = body;
    });
  }

  updateMovie = async updatedMovie => {
    await this.update(movie => {
      movie.title = updatedMovie.title;
      movie.genre = updatedMovie.genre;
      movie.posterImage = updatedMovie.posterImage;
      movie.description = updatedMovie.description;
      movie.releaseDateAt = updatedMovie.releaseDateAt;
    });
  };

  async deleteAllReview() {
    await this.reviews.destroyAllPermanently();
  }

  async deleteMovie() {
    await this.deleteAllReview(); // delete all reviews first
    await this.markAsDeleted(); // syncable
    await this.destroyPermanently(); // permanent
  }
}
// models/Review.js
import { Model } from "@nozbe/watermelondb";
import { field, relation } from "@nozbe/watermelondb/decorators";

export default class Review extends Model {
  static table = "reviews";

  static associations = {
    movie: { type: "belongs_to", key: "movie_id" }
  };

  @field("body") body;

  @relation("movies", "movie_id") movie;

  // add these:

  async deleteReview() {
    await this.markAsDeleted(); // syncable
    await this.destroyPermanently(); // permanent
  }
}
We’re going to use all the functions defined for update and delete operations. We won’t have the model object during creation, so we’ll directly use the database object to create the new rows.
Create two files, models/generate.js and models/randomData.js. generate.js will be used to create a function generateRecords that will generate the dummy records. randomData.js contains different arrays that have dummy data that’s used in generate.js to generate our dummy records.
// models/generate.js
import { times } from "rambdax";
import {
  movieNames,
  movieGenre,
  moviePoster,
  movieDescription,
  reviewBodies
} from "./randomData";

const flatMap = (fn, arr) => arr.map(fn).reduce((a, b) => a.concat(b), []);

const fuzzCount = count => {
  // Makes the number randomly a little larger or smaller for fake data to seem more realistic
  const maxFuzz = 4;
  const fuzz = Math.round((Math.random() - 0.5) * maxFuzz * 2);
  return count + fuzz;
};

const makeMovie = (db, i) => {
  return db.collections.get("movies").prepareCreate(movie => {
    movie.title = movieNames[i % movieNames.length] + " " + (i + 1) || movie.id;
    movie.genre = movieGenre[i % movieGenre.length];
    movie.posterImage = moviePoster[i % moviePoster.length];
    movie.description = movieDescription;
    movie.releaseDateAt = new Date().getTime();
  });
};

const makeReview = (db, movie, i) => {
  return db.collections.get("reviews").prepareCreate(review => {
    review.body =
      reviewBodies[i % reviewBodies.length] || `review#${review.id}`;
    review.movie.set(movie);
  });
};

const makeReviews = (db, movie, count) =>
  times(i => makeReview(db, movie, i), count);

// Generates dummy random records. Accepts db object, no. of movies, and no. of reviews for each movie to generate.
const generate = async (db, movieCount, reviewsPerPost) => {
  await db.action(() => db.unsafeResetDatabase());
  const movies = times(i => makeMovie(db, i), movieCount);

  const reviews = flatMap(
    movie => makeReviews(db, movie, fuzzCount(reviewsPerPost)),
    movies
  );

  const allRecords = [...movies, ...reviews];
  await db.batch(...allRecords);
  return allRecords.length;
};

// Generates 100 movies with up to 10 reviews
export async function generateRecords(database) {
  return generate(database, 100, 10);
}
// models/randomData.js
export const movieNames = [
  "The Shawshank Redemption",
  "The Godfather",
  "The Dark Knight",
  "12 Angry Men"
];

export const movieGenre = [
  "Action",
  "Comedy",
  "Romantic",
  "Thriller",
  "Fantasy"
];

export const moviePoster = [
  "https://m.media-amazon.com/images/M/MV5BMDFkYTc0MGEtZmNhMC00ZDIzLWFmNTEtODM1ZmRlYWMwMWFmXkEyXkFqcGdeQXVyMTMxODk2OTU@._V1_UX182_CR0,0,182,268_AL__QL50.jpg",
  "https://m.media-amazon.com/images/M/MV5BM2MyNjYxNmUtYTAwNi00MTYxLWJmNWYtYzZlODY3ZTk3OTFlXkEyXkFqcGdeQXVyNzkwMjQ5NzM@._V1_UY268_CR3,0,182,268_AL__QL50.jpg",
  "https://m.media-amazon.com/images/M/MV5BMTMxNTMwODM0NF5BMl5BanBnXkFtZTcwODAyMTk2Mw@@._V1_UX182_CR0,0,182,268_AL__QL50.jpg",
  "https://m.media-amazon.com/images/M/MV5BMWU4N2FjNzYtNTVkNC00NzQ0LTg0MjAtYTJlMjFhNGUxZDFmXkEyXkFqcGdeQXVyNjc1NTYyMjg@._V1_UX182_CR0,0,182,268_AL__QL50.jpg"
];

export const movieDescription =
  "Lorem ipsum dolor sit amet enim. Etiam ullamcorper. Suspendisse a pellentesque dui, non felis. Maecenas malesuada elit lectus felis, malesuada ultricies. Curabitur et ligula. Ut molestie a, ultricies porta urna. Vestibulum commodo volutpat a, convallis ac, laoreet enim. Phasellus fermentum in, dolor. Lorem ipsum dolor sit amet enim. Etiam ullamcorper. Suspendisse a pellentesque dui, non felis. Maecenas malesuada elit lectus felis, malesuada ultricies. Curabitur et ligula. Ut molestie a, ultricies porta urna. Vestibulum commodo volutpat a, convallis ac, laoreet enim. Phasellus fermentum in, dolor. Pellentesque facilisis. Nulla imperdiet sit amet magna. Vestibulum dapibus, mauris nec malesuada fames ac turpis velit, rhoncus eu, luctus et interdum adipiscing wisi. Aliquam erat ac ipsum. Integer aliquam purus. Quisque lorem tortor fringilla sed, vestibulum id, eleifend justo vel bibendum sapien massa ac turpis faucibus orci luctus non, consectetuer lobortis quis, varius in, purus. Integer ultrices posuere cubilia Curae, Nulla ipsum dolor lacus, suscipit adipiscing. Cum sociis natoque penatibus et ultrices volutpat.";

export const reviewBodies = [
  "First!!!!",
  "Cool!",
  "Why dont you just…",
  "Maybe useless, but the article is extremely interesting and easy to read. One can definitely try to read it.",
  "Seriously one of the coolest projects going on right now",
  "I think the easiest way is just to write a back end that emits .NET IR since infra is already there.",
  "Open source?",
  "This article is obviously wrong",
  "Just Stupid",
  "The general public won't care",
  "This is my bear case for Google.",
  "All true, but as a potential advertiser you don't really get to use all that targeting when placing ads",
  "I wonder what work environment exists, that would cause a worker to hide their mistakes and endanger the crew, instead of reporting it. And how many more mistakes go unreported? I hope Russia addresses the root issue, and not just fires the person responsible."
];
Now we have to call the function generateRecords to generate dummy data.
We’ll use react-navigation to create the routes. Open index.js from the root and use the following code:
// index.js
import { AppRegistry } from "react-native";
import { name as appName } from "./app.json";

import { Database } from "@nozbe/watermelondb";
import SQLiteAdapter from "@nozbe/watermelondb/adapters/sqlite";
import { mySchema } from "./src/models/schema";
import { dbModels } from "./src/models/index.js";

// Added new import
import { createNavigation } from "./src/screens/Navigation";

// First, create the adapter to the underlying database:
const adapter = new SQLiteAdapter({
  dbName: "WatermelonDemo",
  schema: mySchema
});

// Then, make a Watermelon database from it!
const database = new Database({
  adapter,
  modelClasses: dbModels
});

// Change these:
const Navigation = createNavigation({ database });

AppRegistry.registerComponent(appName, () => Navigation);
We’re using the createNavigation function, but we don’t have it right now, so let’s create it. Create a src/screens/Navigation.js and use the following code:
// screens/Navigation.js
import React from "react";
import { createStackNavigator, createAppContainer } from "react-navigation";

import Root from "./Root";

export const createNavigation = props =>
  createAppContainer(
    createStackNavigator(
      {
        Root: {
          // We have to use a little wrapper because React Navigation doesn't pass simple props (and withObservables needs that)
          screen: ({ navigation }) => {
            const { database } = props;
            return <Root database={database} navigation={navigation} />;
          },
          navigationOptions: { title: "Movies" }
        }
      },
      {
        initialRouteName: "Root",
        initialRouteParams: props
      }
    )
  );
We use Root as the first screen, so let’s create screens/Root.js and use the following code:
// screens/Root.js
import React, { Component } from "react";
import { generateRecords } from "../models/generate";
import { Alert } from "react-native";
import { Container, Content, Button, Text } from "native-base";

import MovieList from "../components/MovieList";

export default class Root extends Component {
  state = {
    isGenerating: false
  };

  generate = async () => {
    this.setState({ isGenerating: true });
    const count = await generateRecords(this.props.database);
    Alert.alert(`Generated ${count} records!`);
    this.setState({ isGenerating: false });
  };

  render() {
    const { isGenerating } = this.state;
    const { database, navigation } = this.props;

    return (
      <Container>
        <Content>
          <Button
            bordered
            full
            onPress={this.generate}
            style={{ marginTop: 5 }}
          >
            <Text>Generate Dummy records</Text>
          </Button>

          {!isGenerating && (
            <MovieList database={database} search="" navigation={navigation} />
          )}
        </Content>
      </Container>
    );
  }
}
We’ve used MovieList to show the list of generated movies. Let’s create it. Create a new file src/components/MovieList.js as below:
// components/MovieList.js
import React from "react";

import { Q } from "@nozbe/watermelondb";
import withObservables from "@nozbe/with-observables";
import { List, ListItem, Body, Text } from "native-base";

const MovieList = ({ movies }) => (
  <List>
    {movies.map(movie => (
      <ListItem key={movie.id}>
        <Body>
          <Text>{movie.title}</Text>
        </Body>
      </ListItem>
    ))}
  </List>
);

// withObservables is HOC(Higher Order Component) to make any React component reactive.
const enhance = withObservables(["search"], ({ database, search }) => ({
  movies: database.collections
    .get("movies")
    .query(Q.where("title", Q.like(`%${Q.sanitizeLikeString(search)}%`)))
}));

export default enhance(MovieList);
MovieList is a simple React component rendering the list of movies, but observe the enhance that calls withObservables. The withObservables is an HOC (Higher Order Component) to make any React component reactive in WatermelonDB. If we change the value of the movie at any place in our application, it will rerender it to reflect the changes. The second argument, ({ database, search }), comprises component props. search is passed from Root.js and database is passed from Navigation.js. The first argument ["search"] is a list of props that trigger observation restart. So if search changes, our observable objects are recalculated and observed again. In the function, we use the database object to get the collection of movies where title is like passed search. Special characters like % and _ are not escaped automatically, so it’s always recommended to use sanitized user input.
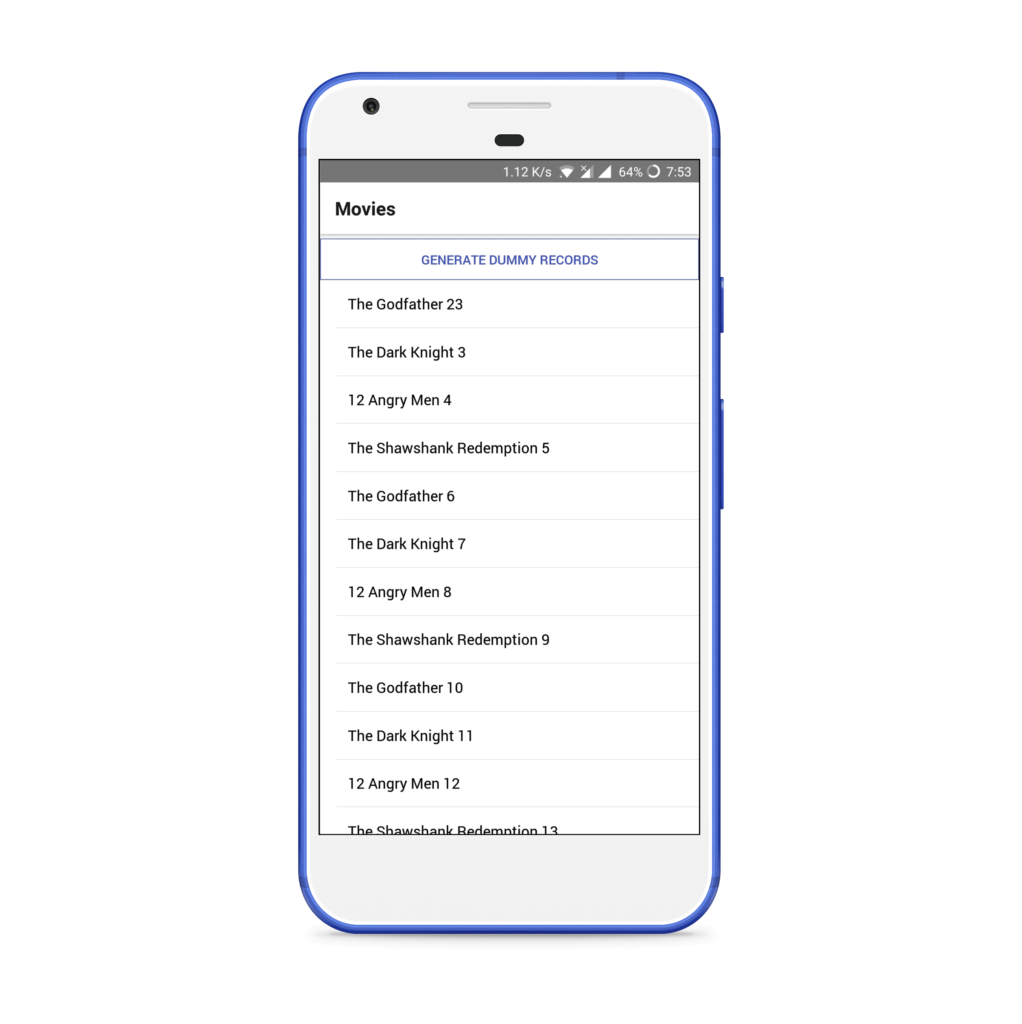
Open your Android Studio or Xcode to sync up the project and then run the application. Click on the GENERATE DUMMY RECORDS button. It will generate the dummy data and show you the list.
npm run start:android
# or
npm run start:ios
This code is available under the v0.2 branch.
Add All CRUD Operations (v1)
Let’s now add functionality to create/update/delete movies and reviews. We’ll add a new button to add a new movie and also create a TextInput to pass the search keyword to the query. So open Root.js and change its content as below:
// screens/Root.js
import React, { Component } from "react";
import { generateRecords } from "../models/generate";
import { Alert } from "react-native";
import {
  View,
  Container,
  Content,
  Button,
  Text,
  Form,
  Item,
  Input,
  Label,
  Body
} from "native-base";

import MovieList from "../components/MovieList";
import styles from "../components/styles";

export default class Root extends Component {
  state = {
    isGenerating: false,
    search: "",
    isSearchFocused: false
  };

  generate = async () => {
    this.setState({ isGenerating: true });
    const count = await generateRecords(this.props.database);
    Alert.alert(`Generated ${count} records!`);
    this.setState({ isGenerating: false });
  };

  // add these:

  addNewMovie = () => {
    this.props.navigation.navigate("NewMovie");
  };

  handleTextChanges = v => this.setState({ search: v });

  handleOnFocus = () => this.setState({ isSearchFocused: true });

  handleOnBlur = () => this.setState({ isSearchFocused: false });

  render() {
    const { search, isGenerating, isSearchFocused } = this.state;
    const { database, navigation } = this.props;

    return (
      <Container style={styles.container}>
        <Content>
          {!isSearchFocused && (
            <View style={styles.marginContainer}>
              <Button
                bordered
                full
                onPress={this.generate}
                style={{ marginTop: 5 }}
              >
                <Text>Generate Dummy records</Text>
              </Button>

              {/* add these: */}
              <Button
                bordered
                full
                onPress={this.addNewMovie}
                style={{ marginTop: 5 }}
              >
                <Text>Add new movie</Text>
              </Button>
              <Body />
            </View>
          )}

          {/* add these: */}
          <Form>
            <Item floatingLabel>
              <Label>Search...</Label>
              <Input
                onFocus={this.handleOnFocus}
                onBlur={this.handleOnBlur}
                onChangeText={this.handleTextChanges}
              />
            </Item>
          </Form>
          {!isGenerating && (
            <MovieList
              database={database}
              search={search}
              navigation={navigation}
            />
          )}
        </Content>
      </Container>
    );
  }
}
We’ll create a new screen, MovieForm.js, and also use this same component to edit the movie. Observe that we’re just calling the handleSubmit method, which in turn calls handleAddNewMovie or handleUpdateMovie. handleUpdateMovie calls the action we defined earlier in our Movie model. That’s it. This will take care of persisting it and also updating everywhere else. Use the following code for MovieForm.js:
// screens/MovieForm.js
import React, { Component } from "react";
import {
  View,
  Button,
  Container,
  Content,
  Form,
  Item,
  Input,
  Label,
  Textarea,
  Picker,
  Body,
  Text,
  DatePicker
} from "native-base";
import { movieGenre } from "../models/randomData";

class MovieForm extends Component {
  constructor(props) {
    super(props);
    if (props.movie) {
      this.state = { ...props.movie.getMovie() };
    } else {
      this.state = {};
    }
  }

  render() {
    return (
      <Container>
        <Content>
          <Form>
            <Item floatingLabel>
              <Label>Title</Label>
              <Input
                onChangeText={title => this.setState({ title })}
                value={this.state.title}
              />
            </Item>
            <View style={{ paddingLeft: 15 }}>
              <Item picker>
                <Picker
                  mode="dropdown"
                  style={{ width: undefined, paddingLeft: 15 }}
                  placeholder="Genre"
                  placeholderStyle={{ color: "#bfc6ea" }}
                  placeholderIconColor="#007aff"
                  selectedValue={this.state.genre}
                  onValueChange={genre => this.setState({ genre })}
                >
                  {movieGenre.map((genre, i) => (
                    <Picker.Item key={i} label={genre} value={genre} />
                  ))}
                </Picker>
              </Item>
            </View>

            <Item floatingLabel>
              <Label>Poster Image</Label>
              <Input
                onChangeText={posterImage => this.setState({ posterImage })}
                value={this.state.posterImage}
              />
            </Item>

            <View style={{ paddingLeft: 15, marginTop: 15 }}>
              <Text style={{ color: "gray" }}>Release Date</Text>
              <DatePicker
                locale={"en"}
                animationType={"fade"}
                androidMode={"default"}
                placeHolderText="Change Date"
                defaultDate={new Date()}
                onDateChange={releaseDateAt => this.setState({ releaseDateAt })}
              />
              <Text>
                {this.state.releaseDateAt &&
                  this.state.releaseDateAt.toString().substr(4, 12)}
              </Text>

              <Text style={{ color: "gray", marginTop: 15 }}>Description</Text>
              <Textarea
                rowSpan={5}
                bordered
                placeholder="Description..."
                onChangeText={description => this.setState({ description })}
                value={this.state.description}
              />
            </View>

            {!this.props.movie && (
              <View style={{ paddingLeft: 15, marginTop: 15 }}>
                <Text style={{ color: "gray" }}>Review</Text>
                <Textarea
                  rowSpan={5}
                  bordered
                  placeholder="Review..."
                  onChangeText={review => this.setState({ review })}
                  value={this.state.review}
                />
              </View>
            )}
            <Body>
              <Button onPress={this.handleSubmit}>
                <Text>{this.props.movie ? "Update " : "Add "} Movie</Text>
              </Button>
            </Body>
          </Form>
        </Content>
      </Container>
    );
  }

  handleSubmit = () => {
    if (this.props.movie) {
      this.handleUpdateMovie();
    } else {
      this.handleAddNewMovie();
    }
  };

  handleAddNewMovie = async () => {
    const { database } = this.props;
    const movies = database.collections.get("movies");
    const newMovie = await movies.create(movie => {
      movie.title = this.state.title;
      movie.genre = this.state.genre;
      movie.posterImage = this.state.posterImage;
      movie.description = this.state.description;
      movie.releaseDateAt = this.state.releaseDateAt.getTime();
    });
    this.props.navigation.goBack();
  };

  handleUpdateMovie = async () => {
    const { movie } = this.props;
    await movie.updateMovie({
      title: this.state.title,
      genre: this.state.genre,
      posterImage: this.state.posterImage,
      description: this.state.description,
      releaseDateAt: this.state.releaseDateAt.getTime()
    });
    this.props.navigation.goBack();
  };
}

export default MovieForm;
We’ll divide our MovieList.js so that we can control the rendering in a stateless component. Update it as follows:
// components/MovieList.js
import React from "react";

import { Q } from "@nozbe/watermelondb";
import withObservables from "@nozbe/with-observables";

import RawMovieItem from "./RawMovieItem";
import { List } from "native-base";

// add these:
const MovieItem = withObservables(["movie"], ({ movie }) => ({
  movie: movie.observe()
}))(RawMovieItem);

const MovieList = ({ movies, navigation }) => (
  <List>
    {movies.map(movie => (
      // change these:
      <MovieItem
        key={movie.id}
        movie={movie}
        countObservable={movie.reviews.observeCount()}
        onPress={() => navigation.navigate("Movie", { movie })}
      />
    ))}
  </List>
);

const enhance = withObservables(["search"], ({ database, search }) => ({
  movies: database.collections
    .get("movies")
    .query(Q.where("title", Q.like(`%${Q.sanitizeLikeString(search)}%`)))
}));

export default enhance(MovieList);
Here, we’ve used RawMovieItem. We’ll write our rendering method in it. Note how we have wrapped our RawMovieItem into withObservables. It’s used to make it reactive. If we don’t use it then we have to manually force an update when the database updates.
Note: creating simple React components and then observing them is the gist of WatermelonDB.
Create a new file, components/RawMovieItem.js, and use the following code:
// components/RawMovieItem.js
import React from "react";
import withObservables from "@nozbe/with-observables";
import {
  ListItem,
  Thumbnail,
  Text,
  Left,
  Body,
  Right,
  Button,
  Icon
} from "native-base";

// We observe and render the counter in a separate component so that we don't have to wait for the database until we can render the component. You can also prefetch all data before displaying the list
const RawCounter = ({ count }) => count;
const Counter = withObservables(["observable"], ({ observable }) => ({
  count: observable
}))(RawCounter);

const CustomListItem = ({ movie, onPress, countObservable }) => (
  <ListItem thumbnail onPress={onPress}>
    <Left>
      <Thumbnail square source={{ uri: movie.posterImage }} />
    </Left>
    <Body>
      <Text>{movie.title}</Text>
      <Text note numberOfLines={1}>
        Total Reviews: <Counter observable={countObservable} />
      </Text>
    </Body>
    <Right>
      <Button transparent onPress={onPress}>
        <Icon name="arrow-forward" />
      </Button>
    </Right>
  </ListItem>
);

export default CustomListItem;
We need to see all the information of a movie and also be able to edit it, so create a new screen, Movie.js, and to get all the reviews and make it also reactive, create two new components, components/ReviewList.js and components/RawReviewItem.js.
Use the following code for respected files:
// screens/Movie.js
import React, { Component } from "react";
import {
  View,
  Card,
  CardItem,
  Text,
  Button,
  Icon,
  Left,
  Body,
  Textarea,
  H1,
  H2,
  Container,
  Content
} from "native-base";
import withObservables from "@nozbe/with-observables";
import styles from "../components/styles";
import FullWidthImage from "react-native-fullwidth-image";
import ReviewList from "../components/ReviewList";

class Movie extends Component {
  state = {
    review: ""
  };

  render() {
    const { movie, reviews } = this.props;
    return (
      <Container style={styles.container}>
        <Content>
          <Card style={{ flex: 0 }}>
            <FullWidthImage source={{ uri: movie.posterImage }} ratio={1} />
            <CardItem />
            <CardItem>
              <Left>
                <Body>
                  <H2>{movie.title}</H2>
                  <Text note textStyle={{ textTransform: "capitalize" }}>
                    {movie.genre}
                  </Text>
                  <Text note>
                    {movie.releaseDateAt.toString().substr(4, 12)}
                  </Text>
                </Body>
              </Left>
            </CardItem>
            <CardItem>
              <Body>
                <Text>{movie.description}</Text>
              </Body>
            </CardItem>
            <CardItem>
              <Left>
                <Button
                  transparent
                  onPress={this.handleDelete}
                  textStyle={{ color: "#87838B" }}
                >
                  <Icon name="md-trash" />
                  <Text>Delete Movie</Text>
                </Button>
                <Button
                  transparent
                  onPress={this.handleEdit}
                  textStyle={{ color: "#87838B" }}
                >
                  <Icon name="md-create" />
                  <Text>Edit Movie</Text>
                </Button>
              </Left>
            </CardItem>

            <View style={styles.newReviewSection}>
              <H1>Add new review</H1>
              <Textarea
                rowSpan={5}
                bordered
                placeholder="Review..."
                onChangeText={review => this.setState({ review })}
                value={this.state.review}
              />
              <Body style={{ marginTop: 10 }}>
                <Button bordered onPress={this.handleAddNewReview}>
                  <Text>Add review</Text>
                </Button>
              </Body>
            </View>

            <ReviewList reviews={reviews} />
          </Card>
        </Content>
      </Container>
    );
  }

  handleAddNewReview = () => {
    let { movie } = this.props;
    movie.addReview(this.state.review);
    this.setState({ review: "" });
  };

  handleEdit = () => {
    let { movie } = this.props;
    this.props.navigation.navigate("EditMovie", { movie });
  };

  handleDelete = () => {
    let { movie } = this.props;
    movie.deleteMovie();
    this.props.navigation.goBack();
  };
}

const enhance = withObservables(["movie"], ({ movie }) => ({
  movie: movie.observe(),
  reviews: movie.reviews.observe()
}));

export default enhance(Movie);
ReviewList.js is a reactive component to show a list of reviews of a movie. It enhances the RawReviewItem component and makes it reactive.
// components/ReviewList.js
import React from "react";

import withObservables from "@nozbe/with-observables";
import { List, View, H1 } from "native-base";
import RawReviewItem from "./RawReviewItem";
import styles from "./styles";

const ReviewItem = withObservables(["review"], ({ review }) => ({
  review: review.observe()
}))(RawReviewItem);

const ReviewList = ({ reviews }) => {
  if (reviews.length > 0) {
    return (
      <View style={styles.allReviewsSection}>
        <H1>Reviews</H1>
        <List>
          {reviews.map(review => (
            <ReviewItem review={review} key={review.id} />
          ))}
        </List>
      </View>
    );
  } else {
    return null;
  }
};

export default ReviewList;
RawReviewItem.js is a simple React component used to render a single review.
// components/RawReviewItem.js
import React from "react";
import { ListItem, Text, Left, Right, Button, Icon } from "native-base";

// We observe and render the counter in a separate component so that we don't have to wait for the database until we can render the component. You can also prefetch all data before displaying the list.
const RawReviewItem = ({ review }) => {
  handleDeleteReview = () => {
    review.deleteReview();
  };

  return (
    <ListItem>
      <Left>
        <Text>{review.body}</Text>
      </Left>
      <Right>
        <Button transparent onPress={this.handleDeleteReview}>
          <Icon name="md-trash" />
        </Button>
      </Right>
    </ListItem>
  );
};

export default RawReviewItem;
Lastly, to route two new screens, we have to update Navigation.js with following code:
// screens/Navigation.js
import React from "react";
import { createStackNavigator, createAppContainer } from "react-navigation";

import Root from "./Root";
import Movie from "./Movie";
import MovieForm from "./MovieForm";

export const createNavigation = props =>
  createAppContainer(
    createStackNavigator(
      {
        Root: {
          // We have to use a little wrapper because React Navigation doesn't pass simple props (and withObservables needs that)
          screen: ({ navigation }) => {
            const { database } = props;
            return <Root database={database} navigation={navigation} />;
          },
          navigationOptions: { title: "Movies" }
        },
        Movie: {
          screen: ({ navigation }) => (
            <Movie
              movie={navigation.state.params.movie}
              navigation={navigation}
            />
          ),
          navigationOptions: ({ navigation }) => ({
            title: navigation.state.params.movie.title
          })
        },
        NewMovie: {
          screen: ({ navigation }) => {
            const { database } = props;
            return <MovieForm database={database} navigation={navigation} />;
          },
          navigationOptions: { title: "New Movie" }
        },
        EditMovie: {
          screen: ({ navigation }) => {
            return (
              <MovieForm
                movie={navigation.state.params.movie}
                navigation={navigation}
              />
            );
          },
          navigationOptions: ({ navigation }) => ({
            title: `Edit "${navigation.state.params.movie.title}"`
          })
        }
      },
      {
        initialRouteName: "Root",
        initialRouteParams: props
      }
    )
  );
All the components use styles for padding and margin. So, create a file called components/styles.js and use the following code:
// components/styles.js
import { StyleSheet } from "react-native";

export default StyleSheet.create({
  container: { flex: 1, paddingHorizontal: 10, marginVertical: 10 },
  marginContainer: { marginVertical: 10, flex: 1 },
  newReviewSection: {
    marginTop: 10,
    paddingHorizontal: 15
  },
  allReviewsSection: {
    marginTop: 30,
    paddingHorizontal: 15
  }
});
Run the application:
npm run start:android
# or
npm run start:ios
The final code is available in the master branch.
Exercise
Here are some next steps to take to practice what you just learned. Feel free to approach them in whatever order you like.
- Sort the query so that new movies come on top.
- Add functionality to update a review.
- Add a genre and date filter in the main screen.
Useful links
- Stack Overflow: options for storing data when using React Native, iOS and Android
- WatermelonDB: a database for React and React Native apps
- WatermelonDB: high performance React Native
Conclusion
I hope this tutorial has helped you to get started with databases in React Native. We covered the need for a database in an application; available database options; choosing a database for your application; and an example application showcasing how to use models, schema, actions, and reactive components in WatermelonDB.
Check out the application code repo on GitHub/MovieDirectory.
If you have any questions, please let me know. I may take a while to respond, but I’ll try to answer all questions. Hit me up (or learn more about me) on GitHub and Twitter.
Frequently Asked Questions (FAQs) about Creating an Offline-First React Native App Using WatermelonDB
What is WatermelonDB and why is it important for React Native Apps?
WatermelonDB is a high-performance, observable database for React and React Native applications. It’s designed to scale well and handle large amounts of data without compromising on speed and responsiveness. This makes it an excellent choice for offline-first applications, where data needs to be stored and accessed locally on the device. WatermelonDB also supports syncing with a backend, making it easy to keep data up-to-date across multiple devices.
How does WatermelonDB handle data synchronization?
WatermelonDB provides a synchronization engine that can be integrated with your backend. It uses a pull-push mechanism, where changes are pulled from the server and pushed from the client. This ensures that the local database on the device is always up-to-date with the server. The synchronization process is efficient and designed to handle conflicts and interruptions gracefully.
How can I integrate WatermelonDB with my existing React Native project?
Integrating WatermelonDB with an existing React Native project involves a few steps. First, you need to install the WatermelonDB package using npm or yarn. Then, you need to set up the database schema and models. Finally, you need to connect your components to the database using the withDatabase and withObservations higher-order components provided by WatermelonDB.
Can I use WatermelonDB with Expo?
Yes, WatermelonDB can be used with Expo, a popular toolchain for React Native development. However, there are some additional steps involved in setting up WatermelonDB with Expo, including installing additional dependencies and configuring the native code.
How does WatermelonDB compare to other databases for React Native?
WatermelonDB is designed specifically for React and React Native, and it offers several advantages over other databases. It’s highly optimized for performance, capable of handling large amounts of data without slowing down. It also provides a simple, intuitive API that integrates well with React’s component-based architecture. Furthermore, it supports offline-first applications and data synchronization out of the box.
What are the limitations of WatermelonDB?
While WatermelonDB is a powerful tool, it does have some limitations. For example, it doesn’t support complex queries or transactions out of the box. However, it’s possible to extend WatermelonDB with custom functionality to overcome these limitations.
How can I debug issues with WatermelonDB?
WatermelonDB provides several tools for debugging, including a logger and a way to inspect the database. You can also use standard JavaScript debugging tools, such as the Chrome Developer Tools or React Native Debugger.
Can I use WatermelonDB with TypeScript?
Yes, WatermelonDB has full TypeScript support. You can define your database schema and models using TypeScript types, and WatermelonDB’s API is fully typed.
How can I test my application that uses WatermelonDB?
WatermelonDB provides a testing utility that allows you to create a test database and populate it with data. You can then use this test database in your tests, ensuring that your application behaves correctly when interacting with the database.
Can I contribute to WatermelonDB?
Yes, WatermelonDB is an open-source project and welcomes contributions from the community. You can contribute by reporting issues, fixing bugs, improving the documentation, or adding new features.
 Dhanraj Acharya
Dhanraj is a full-stack developer who loves experimenting with new tools and tech. You can find out more about him on his personal website.