MobX uses the "magic" of observables to manage state and side effects. This not only has a learning curve but is a different programming paradigm altogether, and there is not a lot of up-to-date training material on how to use React with Mobx, while there is far, far more content on using React with Redux.
In this intro we will progressively build up a simple app that pings a mock API to see how MobX works with React, and then make a MobX + React Kanban board to show off the power of MobX!
How we will proceed:
-
Example A. Build a basic app that lets you type an text Input that is reflected in a Display. We show the basics of establishing
observables andobservercomponents. -
Example B. We split up the Input and Display into siblings to simulate a more complex app. We also introduce async state updating by pinging a mock API. To do this we use the
mobx-reactProviderto put MobX state into React context to demonstrate easy sibling-to-sibling or sibling-to-parent communication similar toreact-redux. -
Example C: We add a secondary Display to our app. Demonstrates the usefulness of
computedvariables (a Mobx concept). - Example D: We scale our app up to do an arbitrary number of Displays. Demonstrates using arrays and maps for our MobX state.
-
Example E: Tune up and Cleanup! We add the MobX dev tools, put our whole app in
useStrictmode and explain the formal use of MobXactions andtransactions for better app performance.
This tutorial will use the recently released MobX 4 and MobX-React 5. A lot of people associate MobX with decorators, which are only a stage 2 proposal. That (rightfully) causes hesitation for some people, but MobX 4 introduces non-decorator based syntax so we don't have that excuse anymore! However; for tutorial writers this is a problem, because you have to decide to either teach one or the other or both. To resolve this, every example here will use the non decorator syntax as the primary version, but will have a clone that uses decorators to show the equivalent implementation (e.g. Example A vs Decorators A).
Note to Reader: There is not an attempt at recommending MobX over Redux or vice versa. This is solely aimed at factually introducing core MobX concepts for people like myself who were only familiar with Redux. I will attempt to draw some conclusions but reasonable people will disagree. Additionally, Michel Weststrate has stated repeatedly that both libraries address completely different requirements and values.
EXAMPLE A1: React + MobX
Here is our very basic app using React + MobX:
import { decorate, observable } from "mobx";
import { observer } from "mobx-react";

const App = observer(
  class App extends React.Component {
    text = ""; // observable state
    render() {
      // reaction
      return (
        <div>
          Display: {this.text} <br />
          <input
            type="text"
            onChange={e => {
              this.text = e.target.value; // action
            }}
          />
        </div>
      );
    }
  }
);
decorate(App, { text: observable });
You can see here that observer connects the observable text property of App so that it rerenders whenever you update text.
While this is nice, it really isn't any different from using state and setState. If you have React you don't need MobX just to do this.
EXAMPLE A2: So what?
Let's try separating the concerns of state and view model:
// this deals with state
const appState = observable({
  text: "" // observable state
});
appState.onChange = function(e) { // action
  appState.text = e.target.value;
};

// this deals with view
const App = observer(
  class App extends React.Component {
    render() { // reaction
      const { text, onChange } = this.props.store;
      return (
        <div>
          Display: {text} <br />
          <input type="text" onChange={onChange} />
        </div>
      );
    }
  }
);

// you only connect state and view later on...
// ...
<App store={appState} />
Here the store:
- is explicitly passed in as a prop (we will use the
Providerpattern later) - brings its own action handlers along with it (no separate reducers to import)
EXAMPLE A3: But that's not OO
Look at this part of the above code.
const appState = observable({
  text: "" // observable state
});
appState.onChange = function(e) { // action
  appState.text = e.target.value;
};
Yeah, I dont like that. The method isn't encapsulated within the observable. Can we make it more object oriented?
// import { decorate } from 'mobx'

class State {
  text = ""; // observable state
  onChange = e => (this.text = e.target.value); // action
};
decorate(State, { text: observable });
const appState = new State()
ahh. much better (especially the Decorators example where you don't need to use decorate)!
EXAMPLE B1: But I hate prop drilling!
Just like react-redux lets you put your store in a Provider, mobx-react also has a Provider that works in the same way. We will refactor our Display and our Input components into sibling apps:
import { inject, observer, Provider } from "mobx-react";

class State {
  text = ""; // observable state
  onChange = e => (this.text = e.target.value); // action
}
decorate(State, { text: observable });
const appState = new State();

const Display = inject(["store"])(
  observer(({ store }) => <div>Display: {store.text}</div>)
);

const Input = inject(["store"])(
  observer(
    class Input extends React.Component {
      render() {
        // reaction
        return <input type="text" onChange={this.props.store.onChange} />;
      }
    }
  )
);

// look ma, no props
const App = () => (
  <React.Fragment>
    <Display />
    <Input />
  </React.Fragment>
);

// connecting state with context with a Provider later on...
// ...
<Provider store={appState}>
    <App />
  </Provider>
Note that if I were to add a -second- store, I could simply define another observable, and pass it in to Provider as another prop, which I can then call from any child. No more redux style combineReducers!
Using a Provider also helps avoid creating global store instances, something that is strongly advised against in MobX React Best Practices.
MobX 4 Note: If you just try to use the old MobX observer(['store']) shorthand, which was always synonymous with observer + inject(['store']), you will get a very nice deprecation warning to not do that anymore.
I found this inject/observer syntax a bit fiddly, so this is a nice little utility function you can define to type less:
const connect = str => Comp => inject([str])(observer(Comp));
Hey! that's like our good friend connect from react-redux! The API is a little different, but you can define whatever you want 🤷🏼♂️.
EXAMPLE B2: Ok but what about async
Well for async API fetching we have a few choices. We can go for:
mobx-thunkmobx-observablemobx-saga- and about 300 other options.
They're all special snowflakes and we can't wait to see what you decide on!
pause for rage quit...
Ok if you couldnt tell, I was kidding. Using observables means you can "just" mutate the observables and your downstream states will react accordingly. You might have observed that I have been annotating the code examples above with // reaction, // action, and // observable state, and they mean what they normally mean in English. We'll come back to this.
Back to code! Assume we now have an async API called fetchAllCaps. This is a Promise that basically capitalizes any text you pass to it, after a 1 second wait. So this simulates a basic request-response flow for any async action you want to take. Let's insert it into our example so far!
class State {
  text = ""; // observable state
  onChange = e => {
    // action
    this.text = e.target.value;
    fetchAllCaps(e.target.value).then(val => (this.text = val));
  };
}
decorate(State, { text: observable });
const appState = new State();
Well that was... easy?
Note that here we are using the public class fields stage 2 feature for that onChange property, while not using decorators, which are also stage 2. I decided to do this because public class fields are so widespread in React (for example, it comes with create-react-app) that you likely already have it set up or can figure out how to set it up in Babel if you need to).
CONCEPT BREAK! Time to recap!
We've come this far without discussing core MobX concepts, so here they are:
- Observable state
- Actions
- Derivations (Reactions and Computed values)
In our examples above we've already used observable states as well as defined actions that modify those states, and we have used mobx-react's @observer to help bind our React components to react to changes in state. So that's 3 out of 4. Shall we check out Computed values?
EXAMPLE C: Computed Values
Computed values are essentially reactions without side effects. Because Observables are lazy by default, MobX is able to defer calculations as needed. They simply update whenever the observable state updates. Another way of phrasing it, computed values are derived from observable state.
Let's add a computed value that just reverses whatever is in text:
class State {
  text = "";
  get reverseText() {
    return this.text
      .split("")
      .reverse()
      .join("");
  }
  onChange = e => {
    // action
    this.text = e.target.value;
    fetchAllCaps(e.target.value).then(val => (this.text = val));
  };
}
decorate(State, { text: observable, reverseText: computed });
const appState = new State();

// lower down...
const Display2 = inject(["store"])(
  observer(({ store }) => <div>Display: {store.reverseText}</div>)
);
Cool! It "just works" (TM) !
A fair question to have when looking at this is: why bother?? I can always put synchronous business logic in my React render function, why have computed values at the appState level at all?
That is a fair criticism in this small example, but imagine if you rely on the same computed values in multiple places in your app. You'd have to copy the same business logic all over the place, or extract it to a file and then import it everywhere. Computed values are a great way to model derivations of state by locating them nearer to the state rather than nearer to the view. It's a minor nuance but can make a difference at scale.
By the way, vue.js also has computed variables, while Angular just uses them implicitly.
EXAMPLE D1: Observable Arrays
MobX can make basically anything observable. Let me quote the docs:
- If value is an ES6 Map: a new Observable Map will be returned. Observable maps are very useful if you don't want to react just to the change of a specific entry, but also to the addition or removal of entries.
- If value is an array, a new Observable Array will be returned.
- If value is an object without prototype, all its current properties will be made observable. See Observable Object
- If value is an object with a prototype, a JavaScript primitive or function, a Boxed Observable will be returned. MobX will not make objects with a prototype automatically observable; as that is the responsibility of its constructor function. Use extendObservable in the constructor, or @observable in its class definition instead.
In the examples above we have so far been making Boxed Observables and Observable Objects, but what if we wanted to make an array of observables?
Observable Arrays are array-like objects, not actual arrays. This can bite people in the behind, particularly when passing data to other libraries. To convert to a normal JS array, call observable.toJS() or observable.slice().
But most of the time you can just treat Arrays as arrays. Here's a very simple Todo app using an observable array:
class State {
  text = ["get milk"]; // observable array
  onSubmit = e => this.text.push(e); // action
}
decorate(State, { text: observable });
const appState = new State();

const Display = inject(["store"])(
  observer(({ store }) => (
    <ul>Todo: {store.text.map(text => <li key={text}>{text}</li>)}</ul>
  ))
);

const Input = observer(
  ["store"],
  class Input extends React.Component {
    render() {
      // reaction
      return (
        <form
          onSubmit={e => {
            e.preventDefault();
            this.props.store.onSubmit(this.input.value);
            this.input.value = "";
          }}
        >
          <input type="text" ref={x => (this.input = x)} />
        </form>
      );
    }
  }
);

const App = () => (
  <React.Fragment>
    <Display />
    <Input />
  </React.Fragment>
);
note that "just push" just works!
Example D2: Observable Maps
What's the difference between Observable Objects (what we used in Examples A, B, and C) and Observable Maps? Well, its the same difference between Plain Old Javascript Objects and ES6 Maps. I will quote the MobX doc in explaining when to use Maps over Objects:
Observable maps are very useful if you don't want to react just to the change of a specific entry, but also to the addition or removal of entries.
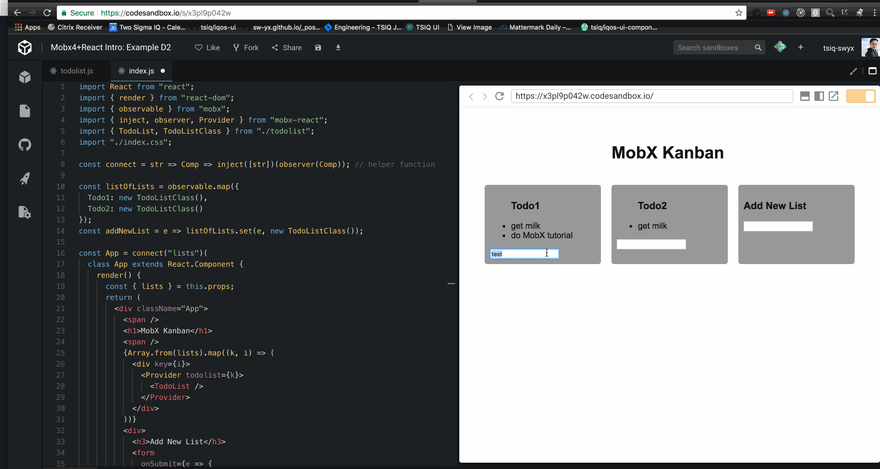
So if we want to have a bunch of Todo lists, where we can add new todo lists, this is the right abstraction. So if we take that App from Example D1, rename it to TodoList and put it in todolist.js with some other superficial tweaks, then on index.js, we can do this:
// index.js
const connect = str => Comp => inject([str])(observer(Comp)); // helper function

const listOfLists = observable.map({
  Todo1: new TodoListClass(),
  Todo2: new TodoListClass()
  // observable map rerenders when you add new members
});
const addNewList = e => listOfLists.set(e, new TodoListClass());

const App = connect("lists")(
  class App extends React.Component {
    render() {
      const { lists } = this.props;
      return (
        <div className="App">
          <span />
          <h1>MobX Kanban</h1>
          <span />
          {Array.from(lists).map((k, i) => (
            <div key={i}>
              {/*Provider within a Provider = Providerception */}
              <Provider todolist={k}>
                <TodoList />
              </Provider>
            </div>
          ))}
          <div>
            <h3>Add New List</h3>
            <form
              onSubmit={e => {
                e.preventDefault();
                addNewList(this.input.value);
                this.input.value = "";
              }}
            >
              <input type="text" ref={x => (this.input = x)} />
            </form>
          </div>
        </div>
      );
    }
  }
);
And hey presto! We have a Kanban board (an expandable list of lists)!
This was enabled by the dynamically expanding ability of that listOfLists which is an Observable Map. To be honest, you could probably also use Arrays to achieve this but if you have a use case that is better suited for demonstrating Observable Maps, please let me know in the comments below.
Example E1: MobX Dev Tools
Redux dev tools are (rightfully) an important part of Redux's value, so let's check out MobX React dev tools!
import DevTools from 'mobx-react-devtools'; // npm install --save-dev mobx-react-devtools

// somewhere within your app...
        <DevTools />
You can see the three icons pop up:
- Visualize rerenders
- Audit the dependency tree
- Log everything to console (use Browser console not Codepen console)
You can't do time travel but this is a pretty good set of tools to audit any unexpected state changes going on in your app.
Stay tuned...
There is a blocking bug with mobx-dev-tools and mobx 4: https://github.com/mobxjs/mobx-react-devtools/issues/86 and I will finish this out when the bug is fixed.
However in the mean time you can check out how to explicitly define actions so that MobX can batch your state changes into transactions, which is a big performance saver:
https://mobx.js.org/refguide/action.html
Notice how we were able to do all our demos without using the actions - MobX has a (poorly) documented strict mode (formerly useStrict, now configure({enforceActions: true});) - see the MobX 4 docs. But we need the dev tools to really show the benefits for our example app.
Acknowledgements
This introduction borrows a lot of code and structure from Michel Weststrate's egghead.io course, but updates the 2 year old course for the current Mobx 4 API. I would also like to thank my employer for allowing me to learn in public.
The examples here were done with the help of Javid Askerov, Nader Dabit, and Michel.
Other Tutorials and Further Reading
Other recent guides
Docs
- MobX docs - common pitfalls and best practices
- MobX changelog - be very careful on v3 vs v4 changes
- official MobX+React 10 minute guide
Older
Related libraries to explore
- MobX state tree and associated blogpost
Contribute
What other current (<1yr) resources should I include in this guide? Have I made any mistakes? Let me know below!


Top comments (2)
Hey thank you for this awesome tutorial! At my new job, we use Mobx so I have to familiarize myself with it. The way you structured this tutorial made it super easy to follow and understand the concept :)
(btw, I noticed in the EXAMPLE B1 section, the Decorators B1 hyperlink points to Decorators B2 codesandbox)
Very well explained! Thanks