


This post is a part of the React Daily UI post series, a joint effort between Jack Oliver, Sophia Shoemaker, and the rest of the team at Fullstack React. Each day we're explaining in detail how to create a UI component with React.
You can view the Codepen implementation here
Or you view the code on Github here
Welcome to React Daily UI, where we go 100 days building 100 beautiful React applications. We're really excited to be partnering with Jack Oliver who is embarking on this ambitious project with us.
Jack is designing and writing the code for these applications and we're going to deconstruct each one to highlight the features that are unique to React.
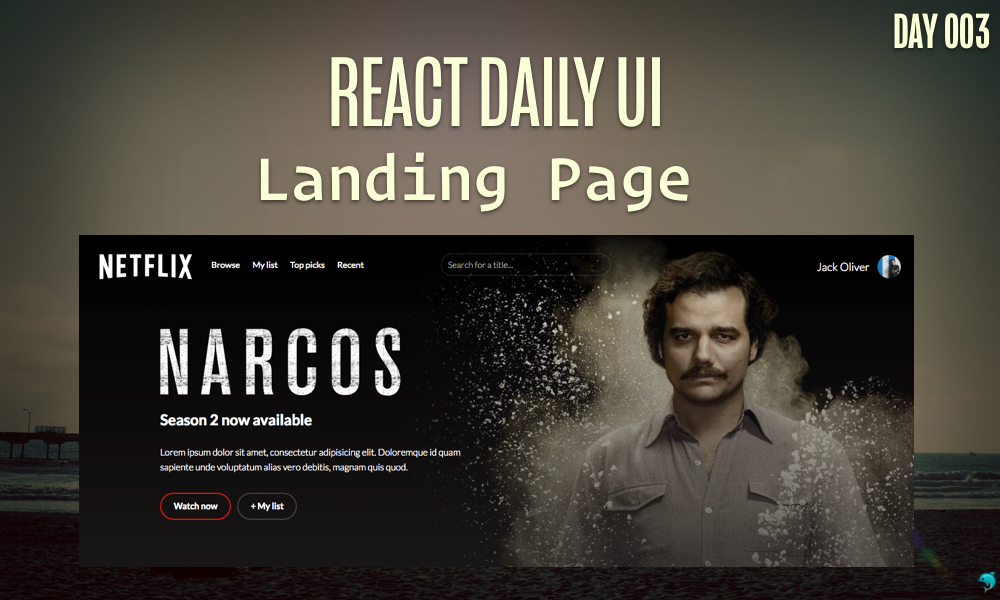
Today we're going to create a landing page similar to Netflix to browse movies:
Overview
This landing page has a couple of interesting components that we are going to explore today. There is a search box at the top that allows us to search for movies and get information about them. The API we'll be using is not actually the Netflix API, rather we're using an API from The Movie DB. They have an extensive database of movies and TV shows from all different genres and time periods. When we hover over the image of a particular show or movie, we get some more information about it. We also have the ability to select and deselect shows or movies we are interested in.
While our application appears to have many components, there are only 3 components that have logic modifying the state of our application. The three key components we'll look at are:
- Our main
Appcomponent, which contains the logic for our search box. We'll use a controlled input for our search box and explain the difference between controlled and uncontrolled inputs in React. - The
TitleListcomponent which contains the logic needed to retrieve results from The Movie DB API. This is where we'll use the JavaScriptfetchAPI and explain how Promises work with thefetchAPI. - The
ListTogglecomponent which has the logic for selecting and deselecting our favorite movies and TV shows. We'll learn how to use thedataattribue combined with a component'sstateto toggle a view.
Table of Contents

Want to be a pro at building UIs in React?
This post is the first of many that will explain step-by-step how to create professional UI components in React. If you want to become a pro at building UIs in React, put in your email below and we'll notify you as each post is completed.
The App component
Our App component is our main component. The App component contains a search box that displays search results when the user enters a search term and submits the form. The simplest way to implement this functionality is by using "controlled inputs", which we'll explain how to use in this section. React also has something called "uncontrolled inputs" which we won't use in our application, but it's important to know the difference between the two types.
Controlled vs Uncontrolled Inputs
React has two different approaches to dealing with form inputs. While the syntax is similar, there are some differences you need to be aware of when dealing with forms in React.
Uncontrolled Inputs
An uncontrolled input is an input that is just like any normal input we would use outside of React. When a user inputs data into a form field (an input box, dropdown, etc) the updated information is reflected. To access the form data we need to access the underlying DOM representation of the form itself. The JSX sytnax for an uncontrolled input looks like this:
<input type="text" name="title"/>
Notice that there is no value attribute in the input -- adding the value attribute would make it a controlled input.
Controlled Inputs
The other variety of form inputs is called a "controlled input". React handles the value of the input, not the browser. The JSX syntax for a controlled input looks like this:
<input type="text" name="title" value="Hello World!"/>
When the user tries to type in the input box, nothing will change. In order for the user to see changes, we need to do two things:
- Add an
onChangehandler to the input - Change the
valueattribute of the input from a hard coded string (or empty) to use a value contained in our component'sthis.stateproperty.
From the example above, our input would now look like this:
<input type="text" value={this.state.value} onChange={this.handleChange}/>
So, how does this work in our application? For a simple search box, we use a controlled input. This allows us to easily update other parts of our application based on what the user inputs into the search box. We will store our input box's value in the this.state.searchTerm property of our component and pass the data to the child component that needs it to render the right information when the user hits enter or clicks the submit button.
What is
state?When we refer to a component's
state, we mean a snapshot of the instance of the component on the page. React's components can define their ownstatewhich we'll use in today's post, and others in the future. Using thestateproperty allows us to manipulate a React component's view and data associated with the view to keep track of the local state of the component.
We set the initial state of our input by defining a method called getInitialState. React expects us to return a JavaScript object from this method that stores any sort of data we want to manipulate or display in the component.
Let's tell React that the App component keeps a two items in it's local state, a string we will call searchTerm and a string we'll call searchUrl:
getInitialState: function() {
  return {searchTerm:"", searchUrl:""};
},
Similar to the example input we looked at above, our search box input has an onChange handler and the value of our input is this.state.searchTerm:
<input onKeyUp={this.handleKeyUp} onChange={this.handleChange} type="search" placeholder="Search for a title..." value={this.state.searchTerm}/>
onChange event handler
When the user types a search term in the input box, the onChange event is triggered and the handleChange function is called. In the handleChange function we modify the value of this.state.searchTerm by using the this.setState() function. Although a component's state is available via this.state, we should treat this.stateas a readonly object and only ever change the state using the setState method available on a React component.
The setState method sends the state object into a queue to be batched for DOM updates, so modifying or changing any portion of a component's state should only happen via setState.
onKeyUp event handler
We have another event prop on our input box, onKeyUp. When the user pushes a key down and then releases a key in the input box, this event is triggered, similar to how the onChange event is triggered. We assign the handleKeyUp function to this prop. In this function we check if the user has pressed the enter key. If so, then we generate the search url and call this.setState to set the correct URL:
  if (e.key === 'Enter' && this.state.searchTerm !== '') {
    var searchUrl = "search/multi?query=" + this.state.searchTerm + "&api_key=" + this.apiKey;
    this.setState({searchUrl:searchUrl});
  }
},
If this.state.searchUrl is blank, the TitleList component (which we'll explore in the next section) that contains the search results doesn't render any results. If this.state.searchUrl contains a string (or that string changes) the TitleList component containing the search results renders the data.
The TitleList component
In our application, we have a TitleList component that displays the various movies and TV shows for each section. To retrieve the information about the movies and TV shows, we will query The Movie DB API using the global fetch method in JavaScript. This new method replaces the XMLHttpRequest API and is a cleaner, simpler interface which makes use of Promises.
Promises in JavaScript
JavaScript is a single threaded environment. What does this mean? It means that when a piece of code is running, no other code can be running at the same time. Why does this matter? If we have code in an application that takes a long time (more than a few seconds), we don't want to stop our entire application from running in case the user decides to interact with it in some other way.
Promises allow us to write non-blocking code. For example, in our application we are making requests to The Movie DB API. When we request information about movies from this API, we don't want to block other parts of our application from running while we are waiting for a response back from the server.
What is a Promise?
A
Promisein JavaScript is an object that represents a value that is either available now, in the future or possibly never. When aPromiseis created, the actual value of the of thePromiseis not necessarily known. APromiseallows for asynchronous actions such as AJAX requests.
The fetch API uses Promises so it's important to learn how Promises work so we can understand the fetch API better. A Promise object has three different states:
- Pending -- the initial state
- Fulfilled -- the operation completed successfully
- Rejected -- the operation encountered a problem and did not complete
This graph from the Mozilla Developer's Network shows the flow of a Promise object as it handles operations:

Every Promise object has two important methods available: the then method and the catch method. The then method is what is called when the operation completed successfully. In the case of an AJAX request, this is where we handle the data that comes back from the request. The catch method is where we handle any errors.
Both of these methods return a Promise. Since these methods return a Promise, we can chain Promises together like so:
api().then(function(result){
    return api2();
}).then(function(result2){
    return api3();
}).then(function(result3){
     // do work
});
By chaining Promises together we can avoid what's commonly referred to as "callback hell" when we have multiple asynchronous actions we want to happen in a certain sequence.
Let's learn how to put Promises into practice by exploring the fetch JavaScript API.
The fetch API
The fetch API is the new EcmaScript6 (also known as ES6) standard for making requests. It is a better version of the XMLHttpRequest API, with a simpler, cleaner API and avoids "callback hell" by making use of Promises.
The fetch method takes two parameters — the URL that you are requesting (or a Request object) and an "options" object and it returns a Promise object. For our use case, we are just going to worry about the first parameter. If you're interested in learning how the options object is used, you can read more here.
In our component, we implement the componentDidMount method. This is the function where we want to make our AJAX requests to retreive data from The Movie DB API. This method is one of the many 'lifecycle hooks' that React components have. 'Lifecycle hooks' are methods that are executed at specific points in a component's lifecycle. We can define custom functionality in these methods during different phases of the component. The componentDidMount method is executed just after the component has been rendered to the page. Within our componentDidMount function we call a function: this.loadContent:
componentDidMount: function() {
  if(this.props.url !== ''){
    this.loadContent();
    this.setState({mounted:true});
  }

},
Our this.loadContent function is where all the action happens and we make a request for data. In the first line of this method we piece together the URL for our request:
var requestUrl = 'https://api.themoviedb.org/3/' + this.props.url + '&api_key=' + this.apiKey;
Each TitleList component we use in our application retrieves different data from the API -- one TitleList component displays the most popular movies and TV shows right now, another TitleList component displays the best Sci-Fi movies and shows. In total, we use the TitleList component 6 different times to display a variety of movies and TV shows:
<TitleList title="Search Results" url={this.state.searchUrl} />
<TitleList title="Top TV picks for Jack" url='discover/tv?sort_by=popularity.desc&page=1' />
<TitleList title="Trending now" url='discover/movie?sort_by=popularity.desc&page=1' />
<TitleList title="Most watched in Horror" url='genre/27/movies?sort_by=popularity.desc&page=1' />
<TitleList title="Sci-Fi greats" url='genre/878/movies?sort_by=popularity.desc&page=1' />
<TitleList title="Comedy magic" url='genre/35/movies?sort_by=popularity.desc&page=1' />
From our App component, we pass a prop to our component named url which is a string. This string is the portion of The Movie DB API that is different for each TitleList component.
Now, in our this.loadContent function, we refer to that string by using this.props.url. We concatenate the other pieces of the URL with this.props.url to create the full URL needed to make a request:
var requestUrl = 'https://api.themoviedb.org/3/' + this.props.url + '&api_key=' + this.apiKey;
Now that we've created the correct URL to retrieve the data we need, we can use the fetch method to actually get the data. The URL is the argument we pass to the fetch method, and the method returns a Promise object which we'll use to process the data received from the API request. As we mentioned previously, Promise objects have a then method which takes two callback functions as arguments. The first callback function is the one that gets called when the Promise successfully resolves (or in our particular scenario, we've received a response back from the server). The success callback function has a Response object as it’s parameter. The Response object also has several methods available to it, one of which is a .json() method which also returns Promise. So, if you want to do anything with a response from an API request and that response is in a JSON format, you’ll need to chain multiple Promises together like this:
fetch(requestUrl).then((response)=>{
    return response.json();
}).then((data)=>{
    this.setState({data : data});
}).catch((err)=>{
The response.json() returns a Promise that resolves to an object literal containing the data from our request.
After retrieving the data, we call this.setState to re-render our TitleList component and display the newly requested content:
}).then((data)=>{
    this.setState({data : data});
}).catch((err)=>{
componentWillReceiveProps method
Our TitleList component implements another 'lifecycle hook' method called componentWillReceiveProps. The componentDidMount is useful for the first time a component is rendered, but what if we receive new data from our App component and need to re-render our component? This is where the componentWillReceiveProps method comes in handy. In our App component we have this.state.searchUrl which is passed down to the first TitleList component via the url prop. When this prop gets updated, the componentWillReceiveProps method is triggered. If our TitleList component receives a new URL (in this case a new search term was submitted), we want to call our loadContent method again to request new data from The Movie DB API.
componentWillReceiveProps : function(nextProps){
  if(nextProps.url !== this.props.url && nextProps.url !== ''){
    this.setState({mounted:true,url:nextProps.url},()=>{
      this.loadContent();
    });

  }
},
The ListToggle component
Our ListToggle component is a small icon container found within our Item component which is a child of our TitleList component. When we click on the icon, we are either indicating that we like a show or that we are no longer interested in it.

Using data attributes with this.setState
In order to toggle between the two different styles for our icon, we give the ListToggle state object a boolean and call it toggled. We use the getInitialState method to set the initial value of toggled:
getInitialState: function() {
  return({ toggled: false })
},
We add an onClick attribute to our outer div in our render function. We also have use a data attribute which gets the value of this.state.toggled. We will use this data-toggled attribute in the next section when we discuss how to style the icon with CSS.
<div onClick={this.handleClick} data-toggled={this.state.toggled} className="ListToggle">
What is a data attribute?
HTML5 introduces a new attribute valid for use in HTML elements -- the
dataattribute. Rather than using theidorclassattribute to store information about an element, we can now use thedataattribute to store extra information about our element that isn't necessarily related to the style of the element. We can use any lowercased name prefixed withdata-to create adataattribute and assign it a string value.
We assign the onClick attribute the handleClick function. In the handleClick function we toggle the boolean between true and false :
handleClick: function() {
  if(this.state.toggled === true) {
    this.setState({ toggled: false });
  } else {
    this.setState({ toggled: true });
  }

},
Now, our data-toggled attribute will get updated with a true or false value
Using CSS flexbox
Our CSS stylesheet has a few lines of code for the initial styles of the icon. The icon itself is white and centered in the middle of the .ListToggle parent container. It has a height and width of 32px Our icon element <i> has a couple of CSS styles that are newer -- the display: flex, align-items:center and justify-content:center styles. These three styles are part of the new CSS3 Flexible Box or flexbox layout mode. Using flexbox makes arranging elements on a page more predictable given that we now have many different screen sizes to manage when building web applications. When we specify the display:flex style, then all the direct children of that element will have access to flexbox styles. We give our <i> element two other styles, align-items:center and justify-content center so that the content inside the <i> element will be exactly in the center. The justify-content:center centers the content horizontally within the container and the align-items:center centers the content vertically within the container.
.ListToggle div i {
  display: -webkit-box;
  display: -webkit-flex;
  display: -ms-flexbox;
  display: flex;
  -webkit-box-align: center;
  -webkit-align-items: center;
      -ms-flex-align: center;
          align-items: center;
  -webkit-box-pack: center;
  -webkit-justify-content: center;
      -ms-flex-pack: center;
          justify-content: center;
  height: 32px;
  width: 32px;
}
We use two different icons depending on whether or not the user clicks on the icon. The two icons are stacked one on top of the other.
<div onClick={this.handleClick} data-toggled={this.state.toggled} className="ListToggle">
The div that surrounds the two icon has a height of 64px and a width of 32px, positioned absolutely. Having this div twice the height of the width will come into play when the user clicks the icon and we change the styles.
.ListToggle div {
  position: absolute;
  top: 0;
  left: 0;
  height: 64px;
  width: 32px;
  -webkit-transition: .125s ease;
  transition: .125s ease;
}
Our .ListToggle element which wraps the two icons and their parent div container has a white border and a height and width of 32px, which without the border-radius style would make it a perfect square. Giving our .ListToggle element a border-radius:50% will make it a circle.
.ListToggle {
  border: 2px solid rgba(255, 255, 255, 0.2);
  width: 32px;
  height: 32px;
  font-size: 16px;
  border-radius: 50%;
  overflow: hidden;
  position: absolute;
  right: 20px;
  top: 20px;
  opacity: 0;
}
When a user hovers over the icon or clicks the icon, the styles change. We use CSS attribute selectors to change the style of our icon when a user clicks on it. To target elements that have a data-toggled attribute set to true we use this syntax:
.ListToggle[data-toggled="true"] {
  background: #e50914;
  border: 2px solid #e50914;
}

.ListToggle[data-toggled="true"] div {
  top: -32px;
}
And when a user hover overs the icon we use similar styles like this:
.ListToggle:hover {
  border: 2px solid #ffffff;
}

.ListToggle:hover div {
  top: -32px;
}
This is where having the div that is twice the height of the icons comes into play. Only half of the div is actually visible, since the outer .ListToggle element only has a height of 32px. When we set top:-32px we shifting which portion of the div is visible. So, the top <i> element is visible when we set top:-32px and the bottom <i> element is visible when we set top:0px
Try it out!
Check out the Codepen example:
The complete source for this article is also available on Github here.
To start the app, download the code,
cdinto the project directory and type:npm install npm start
Be notified of new posts?
This post is the first of many that will explain step-by-step how to create professional UI components in React. If you want to become a pro at building UIs in React, put in your email below and we'll notify you as each post is completed.
Learn React the right way
The up-to-date, in-depth, complete guide to React and friends.
Download the first chapter