React State Management Using Easy Peasy

Email Newsletter
Weekly tips on front-end & UX.
Trusted by 200,000+ folks.

 Register!


 Flexible CMS. Headless & API 1st
In building React applications, one of the most important questions for developers include managing state effectively. In this tutorial, we are going to learn how to use Easy Peasy for managing state in React applications. We’d understand the core concepts of Easy Peasy, some use cases for it, why it should be used for your next application and build a simple example. Easy Peasy is open source with more than 4.1k stars on GitHub.
This tutorial will be beneficial to readers who are interested in learning how to manage state with Easy Peasy in their React applications, or looking for alternatives in regards to state management in a React application. This article requires a basic understanding of React and JavaScript.
What Is Easy Peasy?
Easy Peasy is a state manager that works similar to Redux but with less code and complexity than Redux. Easy Peasy was built in mind to provide the same performance as Redux and other state managers.
Core concepts of Easy Peasy include the following hooks and methods.
- Store
Similar to Redux, Easy Peasy requires a store powered by React Context, which will disclose the application state to certains parts of your application. - State
This is an essential part of Easy Peasy because it uses the state or model to define your application store. - Thunk Action
This is used in Easy Peasy to perform operations that are termed side effects, such as making an API call. - Actions
Actions are used to update the application store. - useStoreState
This is a custom hook from Easy Peasy that gives our components access to the application’s store state. - useStoreActions
Like the name implies, this hook gives our components access to the store’s actions. - Provider
Similar to Redux, Easy Peasy comes with a Provider method that exposes the store to our React app, this is done so our components will be able to consume the store with React hooks.
Easy Peasy can be installed using any package manager by using the command below:
npm install easy-peasyOr this command for yarn package manager :
yarn add easy-peasyWhy Easy Peasy?
Easy Peasy’s main objective is to improve state management for React developers and make for an easier way of managing application state with less code and boilerplate. Easy Peasy removes the abstractions of Redux and simplifies state management with a simpler process, making it easier for anyone to use in React applications.
Easy Peasy also provides support for React Hooks based API and Redux middlewares such as Redux thunk out of the box. With this, Easy Peasy can be setup to perform API requests as side effect using thunk actions. Let’s see the API call below for an example of a request that deletes a user and gets a user by their id.
import { action, computed, createContextStore, thunk } from 'easy-peasy';
import { deleteUser, getUserById } from './user';

const UserStore = createContextStore({
  getUsers: thunk(async actions => {
    actions.setIsLoading();
    try {
      const { data } = await getUsers();
      actions.setUsers(data);
    } catch (e) {
      actions.setError(e);
    }
    actions.setIsLoading();
  }),
  getUserById: thunk(async (actions, id) => {
    actions.setIsLoading();
    try {
      const { data } = await getUserById(id);
      actions.setUser(data);
    } catch (e) {
      actions.setError(e);
    }
    actions.setIsLoading();
  })
});
In the code block, we are getting users from the API using the getUser thunk and setting the user as our current state, we also did the same thing to the deleteUser method.
Easy Peasy vs Redux/MobX/HookState
Similar to other state managers like Redux and MobX, Easy Peasy makes use of a single store to handle the application state, and it also appreciates the use of actions as a source of data for our application store. It’s important to note that Easy Peasy uses Redux internally to manage state.
Unlike Redux and MobX, Easy Peasy requires little to no boilerplate code to work with, Easy Peasy uses Immer under the hood, which gives developers the power to interact with data while keeping the benefits of the immutable data.
Easy Peasy allows developers to extend the application store by using Redux middlewares and other custom hooks to enhance performance.
Compared to React HookState, Easy Peasy offers more ease of managing and updating state with a single store and sharing information with component using custom hooks such as useStoreState and useStoreAction which comes out of the box with Easy Peasy.
With its ease and zero boilerplate code, Easy Peasy can be used to manage state from simple React to-do applications to larger applications. Easy Peasy also provides a support for TypeScript out of the box.
Building Notes Application With Easy Peasy
Now that we know the core concepts of Easy Peasy, we’ll be building a notes application and managing the state with Easy Peasy. The application will allow users to add, delete and temporary cancel a note using a toggle.
Without further ado, let’s start!
Setting Up Your Environment
First, let’s create a bare React application, write the code block below on your terminal:
create-react-app easy-peasy-notes-appThe above code will create a bare React application using the create-react-app package. Move into the project directory and add the dependencies we’d need for our application.
cd easy-peasy-notes-appyarn add easy-peasy uuid
In the above code block, we installed- easy-peasy
Our state manager for our application. - uuid
This is for creating unique string of notes for our application.
If you’ve done this, then start the project server using the command below:
yarn startNext, let’s create a components folder in our src directory, we’d be creating three components and an app store for our application.
Creating The App Store
As mentioned above, Easy Peasy works with a store to hold the application state. With this we can access the application store and update the state. In the store, we’d need to set up a function to add, toggle and delete notes in our application.
To create our app store, first create a Store.js file in our project’s src directory, next let’s add logic to our store.
import { action } from "easy-peasy";
import uuid from "uuid";

export default {
  notes: [],
  setNote: action((state, notes) => {
    state.notes = notes;
  }),
  addNote: action((state, note) => {
    note.id = uuid.v4();
    state.notes.push(note);
  }),
  toggleNote: action((state, id) => {
    state.notes.map((note) => {
      return note.id === id ? (note.completed = !note.completed) : note;
    });
  }),
  removeNote: action((state, id) => {
    state.notes = state.notes.filter((note) => note.id !== id);
  })
};
In the code above, we imported actions from easy-peasy, the actions will be used to update our application store, we imported uuid to give unique ids to our notes when they are created. We initialized notes as an empty array object and created a function setNote that takes in the state and note parameters and sets the current note as the value for state.notes.
The addNote function takes in two parameters, an initial state and a note, next we assigned the note id to one automatically provided by uuid.v4() and pushes the new note into the state.notes array.
The toggleNote takes in the state and id parameters and using the native JavaScript map object to cross off completed notes by toggling the value of note.completed, the removeNote object deletes a note using the filter object.
We will use the logic above to create our application’s component in the next section.
Building The Note Component
Here, we will build our note component which will be the basic component for how each list will look on our application, to do this, let’s create a components folder in the src directory of our project and create a new file Note.jsx and inside it, write the code block below.
import React from "react";
import { useStoreActions } from "easy-peasy";

const Note = ({ note }) => {
  const { completed } = note;
  const removeNote = useStoreActions(actions => actions.removeNote);
  const toggleNote = useStoreActions(actions => actions.toggleNote);
  return (
    <li className="d-flex justify-content-between align-items-center mb-2">
      <span
        className="h2 mr-2"
        style={{
          textDecoration: completed ? "line-through" : "",
          cursor: "pointer"
        }}
        onClick={() => toggleNote(note.id)}
      >
        {note.title}
      </span>
      <button
        onClick={() => removeNote(note.id)}
        className="btn btn-danger btn-lg"
      >
        ×
      </button>
    </li>
  );
};

export default Note;
Here, the useStoreActions hook from easy-peasy give our Note component access to the actions in the store, in this case the toggleNote for crossing off a note as completed and addNote for adding a new note. We returned the li tag which contains the new note.
Next, we added a delete button for our application, similar to the toggling a note, we added an onClick event that takes in the removeNote action, if we did this correctly our app should look like the image below.

Building Notes Component
This component will act as a render for our notes, here we will add a header component for our application name and render all our notes in this component, let’s do that below.
import React from "react";
import { useStoreState } from "easy-peasy";
import Note from "./Note";
const Notes = () => {
  const notes = useStoreState((state) => state.notes);
  return (
    <>
      <h1 className="display-4">Notes</h1>
      {notes.length === 0 ? (
        <h2 className="display-3 text-capitalize">Please add note</h2>
      ) : (
        notes.map((note) => <Note key={note.id} note={note} />)
      )}
    </>
  );
};
export default Notes;
Here, we imported the useStoreState hook from easy-peasy, the useStoreState grants our component access to the store’s state, next we created a functional component notes and using the useStorestate we assigned notes to the state of the application found on the store.
As an edge case using a tenary operaor, we will drop a text for the user to add a note if they haven’t and to render a note if they did. You can learn more about tenary operators here.
Building NotesForm Component
This component will be the bulk of our application, here will will handle submitting our notes and setting it as the updated value of our application state. Let’s build the component below.
import React, { useState } from "react";
import { useStoreActions } from "easy-peasy";

const NotesForm = () => {
  const [title, setTitle] = useState("");
  const [err, setErr] = useState(false);
  const addNote = useStoreActions(actions => actions.addNote);
  const handleSubmit = e => {
    e.preventDefault();
    if (title.trim() === "") {
      setErr(true);
    } else {
      setErr(false);
      addNote({
        title,
        completed: false
      });
    }
    setTitle("");
  };
  return (
    <>
      <form onSubmit={handleSubmit} className="d-flex py-5 form-inline">
        <input
          type="text"
          placeholder="Add Todo Title"
          value={title}
          className="form-control mr-sm-2 form-control-lg"
          onChange={e => setTitle(e.target.value)}
        />
        <button type="submit" className="btn btn-success btn-lg rounded">
          Add Note
        </button>
      </form>
      {err && (
        <div className="alert alert-dismissible alert-danger">
          <button
            type="button"
            className="close"
            data-dismiss="alert"
            onClick={() => setErr(false)}
          >
            ×
          </button>
          <strong>Oh oh!</strong>{" "}
          <span className="alert-link">please add a valid text</span></div>
      )}
    </>
  );
};
export default NotesForm;
In this component, first in order to access our project’s action objects in the store, we imported the useStoreActions and initialized the addNote action for adding a note in our component, next we created an input form that includes input for adding notes, submitting a note to be added and a button for alert for when a user tries to add an empty note using the input.
A final act will be to setup our App.js file and wrap our application using a Provider and restart our server to see our final application, let’s do tht in the code block below.
import React from "react";
import "./styles.css";
import Notes from './components/Notes';
import NotesForm from './components/NotesForm'

import { StoreProvider, createStore } from "easy-peasy";
import store from "./Store";

const Store = createStore(store);
function App() {
  return (
    <StoreProvider store={Store}>
      <div className="container">
        <NotesForm />
        <Notes />
      </div>
    </StoreProvider>
  );
}
Here, we are imported the StoreProvider and createStore, the StoreProvider exposes the store to our application so that our components will be able to able to consume the store using hooks while the createStore similar to Redux creates a global store based on the models we’ve provided, next we wrapped our App component using the store as a parameter of the StoreProvider.
Once done correctly, our app should look like the image below.

API Request With Easy Peasy
In this section, we are going to look at handling API requests with Easy peasy, to better understand this, we will be building a currency converter using React, TypeScript and Easy peasy to manage the state of the application. In our application, users should be able to convert dollars to any currency, users can input the amount they’d like to convert and the currency they’re converting to.
First, we will create a react app using the command below.
create-react-app currency-converterWe will add typescript support and reactstrap for styling using the Yarn package manager.
yarn add @testing-library/jest-dom @testing-library/react @testing-library/user-event @types/jest @types/node @types/react @types/react-dom axios bootstrap easy-peasy reactstrap typescriptFor TypeScript support, create a tsconfig.json file in the root directory of our project and copy the code block below into it.
{
  "compilerOptions": {
    "target": "es5",
    "lib": [
      "dom",
      "dom.iterable",
      "esnext"
    ],
    "allowJs": true,
    "skipLibCheck": true,
    "esModuleInterop": true,
    "allowSyntheticDefaultImports": true,
    "strict": true,
    "forceConsistentCasingInFileNames": true,
    "noFallthroughCasesInSwitch": true,
    "module": "esnext",
    "moduleResolution": "node",
    "resolveJsonModule": true,
    "isolatedModules": true,
    "noEmit": true,
    "jsx": "react-jsx"
  },
  "include": [
    "src"
  ]
}
After we’ve added the code above, to finish TypeScript configuration for our project, create a new file in the root directory of our project named react-app-env.d.ts, this file will reference the type of react-scripts we’d have in our project, you can learn more about it here.
/// <reference types="react-scripts" />Building Our App’s Store
To get started on our project proper, in the src directory of your project, create a store folder for our app’s store and inside it, create two files, index.ts and typehook.ts. Our index.ts file will contain our TypeScript interfaces for our API functions and our application store actions while our typehook.ts will contain Typed hooks from Easy peasy. In the code block below, we will create interfaces for our API requests.
import { createStore, Action, action, Thunk, thunk } from "easy-peasy";
import axios from "../axios";

export interface ICurrency {
  currency_name: string;
  currency_code: string;
  decimal_units: string;
  countries: string[];
}
interface IAllCurrencies {
  data: ICurrency[];
  updateResult: Action<IAllCurrencies, ICurrency[]>;
  getAllCurrencies: Thunk<IAllCurrencies>;
}
interface ICurrencyRates {
  rates: { [key: string]: string };
  updateRates: Action<ICurrencyRates, any>;
  getCurrencyRates: Thunk<ICurrencyRates>;
}
interface IConversion {
  data: {
    to: string;
    amount: string;
  };
  updateTo: Action<IConversion, string>;
  updateAmount: Action<IConversion, string>;
}
export interface IStore {
  allCurrencies: IAllCurrencies;
  currencyRates: ICurrencyRates;
  conversion: IConversion;
}

const store = createStore<IStore>({
  allCurrencies: {
    data: [],
    updateResult: action((state, payload) => {
      state.data = Object.values(payload);
    }),
    getAllCurrencies: thunk(async (actions) => {
      try {
        const res = await axios.get(`/currencies`);
        actions.updateResult(res?.data?.response?.fiats);
      } catch (error) {
        console.log(error);
      }
    }),
  },
  currencyRates: {
    rates: {},
    updateRates: action((state, payload) => {
      state.rates = payload;
    }),
    getCurrencyRates: thunk(async (actions) => {
      try {
        const res = await axios.get(`/latest`);
        actions.updateRates(res?.data?.response?.rates);
      } catch (error) {
        console.log(error);
      }
    }),
  },
  conversion: {
    data: {
      to: "",
      amount: "",
    },
    updateTo: action((state, payload) => {
      state.data.to = payload;
    }),
    updateAmount: action((state, payload) => {
      state.data.amount = payload;
    }),
  },
});
export default store;
Here, we created interfaces, which defines the contract on the properties we have, for example in ICurrency we enforced the name, code, decimal units and countries to be of type string.
In IAllCurrencies we defined the data we’ll get from the API as an array containing the object we’ve defined in ICurrency, we also enforced our updateResult works based on the interface of IAllCurrencies and accepts a payload of ICurrency in an array while the getAllCurrencies method uses a Thunk to perform asynchronous functions.
We added an interface for ICurrencyRates, we defined rates to take in objects with keys which must be strings and also accept a string payload and updateRates will work with the data and any data type, getCurrencyRates uses Thunk to perform asynchronous functions with the data returned.
To create store, we first called the easy-peasy store, in our case we structured the store to use the IStore interface, next we called the allCurrencies object from the IStore, inside it we will receive the data as an array.
Similar to Redux, to update a state in easy peasy, you’d use an action. To update our state, we defined the action updateResult which acts as a reducer and takes in our current state and the user’s payload and sets the current state using the values we get from the user’s payload. You can learn more about updating the store and createStore.
To getAllCurrencies we performed an async operation using axios to get all currencies and use actions from set the data as the response, in the case of errors we wrapped the full application with a try…catch method. We performed similar functions in our currencyRate object, updating the state with an action and performing an async operation to get the latest rates from the API and setting the state using the data we receive.
The Conversion object converts the amount inputted by the user from dollars to any currency the user chooses, to display the amount we defined an action that updates and renders the amount converted to the user.
Building Our Store Type Hooks
When using Easy Peasy with TypeScript, hooks are often recommended to have types, often this is done with interfaces defined in the project store. In this section, we will add types to the hooks we will be using in our application.
To do this, inside of our store directory, create a new file called typehook.ts and inside it, write the code block below.
import { createTypedHooks } from "easy-peasy";
import { IStore } from "./index";

const typedHooks = createTypedHooks<IStore>();

export const useStoreActions = typedHooks.useStoreActions;
export const useStoreDispatch = typedHooks.useStoreDispatch;
export const useStoreState = typedHooks.useStoreState;
In the code block above, we are adding types to our useStoreActions, useStoreDispatch and our useStoreState hooks, with this we are configuring it to the interfaces we’ve defined in our IStore. By doing this, whatever actions we are dispatching here will come from actions from the store.
Building Header Component
In this section, we will add a Header to our application, the application header will contain our header, input fields for the user to add the amount and the currency they wish to convert. First, inside of our src directory, create a components folder and inside that folder, we’ll create a header folder, which will contain a header.tsx file. Let’s add the logic for this.
import { useState } from "react";
import { Button, Form, FormGroup, Input, Jumbotron } from "reactstrap";
import { ICurrency } from "../../store";
import { useStoreState, useStoreActions } from "../../store/typehook";

const Header = () => {
  const allCurrencies = useStoreState((state) => state.allCurrencies.data);
  const setAmountToConvert = useStoreActions((actions) => actions.conversion.updateAmount);
  const setCurrencyToConvertTo = useStoreActions((actions) => actions.conversion.updateTo);
  const [to, setTo] = useState<string>("");
  const [amount, setAmount] = useState<string>("");

  const onSubmitHandler = (e: { preventDefault: () => void }) => {
    e.preventDefault();
    (to && amount) && setAmountToConvert(amount);
    (to && amount) && setCurrencyToConvertTo(to);
  };
In the code block above, we imported the ICurrency object from our store, we also imported useStoreState and useStoreActions from our custom typed hooks.
We initialized our Header as a functional component, next we create a constant allCurrencies to get the state of allCurrencies in our store. With setAmountToConvertTo, there we called an action, the action we called is the updateAmount action from the store.
Using React useState, we defined the state we want to update, we added a <string> to let our app know that state we are updating and defining is of string type.
To handle submit, we created a function onSubmitHandler which converts an amount and currency the user inputted on submit.
To finish our Header component, let’s render the input fields using react strap for our components and bootstrap for styling, to do that we’d append the code block below to the functions we’ve defined at the beginning of this section.
return (
<div className="text-center">
<Jumbotron fluid>
<h1 className="display-4">Currency Converter</h1>
<div className="w-50 mx-auto">
<Form id='my-form' onSubmit={onSubmitHandler}>
<FormGroup className="d-flex flex-row mt-5 mb-5">
<Input
type="number"
value={amount}
onChange={(e) => setAmount(e.target.value)}
placeholder="Amount in Number"
/>
<Input
type="text"
value="from USD ($)"
className='text-center w-50 mx-4'
disabled
/>
<Input
type="select"
value={to}
onChange={(e) => setTo(e.target.value)}
>
<option>Converting to?</option>
{allCurrencies.map((currency: ICurrency) => (
<option
key={currency?.currency_code}
value={currency?.currency_code}
>
{currency?.currency_name}
</option>
))}
</Input>
</FormGroup>
</Form>
<Button
color="primary"
size="lg"
block
className="px-4"
type="submit"
form='my-form'
>
Convert
</Button>
</div>
</Jumbotron>
</div>
);
};
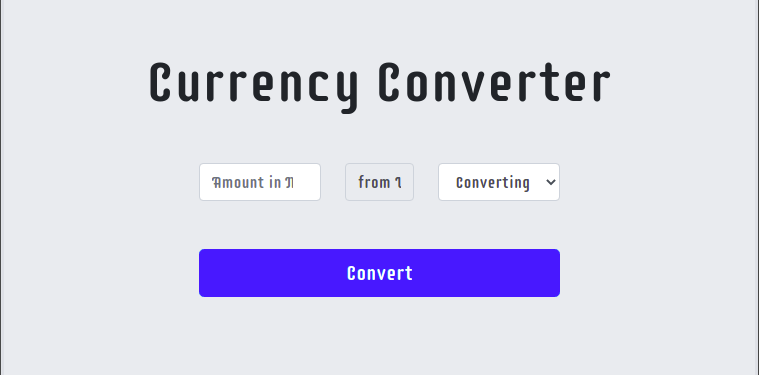
export default Header;Here, we built the input fields for our application, one for the amount to be converted and the currency, if done correctly our app should look similar to the image below.
Adding Currency API
To get the latest conversion rates and countries, we’d be using the rapid API currency API. To get started, first create a new folder axios in our src directory, inside this folder create a new file index.tsx.
Next is to visit Rapid API and sign up to get an apiKey, when we do this, paste your API base URL and API keys inside our index.tsx in the format below.
import axios from "axios";
export default axios.create({
  baseURL: "https://currencyscoop.p.rapidapi.com",
  headers: {
    "your api key goes here",
    "x-rapidapi-host": "currencyscoop.p.rapidapi.com",
  },
});
To complete our application, let’s configure our App.tsx in the next section
Configuring App.tsx
First, we’d import all our actions and state from our typedhooks, initialize them in our App.tsx. Let’s do that below.
import { useEffect } from "react";
import { useStoreActions, useStoreState } from "./store/typehook";
import Header from "./components/header/Header";

const App = () => {
  const getAllCurrencies = useStoreActions(
    (actions) => actions.allCurrencies.getAllCurrencies
  );
  const getCurrencyRates = useStoreActions(
    (actions) => actions.currencyRates.getCurrencyRates
  );
  const currencyRates = useStoreState((state) => state.currencyRates.rates);
  const amountToConvert = useStoreState(
    (state) => state.conversion.data.amount
  );
  const currencyConvertingTo = useStoreState(
    (state) => state.conversion.data.to
  );

  useEffect(() => {
    getAllCurrencies();
    getCurrencyRates();
  }, [getAllCurrencies, getCurrencyRates]);

  const equivalence = () => {
    const val = Number(currencyRates[currencyConvertingTo]);
    return val * parseInt(amountToConvert);
  };

  return (
    <div
      style={{ background: "#E9ECEF", height: "100vh" }}
      className="container-fluid"
    >
      <Header />
      <div className="w-50 mx-auto">
        {amountToConvert && currencyConvertingTo ? <h2>Result:</h2> : null}
        {amountToConvert ? (
          <h3>
            ${amountToConvert} = {equivalence()}
          </h3>
        ) : null}
      </div>
    </div>
  );
};
export default App;
Similar to what we did in our typedhooks file, in the code block above, we initialized all our store functions such as the getAllCurrencies and getCurrencyRates in this component. We used React useEffect hook to call the actions getAllCurrencies and getCurrencyRates from our store.
Next, we initialized a function equivalence that converts the currency rates from an object and returning the value we get from the API and multiplies it by the amount inputted by the user as an integer.
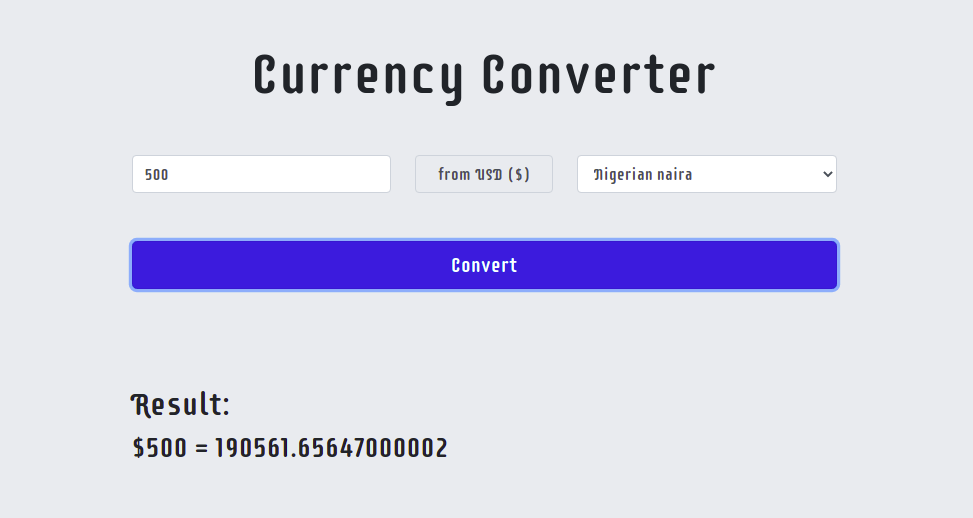
To conclude we used bootstrap and react strap to build components for our input. If done correctly, our app should look like this:
Conclusion
In this article, we learnt about Easy-Peasy, a state manager for React applications that focuses on providing better experience for developers. We also went through the process of creating a notes application using Easy-Peasy, to manage the state and also detailed the pros of using easy-peasy to manage state for your next application. Have fun using easy-peasy for your next React application. A working version of the notes app can be found on Codesandbox, a working version of the currency converter can be found here.
Resources
- Easy Peasy docs
- Easy Peasy GitHub page
- Easy Peasy The React Redux Wrapper
- Easy Peasy global state with React Hooks
- Easy Peasy TypeScript


