

Create an Image Tagger App with React.js and AI in Just a Few Simple Steps!


In this tutorial, we'll create a simple application that enables users to upload an image using a React.js form and display image tags using AI. We'll be using Next.js with TailwindCSS since it's straightforward to set up for both the front-end HTML and simple API endpoints with minimal configuration. We'll also be using Amazon's Rekognition API for the AI image tagging.
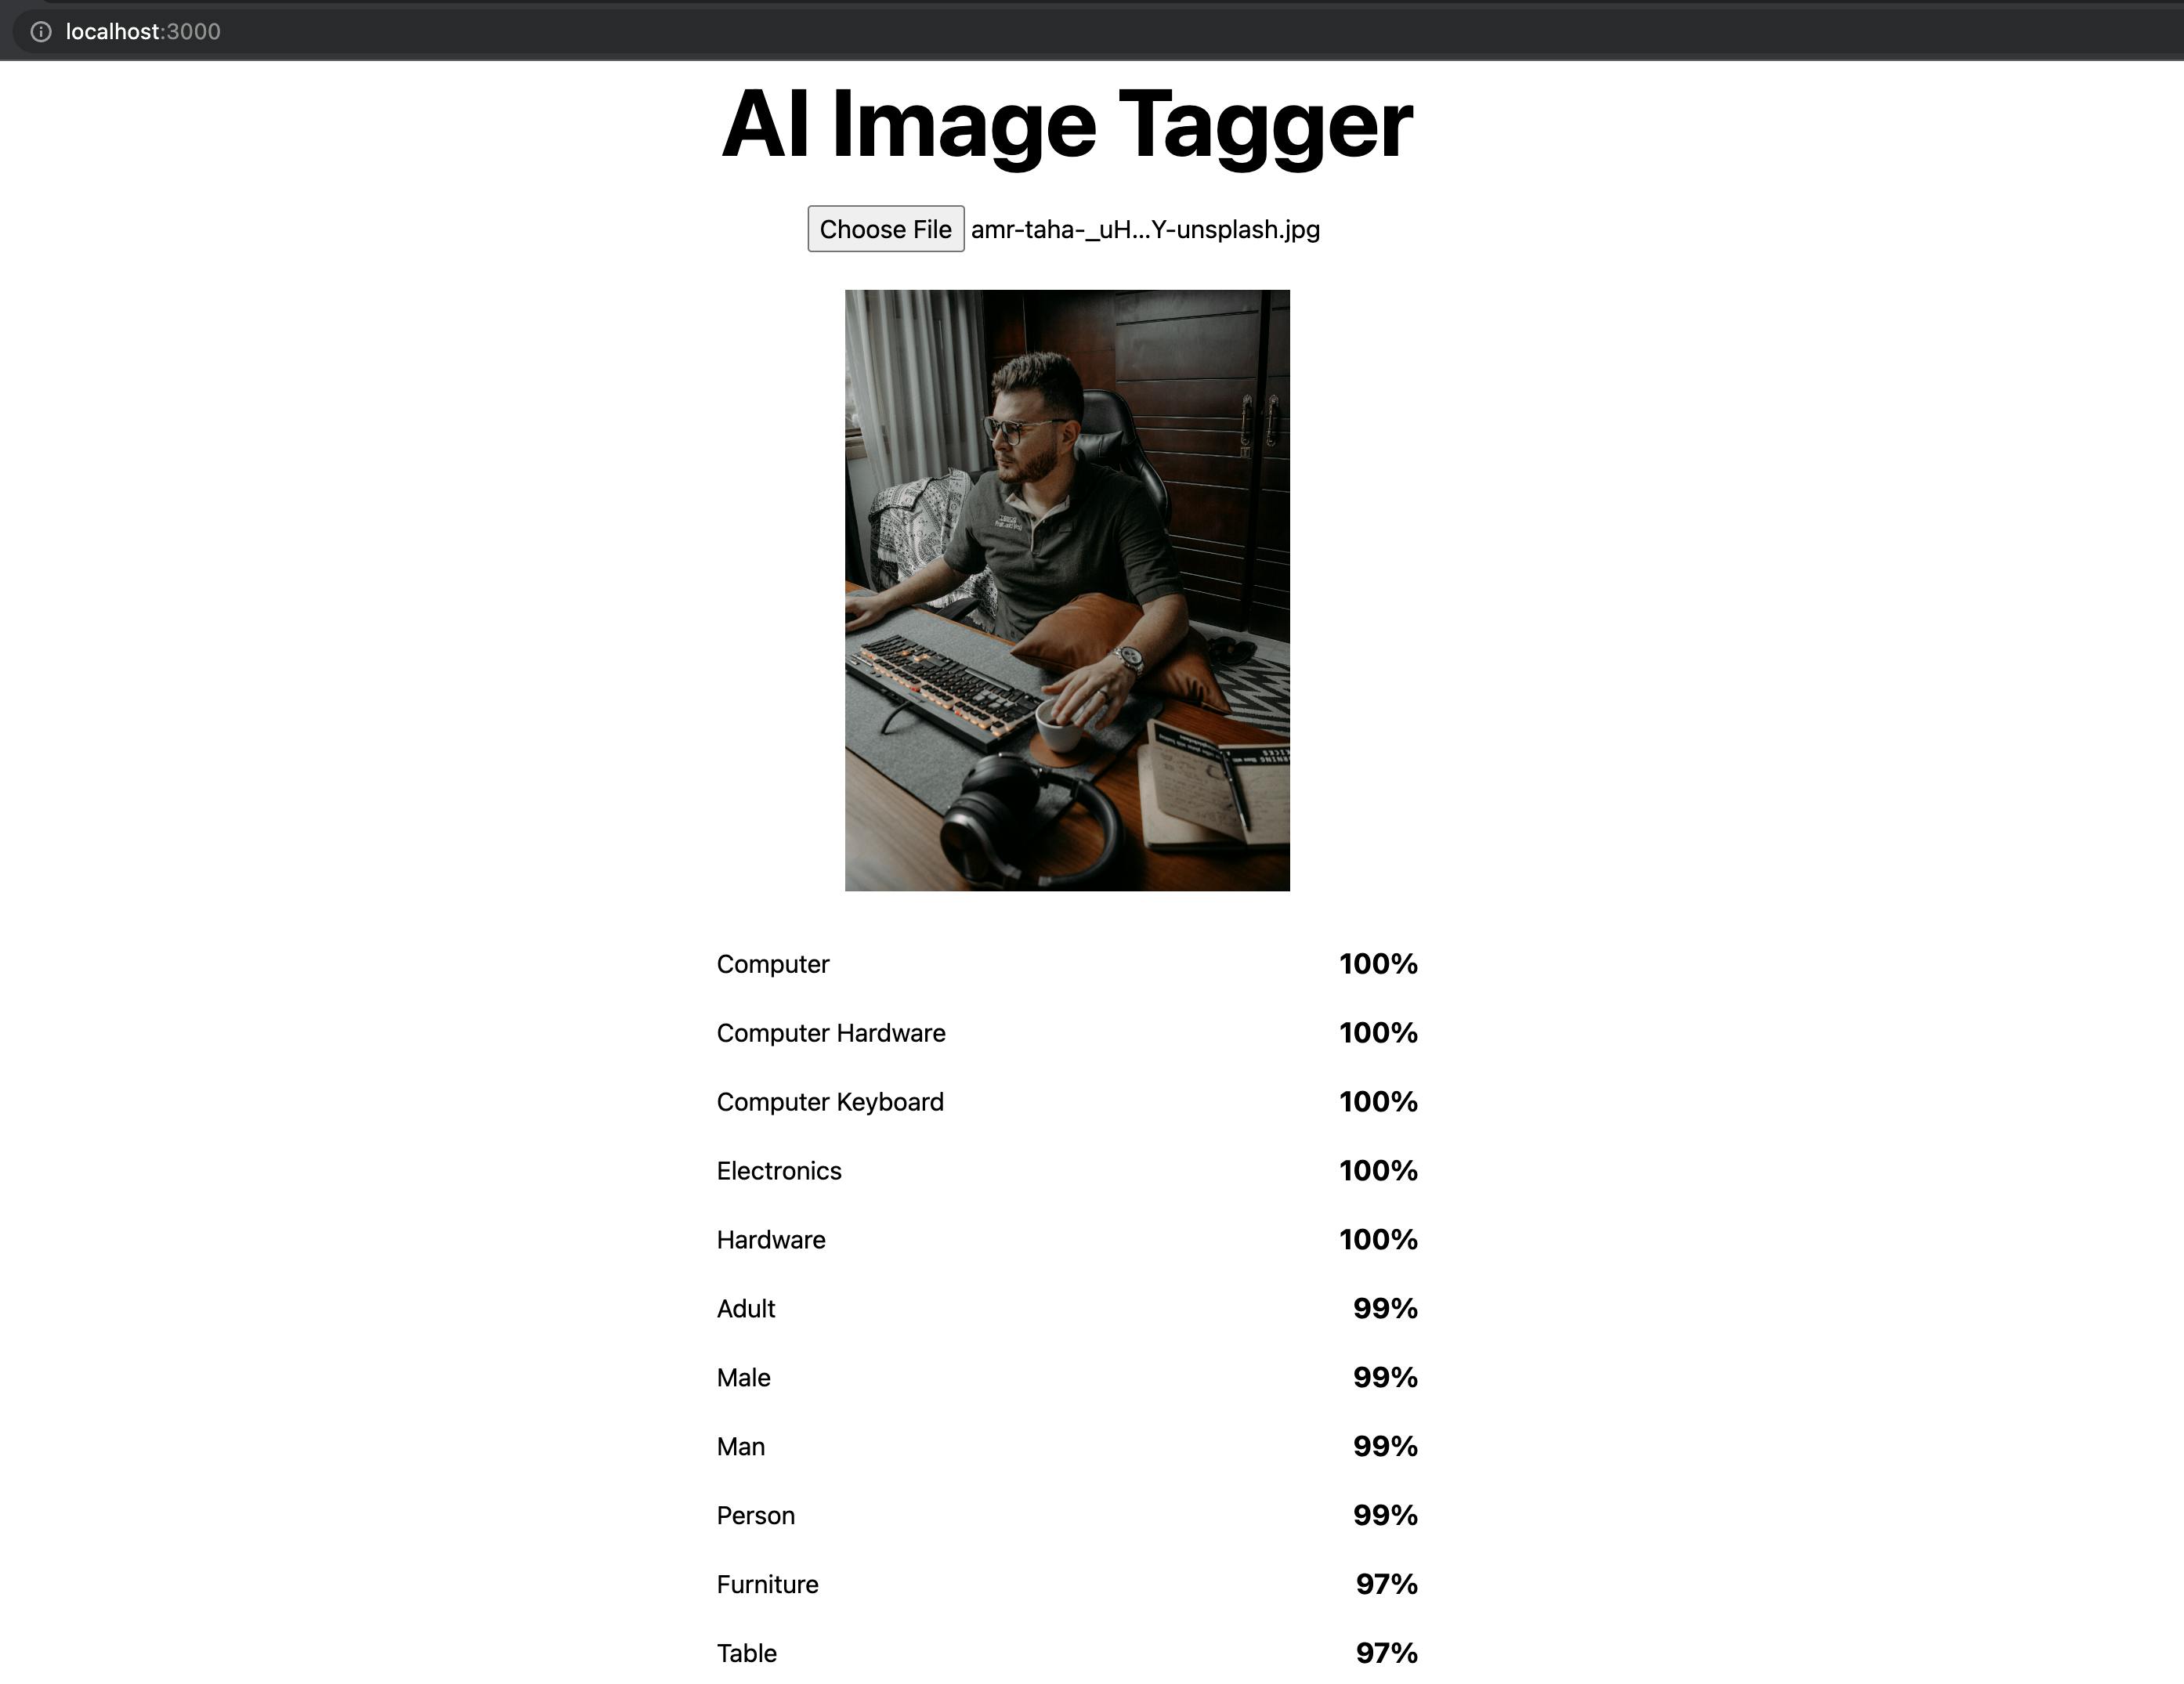
By the end of this tutorial, you will have an application that looks like this:
Prerequisites
To start with, we need to have an AWS access key and secret available to the local Next.js application. For this tutorial, we assume you already have the credentials. If you need instructions on obtaining those, you can go to this link - docs.aws.amazon.com/powershell/latest/userg... Once you have the credentials, ensure to export AWS_ACCESS_KEY_ID and AWS_SECRET_ACCESS_KEY in your shell environment locally. If you need help doing that, go to this link - docs.aws.amazon.com/cli/latest/userguide/cl...
Building an image upload form
In my previous articles, I showed you how to build a file uploader that can support files up to 5 terabytes directly to Amazon S3 (https://blog.danoph.com/how-to-upload-large-files-directly-to-amazon-s3-in-reactnextjs). For this example, supporting 5TB file uploads seems a little overkill so we're going to start from scratch making the simplest thing possible that can accept images up to 5 megabytes. We're not going to store file uploads in a database or deploy the app anywhere. I just want to demonstrate how easy it is to build an image tagger using Amazon Rekognition AI.
Let's start by creating a new Next.js application with TailwindCSS preconfigured:
npx create-next-app -e with-tailwindcss image-classifier
After that's done, go into the new app directory and start the local server:
cd image-classifier
npm run dev
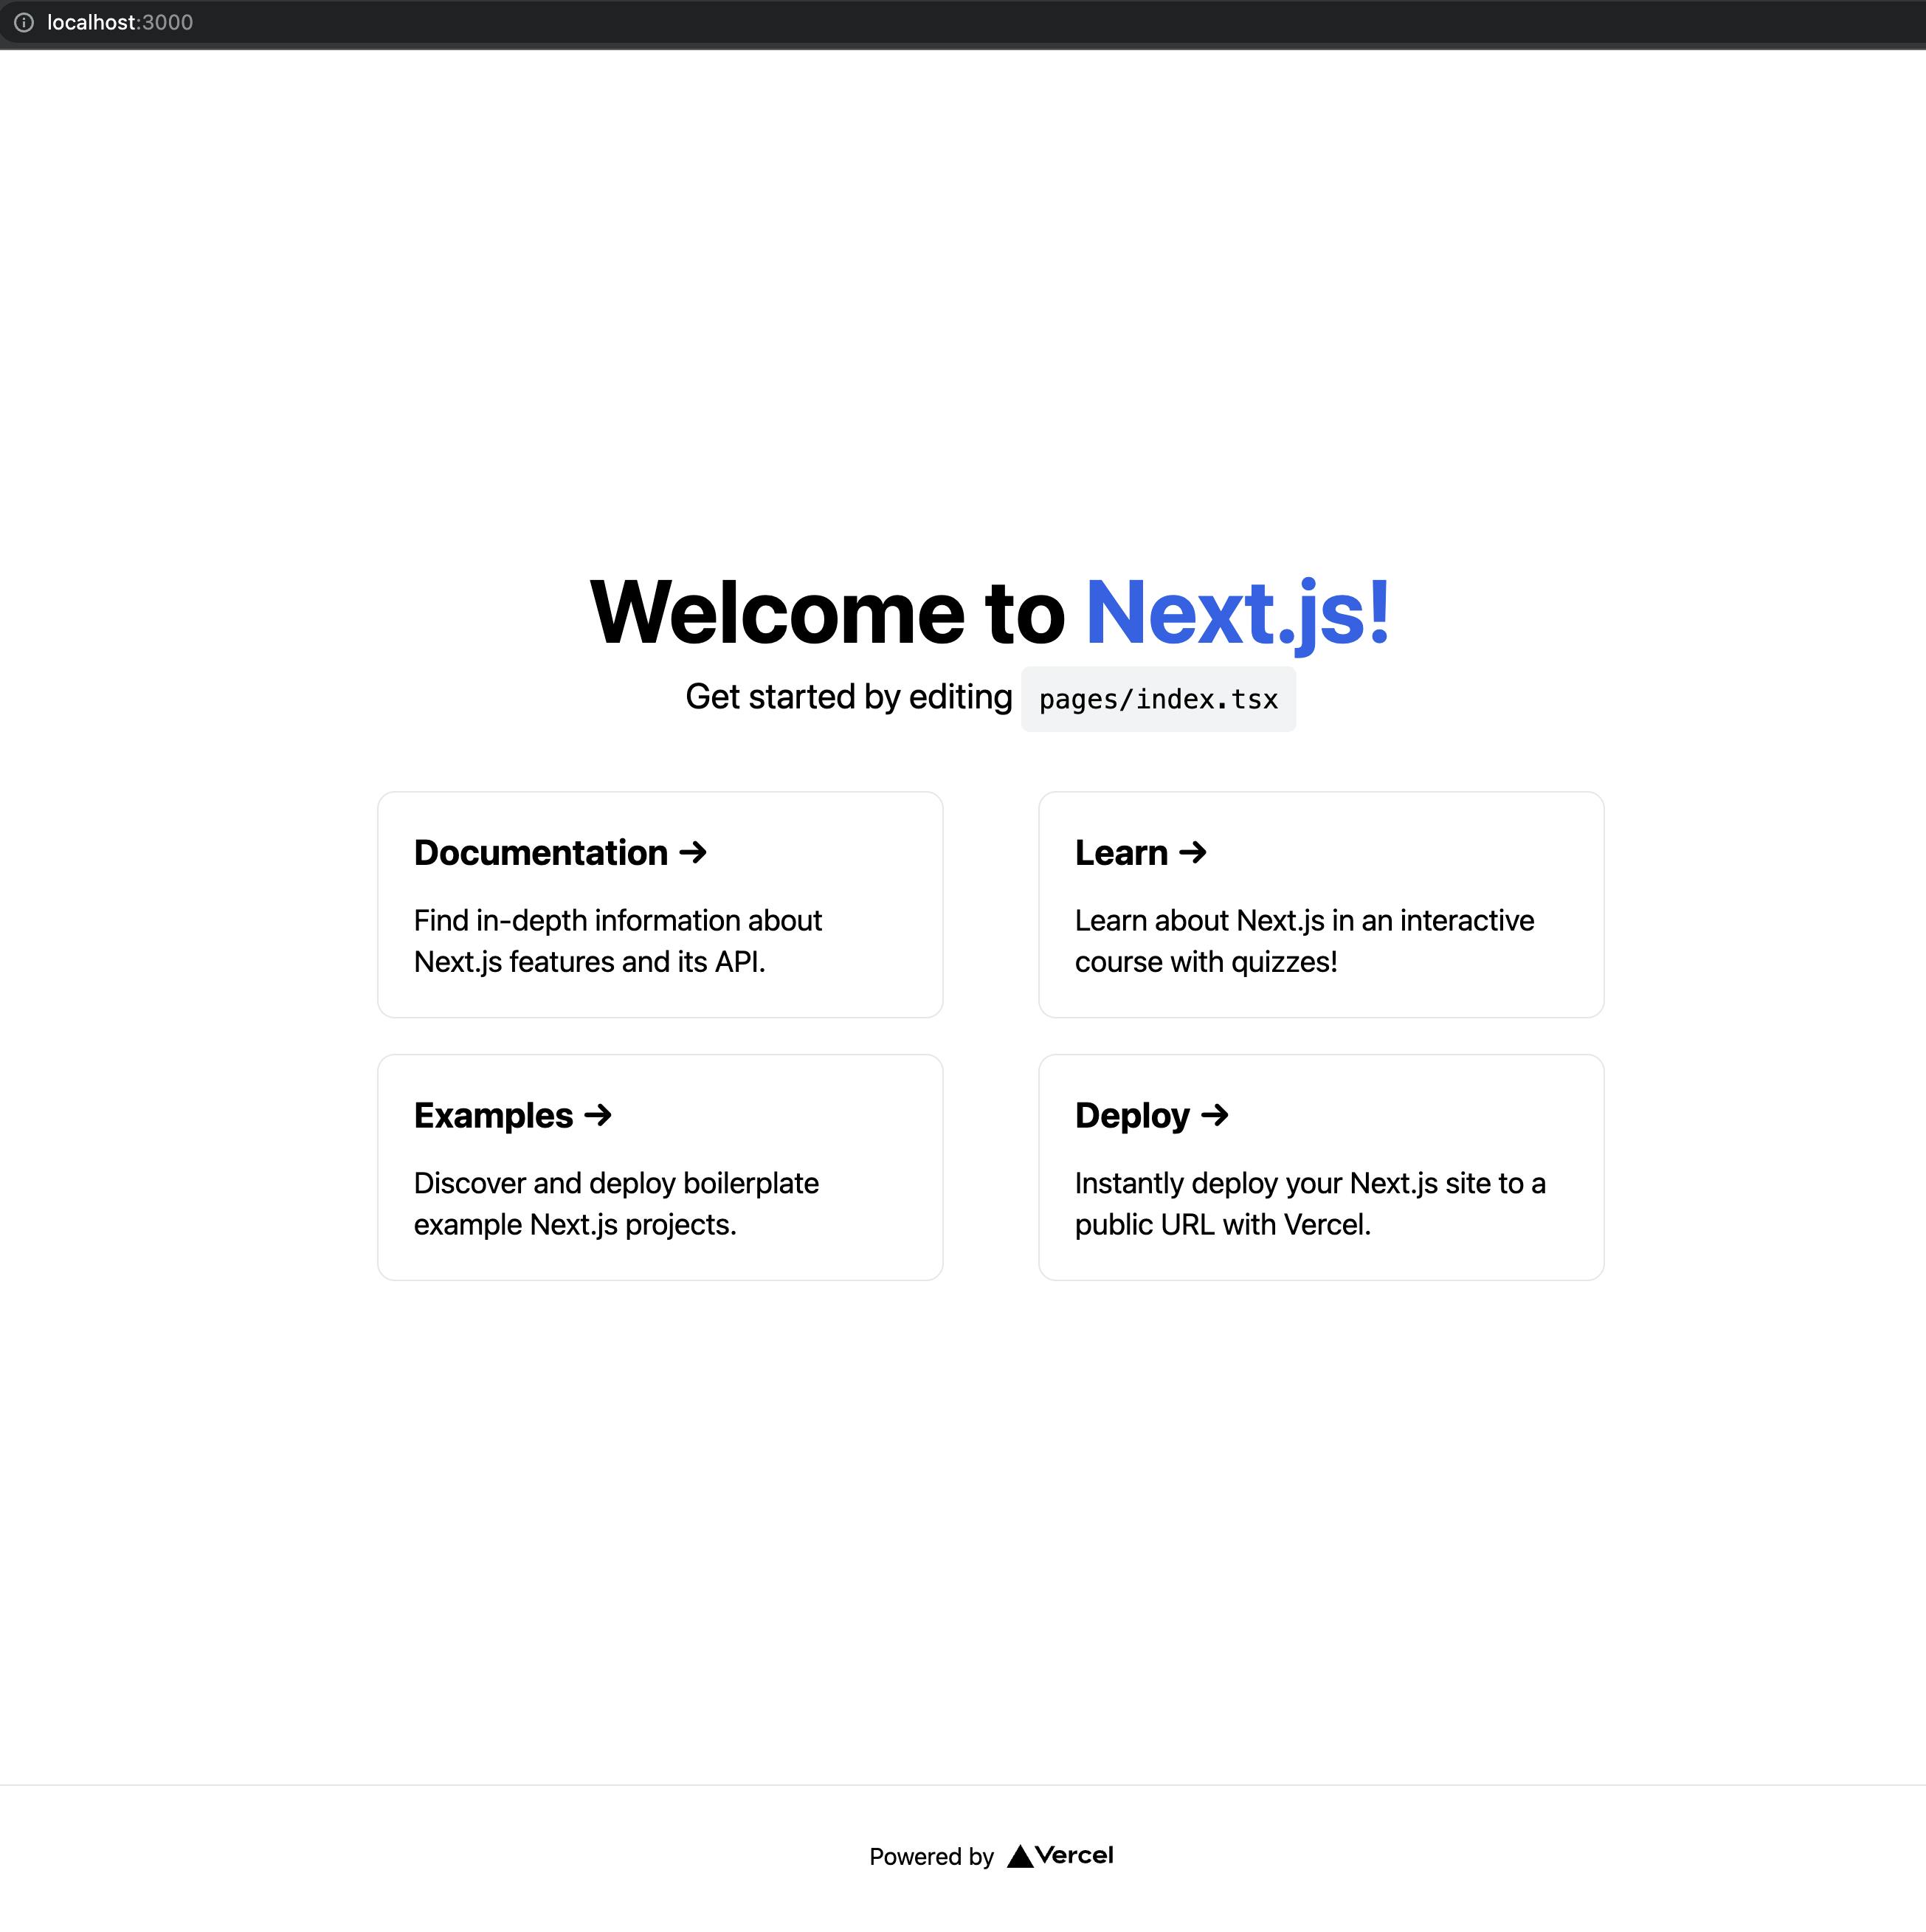
When you visit http://localhost:3000 your page should look like this:
Now, let's replace the default boilerplate component in pages/index.tsx with our own component that includes a file upload form:
import { useState } from 'react'
import type { NextPage } from 'next'
import Head from 'next/head'
import Image from 'next/image'

const Home: NextPage = () => {
  const onFileChanged = event => {
    const file = event.target.files[0];

    const uploadFile = async () => {
      const formData = new FormData();

      formData.append("file", file);

      const response = await fetch("/api/classify-image", {
        method: "POST",
        body: formData
      });

      console.log('response', response);
    }

    uploadFile();
  };

  return (
    <div className="flex min-h-screen flex-col items-center justify-center py-2">
      <Head>
        <title>Image Classifier</title>
        <link rel="icon" href="/favicon.ico" />
      </Head>

      <main className="flex w-full flex-1 flex-col items-center justify-center px-20 text-center">
        <h1 className="text-6xl font-bold">
          Image Labeler
        </h1>

        <div className="mt-6 flex max-w-4xl flex-wrap items-center justify-around sm:w-full">
          <input
            id="file-upload"
            name="files"
            type="file"
            onChange={onFileChanged}
            accept="image/*"
          />
        </div>
      </main>
    </div>
  )
}

export default Home
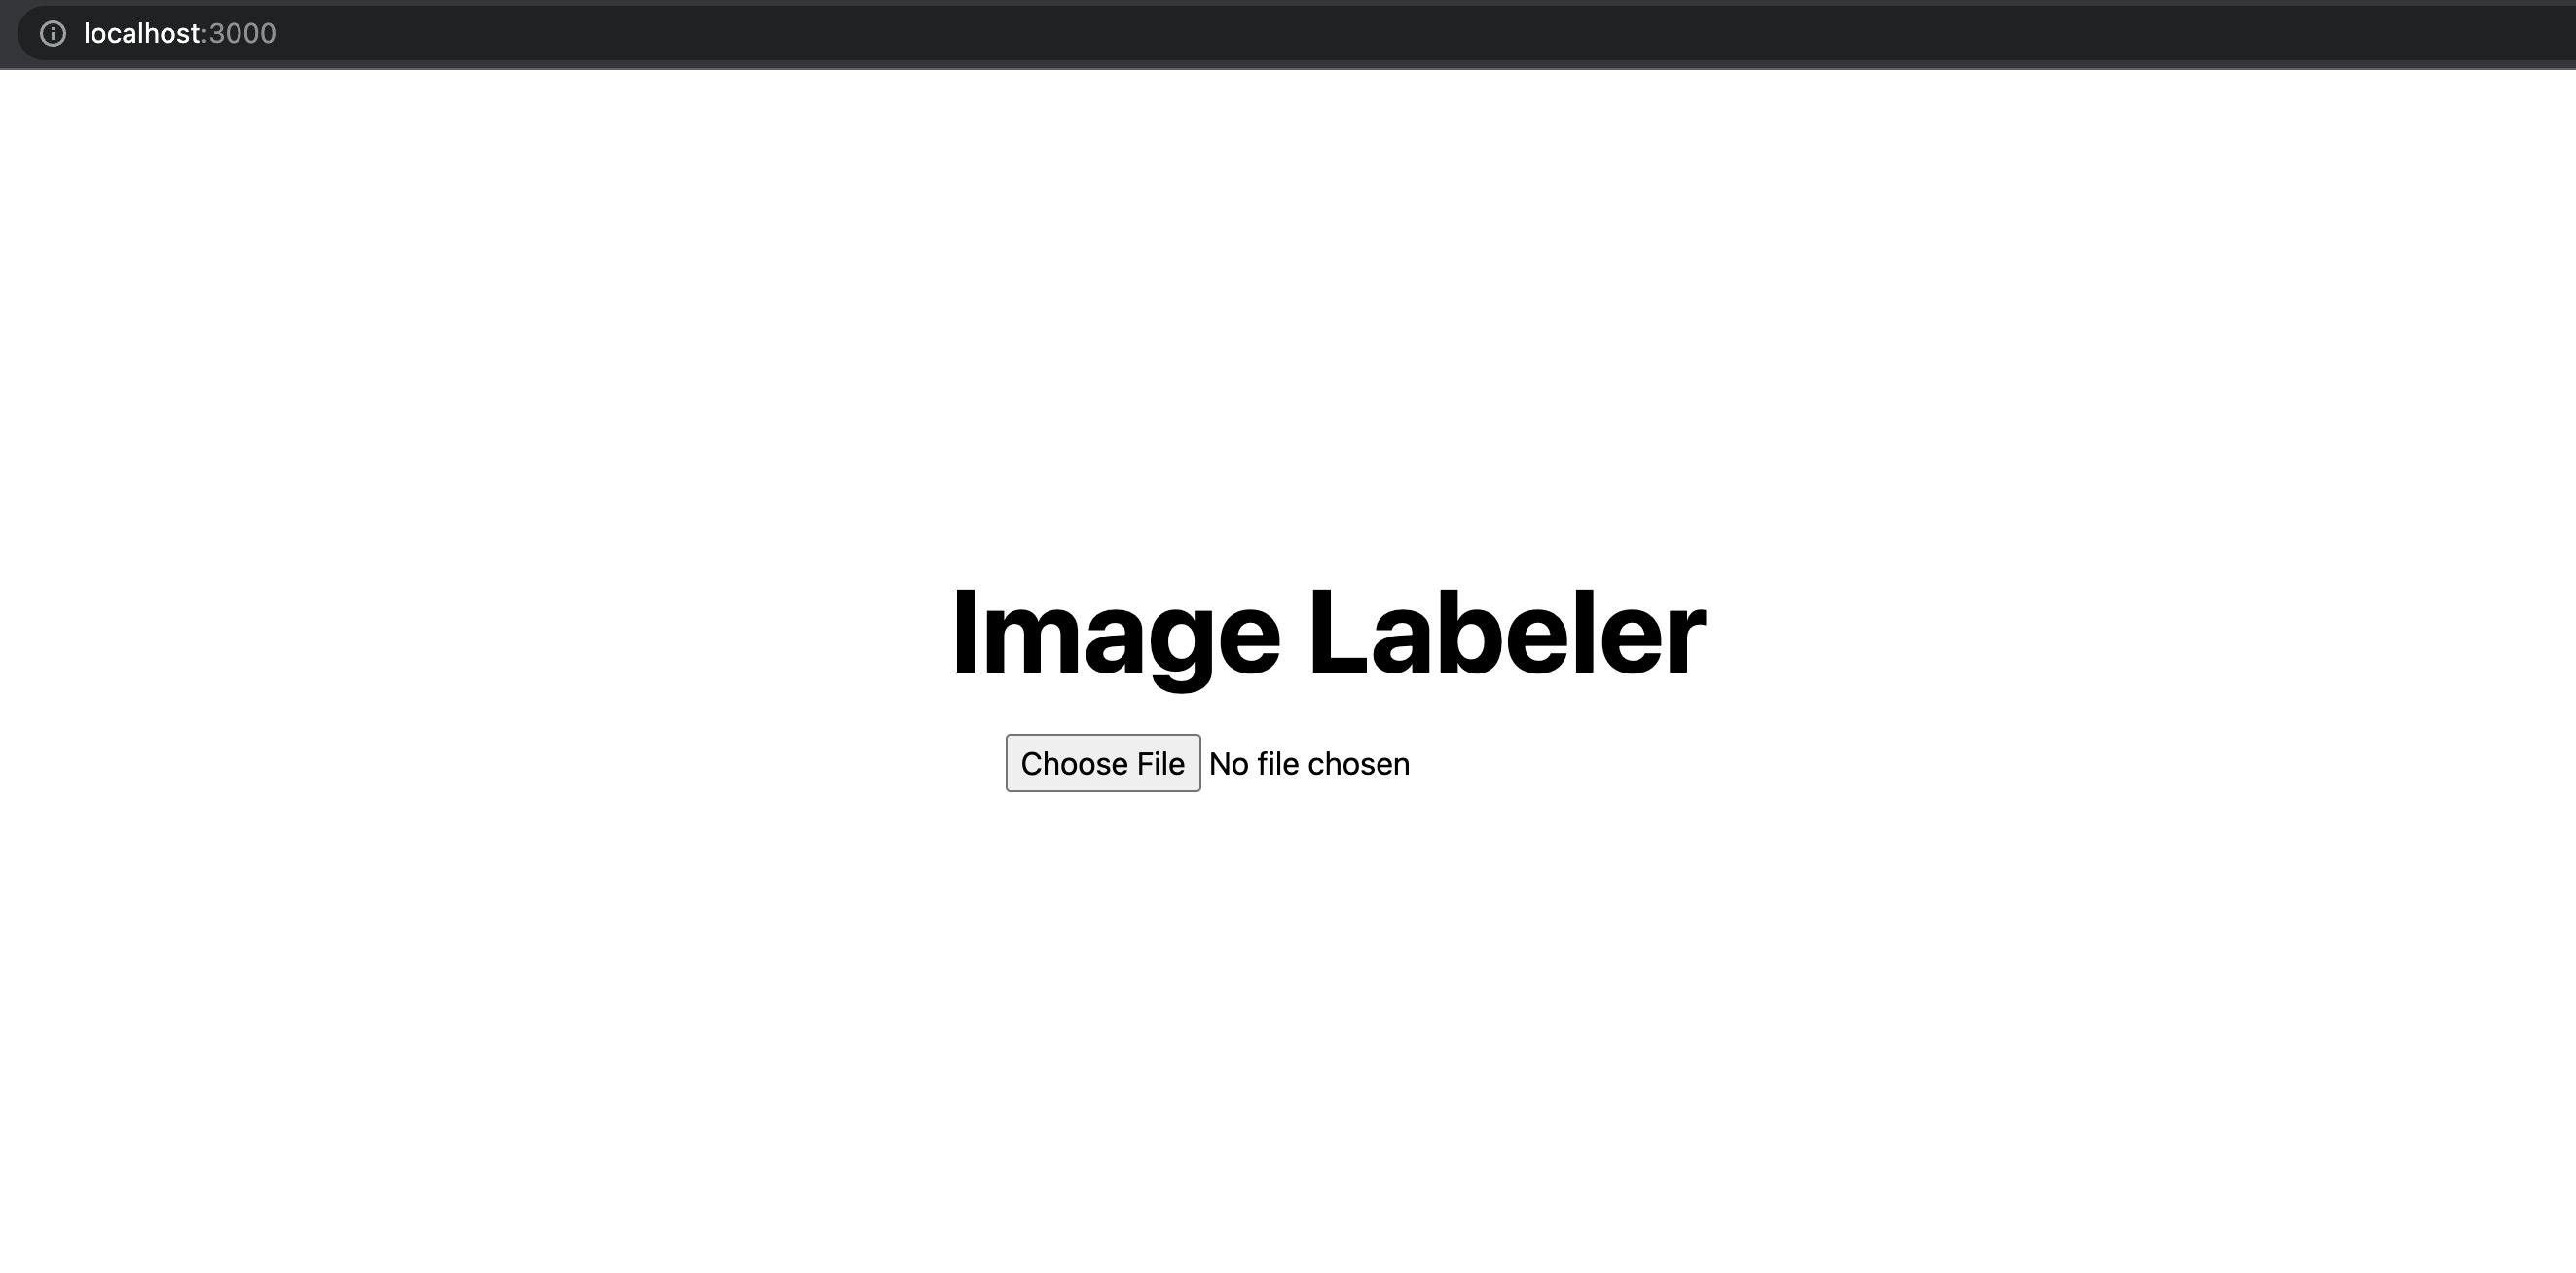
Your page should look like this when you go back to your browser:
The onChange on the file input calls the onFileChanged function in our component when you select a file and then it uploads the file to the /api/classify-image endpoint which we haven't created yet. Let's do that now.
Building the image classifier endpoint
We're going to be using the Amazon Rekognition API to label our images and the Formidable library to parse the form submission data from the upload form so we'll need to add two libraries to our project:
npm i @aws-sdk/client-rekognition formidable
Adding a new API endpoint is extremely easy in Next.js. All we have to do is name the file what we want the endpoint to be. Since our HTML form sends a POST request to /api/classify-image let's create a new file pages/api/classify-image.ts:
import type { NextApiRequest, NextApiResponse } from 'next'
import { RekognitionClient, DetectLabelsCommand } from "@aws-sdk/client-rekognition";
import { IncomingForm } from 'formidable';
import { readFileSync } from 'fs';

// we need to disable the default body parser since this endpoint is not accepting JSON
export const config = {
  api: {
    bodyParser: false,
  }
};

const client = new RekognitionClient({});

const getImageLabels = async (base64EncodedImage: Uint8Array) => {
  const response = await client.send(
    new DetectLabelsCommand({
      Image: {
        Bytes: base64EncodedImage
      }
    })
  );

  return response.Labels;
};

export default async function handler(req: NextApiRequest, res: NextApiResponse) {
  const imageBuffer = await (
    new Promise((resolve, reject) => {
      new IncomingForm().parse(req, (err, fields, files) => {
        resolve(readFileSync(files.file.filepath));
      });
    })
  );

  const labels = await getImageLabels(imageBuffer);

  res.status(200).json(labels);
}
A few things are going on here:
Near the top of the file, we are disabling the Next.js
bodyParserso it doesn't try and parse the request body as JSON.The
getImageLabelsfunction makes an API request to AmazonRekognitionwith our base64 encoded image.The default exported
handlerfunction is the actualNext.jsAPI endpoint that our HTML upload form is calling. We didn't add any form validation or error handling so the function assumes an image file has been uploaded and encoded asmultipart/form-data.IncomingForm'sparsefunction doesn't return a promise (instead it expects a callback function) so we are wrapping that code with a new promise and resolving after the form is done parsing in the callback function. Formidable'sIncomingFormparses the multipart form data and then saves the file to a temporary file path on disk by default so that's why we are reading the file from disk. SincereadFileSyncreturns a Node.jsBufferwe can pass that straight to thegetImageLabelsfunction and get our JSON label array back. After all that we respond to the front-end HTML component with the label data.
Changing the front end to display our image tags
Right now we aren't doing anything with the API response after we upload the file to our backend API endpoint besides logging to the browser console. Let's fix that by adding some state to keep track of the image labels that come back from the server.
First, import useState at the top of the file:
import { useState } from 'react'
And then let's add the state variable inside our component:
const [imageLabels, setImageLabels] = useState([]);
Now, we can use setImageLabels to capture the API response from the server inside our onFileChanged function. We can also remove the console.log that was there before so our function looks like this now:
  const onFileChanged = event => {
    const file = event.target.files[0];

    const uploadFile = async () => {
      const formData = new FormData();

      formData.append("file", file);

      const response = await fetch("/api/classify-image", {
        method: "POST",
        body: formData
      });

      setImageLabels(await response.json());
    }

    uploadFile();
  };
In the HTML view, let's display each label along with the confidence score that Rekognition gives us:
        {imageLabels.length > 0 && (
          <ul role="list" className="mt-6 max-w-md sm:w-full">
            {imageLabels.map((label, index) => (
              <li key={index} className="py-2 flex items-center justify-between">
                <div>
                  {label.Name}
                </div>
                <div className="text-lg font-bold">
                  {Math.round(label.Confidence)}%
                </div>
              </li>
            ))}
          </ul>
        )}
We are rounding the Confidence score is just for a nicer display since they are 8 or 9 decimal points.
It'd also be nice if we could see the image along with the labels that Rekognition returned. To keep things simple, let's add a preview image in the client-side HTML so we don't have to add any server-side code:
        {previewUrl && (
          <div className="mt-6 h-96 aspect-w-10 aspect-h-7 block w-full overflow-hidden relative">
            <Image
              alt="file uploader preview"
              src={previewUrl}
              fill
              sizes="(max-width: 768px) 100vw,
              (max-width: 1200px) 50vw,
              33vw"
              quality={100}
              className="pointer-events-none object-contain"
            />
          </div>
        )}
Since we haven't declared previewUrl yet, let's add that to our state at the top of the component:
const [previewUrl, setPreviewUrl] = useState<string | null>(null);
And let's set the previewUrl after an image file has been selected in our onFileChanged function:
  const onFileChanged = event => {
    const file = event.target.files[0];

    setPreviewUrl(URL.createObjectURL(file));

    const uploadFile = async () => {
      const formData = new FormData();

      formData.append("file", file);

      const response = await fetch("/api/classify-image", {
        method: "POST",
        body: formData
      });

      setImageLabels(await response.json());
    }

    uploadFile();
  };
Side Note - If you've ever wanted to display images client side before they get uploaded to a server, this technique isn't dependent on React or Next.js.
So, after all of those changes, our pages/index.tsx file looks like this now:
import { useState } from 'react'
import type { NextPage } from 'next'
import Head from 'next/head'
import Image from 'next/image'

const Home: NextPage = () => {
  const [previewUrl, setPreviewUrl] = useState<string | null>(null);
  const [imageLabels, setImageLabels] = useState([]);

  const onFileChanged = event => {
    const file = event.target.files[0];

    setPreviewUrl(URL.createObjectURL(file));

    const uploadFile = async () => {
      const formData = new FormData();

      formData.append("file", file);

      const response = await fetch("/api/classify-image", {
        method: "POST",
        body: formData
      });

      setImageLabels(await response.json());
    }

    uploadFile();
  };

  return (
    <div className="flex min-h-screen flex-col items-center py-2">
      <Head>
        <title>Image Tagger</title>
        <link rel="icon" href="/favicon.ico" />
      </Head>

      <main className="flex w-full flex-1 flex-col items-center px-20">
        <h1 className="text-6xl font-bold text-center">
          Image Tagger
        </h1>

        <div className="mt-6 flex max-w-4xl flex-wrap items-center justify-around sm:w-full">
          <input
            id="file-upload"
            name="files"
            type="file"
            onChange={onFileChanged}
            accept="image/*"
          />
        </div>

        {previewUrl && (
          <div className="mt-6 h-96 aspect-w-10 aspect-h-7 block w-full overflow-hidden relative">
            <Image
              alt="file uploader preview"
              src={previewUrl}
              fill
              sizes="(max-width: 768px) 100vw,
              (max-width: 1200px) 50vw,
              33vw"
              quality={100}
              className="pointer-events-none object-contain"
            />
          </div>
        )}

        {imageLabels.length > 0 && (
          <ul role="list" className="mt-6 max-w-md sm:w-full">
            {imageLabels.map((label, index) => (
              <li key={index} className="py-2 flex items-center justify-between">
                <div>
                  {label.Name}
                </div>
                <div className="text-lg font-bold">
                  {Math.round(label.Confidence)}%
                </div>
              </li>
            ))}
          </ul>
        )}
      </main>
    </div>
  )
}

export default Home
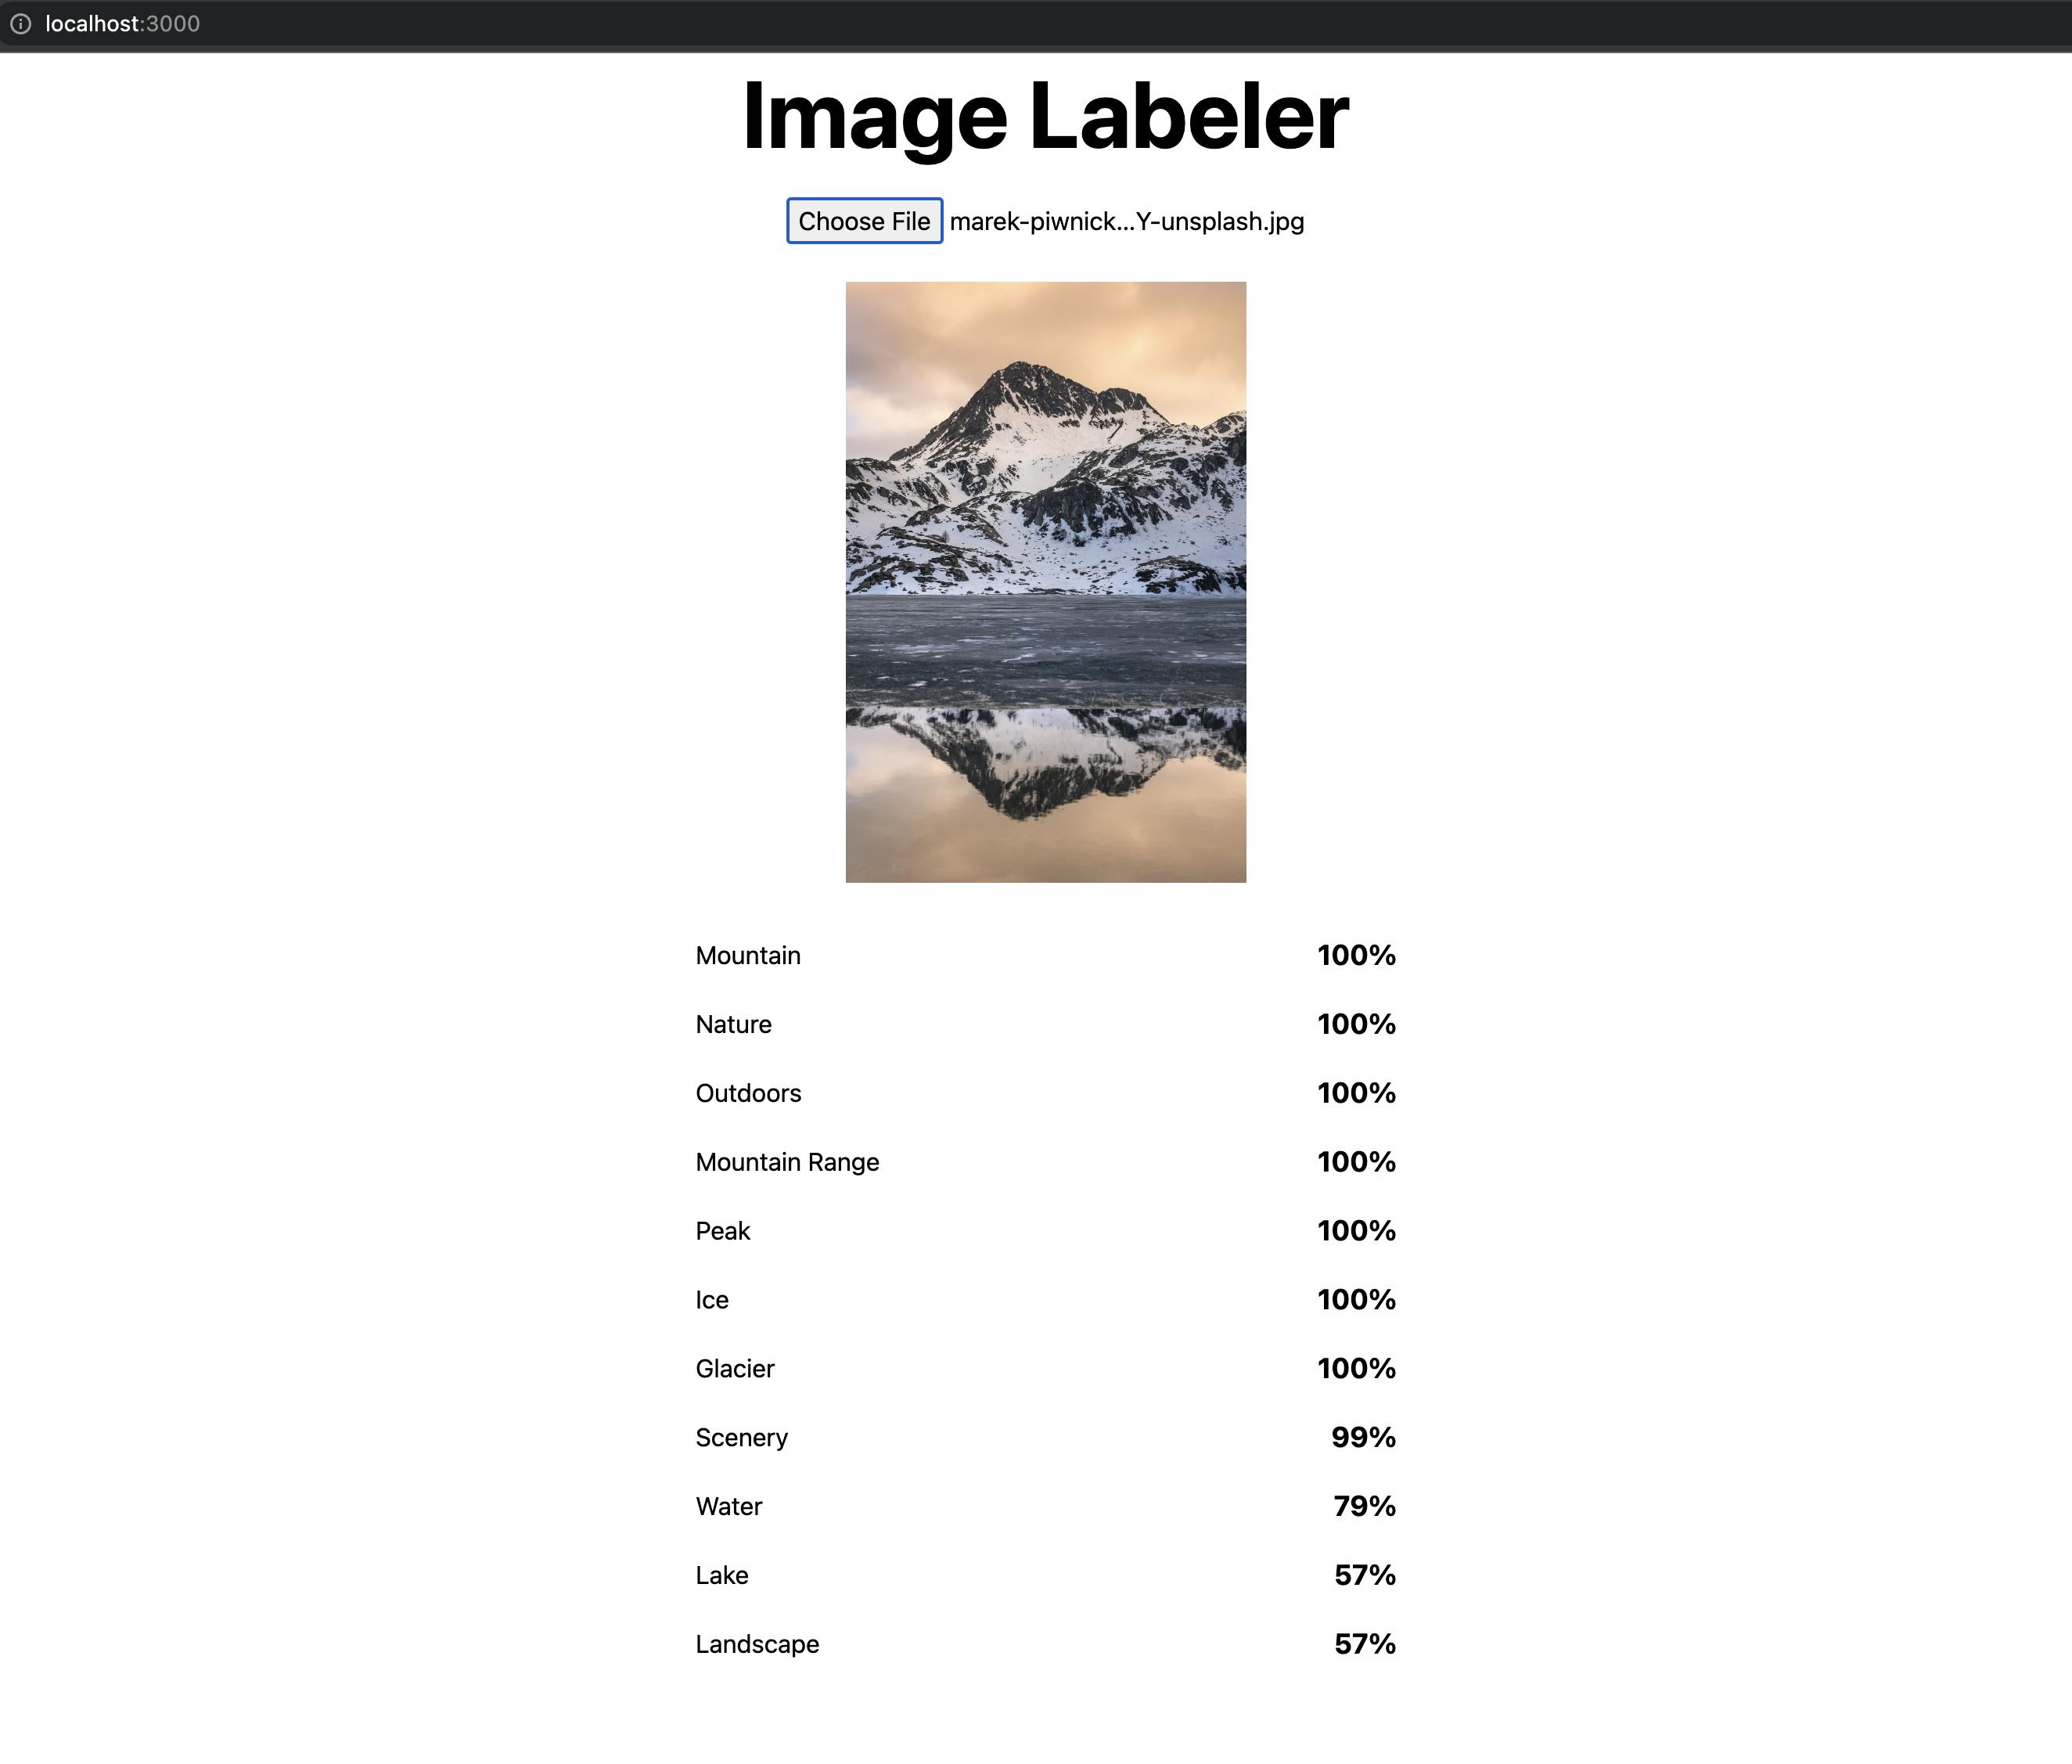
In the browser, click on Choose File and select an image file under 5 megabytes (that is the limit for Amazon Rekognition - https://docs.aws.amazon.com/AWSJavaScriptSDK/v3/latest/clients/client-rekognition/interfaces/image.html). You might see a slight delay depending on the size of the image you uploaded, but after the file gets sent to Amazon Rekgonition and gets processed, you will see tags showing up for your uploaded image!
The full source code for this example is available here: https://github.com/danoph/ai-image-tagger