In this post, we’ll show you how to use Next.js and Vercel to build a live link-sharing app. Along the way, in this article, you will learn how to:
- Create a Next.js application and deploy it to Vercel
- Use best practices for authentication and publishing
- Add live features using Ably
- Manage user presence
- Show site previews using OpenGraph
- Deploy your application to Vercel
You can view the solution code on Github, or play with a live example.
Before we get started, let’s introduce some of the technologies you’ll be working with.
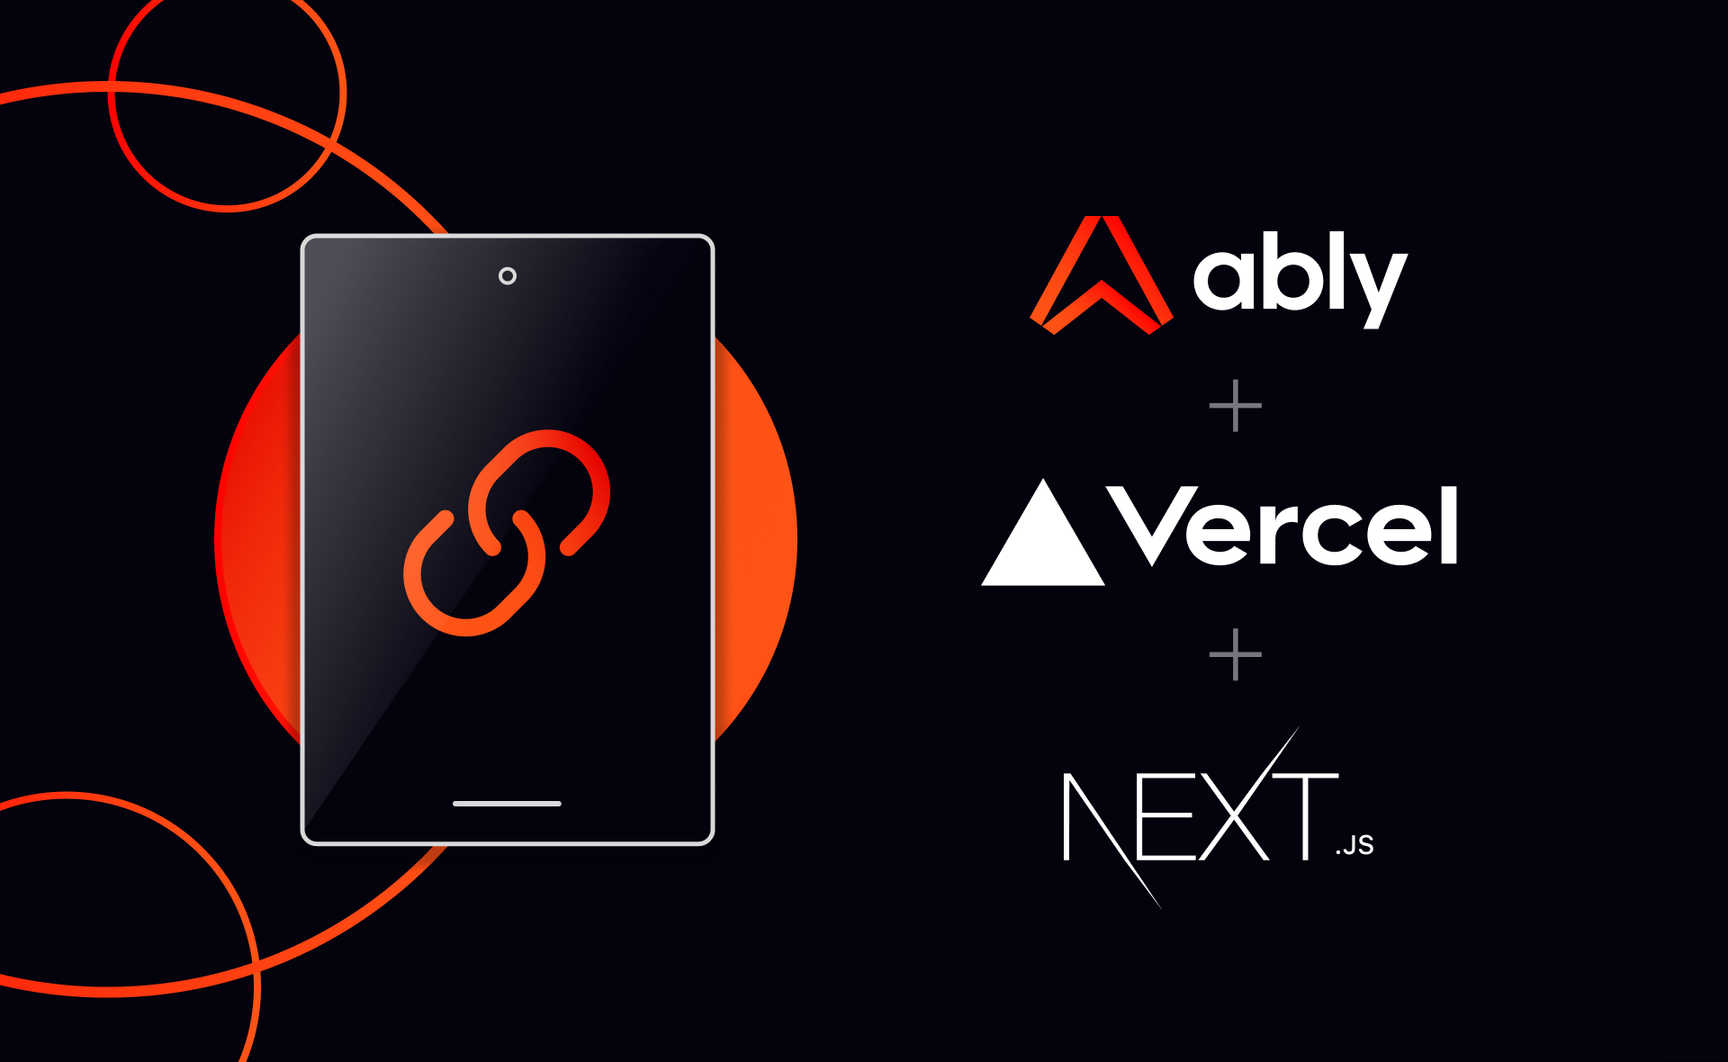
Introducing Vercel and Next.js
We’re big fans of Vercel; they provide arguably one of the most accessible cloud platforms for deploying web sites. Vercel is also behind the Next.js framework, which makes it easy to develop and deploy highly-optimized full-stack applications based on React.
One of the most useful features Vercel offers is its Serverless Functions, which enable you to execute code on-demand, without having to worry about setting up and managing your own server infrastructure. In the context of Next.js, this is simply a matter of creating an HTTP handler module in your /pages/api directory and then you can make requests to it at /api/module.
Serverless functions are fantastic for common tasks such as user authentication, database queries, and form processing. However, because they timeout after a certain period, they can’t support a WebSocket connection. This makes implementing realtime features difficult.
That’s where Ably comes to the rescue! Ably can work on the client to connect that client to a named channel. The client can then publish messages to that channel and subscribe to receive messages from the channel. This pattern is commonly referred to as pub/sub and it’s a highly resilient and scalable way to support realtime messaging in applications.
Let’s get started.
Using Vercel with Next.js to implement realtime functionality
Step 1 - Create the Next.js app
The first step is to create a new Next.js application. Make sure that you have Node.js installed, then execute the following command in your terminal:
npx create-next-app
Follow the prompt to name your project and then change into the directory it creates for you of the same name.
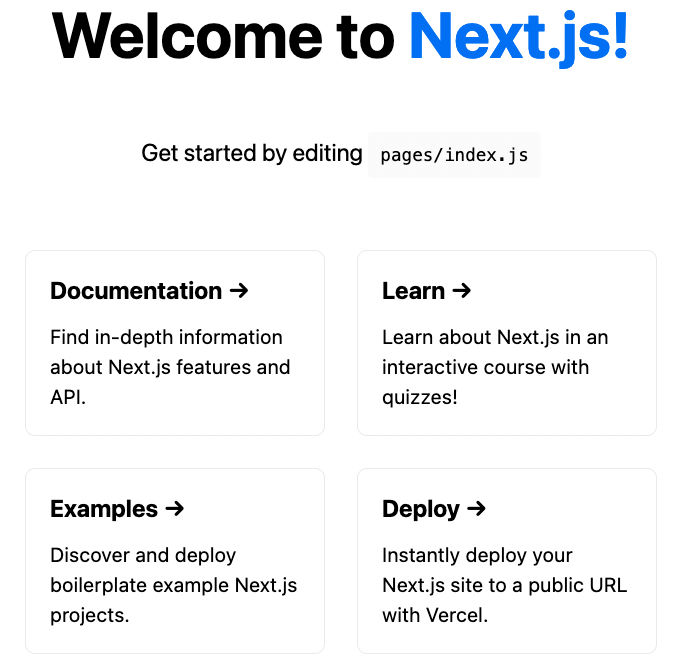
This process creates the boilerplate code for your Next.js application and includes a sample single-page application you can try out. Run it by executing:
npm run dev
And then visit https://localhost:3000 in your browser:
Step 2 - Architecture
In order to complete this tutorial, you’re going to make a small change to the generated project structure. This is what the finished app structure will look like:
.
└── ably-next-vercel-news
    ├── CODE_OF_CONDUCT.md
    ├── CONTRIBUTING.md
    ├── LICENSE
    ├── README.md
    ├── components
    │   ├── ArticlePreview.js
    │   ├── Articles.js
    │   └── Participants.js
    ├── lib
    │   └── history.js
    ├── next.config.js
    ├── package-lock.json
    ├── package.json
    ├── pages
    │   ├── _app.js
    │   ├── api
    │   │   ├── createTokenRequest.js
    │   │   └── publish.js
    │   └── index.js
    ├── public
    │   ├── ably-logo.svg
    │   ├── favicon.ico
    │   └── vercel.svg
    ├── styles
    │   ├── Home.module.css
    │   └── globals.css
    └── yarn.lock

7 directories, 21 files
To achieve this, first create the components folder. This is where you will create the React components that provide the core functionality of your application. Components are re-usable bits of code that return information that React can render.
Then, create the lib folder. This is where we will put our utility functions. In this instance, this will be a function that retrieves historical messages using Ably's History API which you'll create in a later step.
Step 3 - Build the basic UI
Replace the contents of the styles directory with the following CSS files, which you can find in the solution code repo on Github:
Then, paste the following into a file in your public directory called ably-logo.svg:
<svg width="108" height="32" viewBox="0 0 108 32" xmlns="http://www.w3.org/2000/svg">
    <path d="M62.922 24.9786V4.08813H66.6933V11.6512C67.9709 10.435 69.6164 9.76044 71.3538 9.76044C75.4318 9.76044 79.0498 12.8674 79.0498 17.5484C79.0498 22.2293 75.4318 25.3465 71.3538 25.3465C69.5244 25.3465 67.7971 24.6209 66.5094 23.3024V24.9786H62.922ZM75.2785 17.5484C75.2785 14.932 73.4183 13.1025 70.9859 13.1025C68.6148 13.1025 66.7853 14.84 66.6933 17.3644V17.5484C66.6933 20.1648 68.5534 21.9942 70.9859 21.9942C73.4183 21.9942 75.2785 20.1648 75.2785 17.5484ZM80.7975 24.9786V4.08813H84.5688V24.9786H80.7975ZM89.8425 30.3954L92.0399 25.1523L86.0712 10.1284H90.1491L93.9511 20.6247L97.8144 10.1284H101.954L93.8591 30.4056H89.8425V30.3954ZM56.9329 10.1284V12.0191C55.6247 10.5883 53.7952 9.77066 51.9147 9.77066C47.8367 9.77066 44.2187 12.8777 44.2187 17.5586C44.2187 22.2497 47.8367 25.3465 51.9147 25.3465C53.8668 25.3465 55.7166 24.4982 57.0555 22.9754V24.9888H60.3465V10.1284H56.9329ZM56.5649 17.5484C56.5649 20.1341 54.7048 21.9942 52.2724 21.9942C49.8399 21.9942 47.9798 20.1341 47.9798 17.5484C47.9798 14.9626 49.8399 13.1025 52.2724 13.1025C54.6435 13.1025 56.473 14.8706 56.5649 17.3644V17.5484Z" fill="currentColor"></path>
    <path d="M19.2858 0L3.14788 29.5369L0 27.3293L14.932 0H19.2858ZM19.5107 0L35.6487 29.5369L38.7965 27.3293L23.8646 0H19.5107Z" fill="url(#paint0_linear)"></path>
    <path d="M35.4238 29.7107L19.3983 17.16L3.37271 29.7107L6.64323 32L19.3983 22.0147L32.1533 32L35.4238 29.7107Z" fill="url(#paint1_linear)"></path>
    <defs>
      <linearGradient id="paint0_linear" x1="5.47361" y1="37.4219" x2="32.4603" y2="7.45023" gradientUnits="userSpaceOnUse">
        <stop stop-color="#FF5416"></stop>
        <stop offset="0.2535" stop-color="#FF5115"></stop>
        <stop offset="0.461" stop-color="#FF4712"></stop>
        <stop offset="0.6523" stop-color="#FF350E"></stop>
        <stop offset="0.8327" stop-color="#FF1E08"></stop>
        <stop offset="1" stop-color="#FF0000"></stop>
      </linearGradient>
      <linearGradient id="paint1_linear" x1="10.7084" y1="39.3593" x2="26.6583" y2="21.6452" gradientUnits="userSpaceOnUse">
        <stop stop-color="#FF5416"></stop>
        <stop offset="0.2535" stop-color="#FF5115"></stop>
        <stop offset="0.461" stop-color="#FF4712"></stop>
        <stop offset="0.6523" stop-color="#FF350E"></stop>
        <stop offset="0.8327" stop-color="#FF1E08"></stop>
        <stop offset="1" stop-color="#FF0000"></stop>
      </linearGradient>
    </defs>
</svg>
Replace the contents of pages/index.js with the following code:
import Head from "next/head";
import Image from "next/image";
import ablyLogo from "../public/ably-logo.svg";
import styles from "../styles/Home.module.css";

export default function Home() {
  return (
    <div className={styles.container}>
      <Head>
        <title>Ably Realtime News Demo</title>
        <meta
          name="description"
          content="Generated by create next app"
        />
        <link
          rel="icon"
          href="https://static.ably.dev/motif-red.svg?realtime-news"
          type="image/svg+xml"
        />
      </Head>

      <main className={styles.main}>
        <Image
          alt="ably logo"
          src={ablyLogo}
          width="160px"
          height="100%"
        ></Image>
        <h1>Realtime News</h1>
        <h2>Share your favorite news articles</h2>
        <h3>Participants</h3>
      </main>
    </div>
  );
}
If you run this using npm run dev, it just displays the following page, which does absolutely nothing:
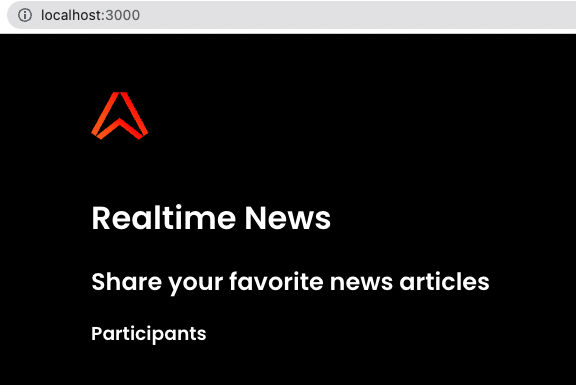
That’s because you need to create the components that will interact with the Ably platform and display the results.
Keep reading, and we’ll guide you through the process!
Step 4: Create your Ably API keys
You’re going to work with two Ably packages in this application:
- @ably-labs/react-hooks: A lightweight version of the Ably SDK that makes it easy to work with Ably in React applications. You will use this on the client to subscribe to messages from a channel and show which users are present.
- ably: The Ably REST SDK, which you will use on the server to authenticate clients and publish messages to the channel.
This separation of concerns is best practice. Wherever possible, you should authenticate clients on the server to avoid revealing your API keys. And publishing from the server lets you perform any required pre-processing and validation.
Both server and client require different capabilities on the Ably platform, so you will use separate API keys for authentication.
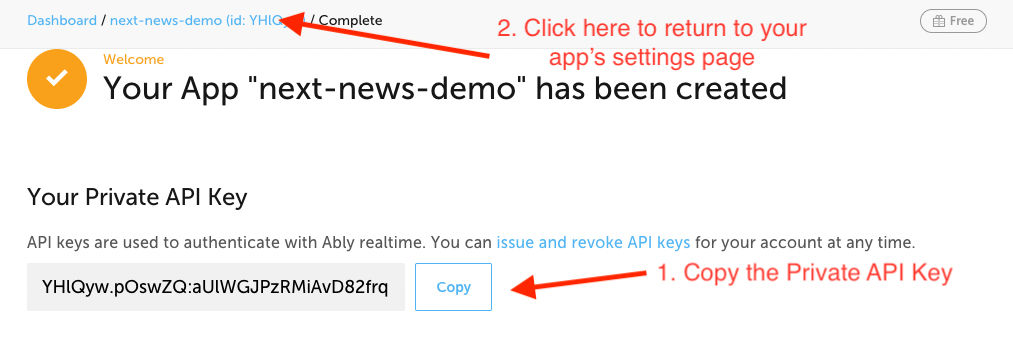
First, generate the Server API key. Once you have created an Ably account, you can generate an API key by performing the following steps:
- Visit your app dashboard and click on "Create New App".
- Give the new app a name - next-news-demo will do.
- Copy the Private API key once the app has been created. This key is your “Root” key, which provides widespread permissions on the Ably platform. Make a note of it, this is how your server will authenticate with the Ably service.
Return to the Apps settings page by clicking the name of your app in the breadcrumb trail at the top of the page:
Click the API keys tab and you will see two API keys: the Root key and a Subscribe only key. The subscribe-only one will be the key that clients authenticate with.
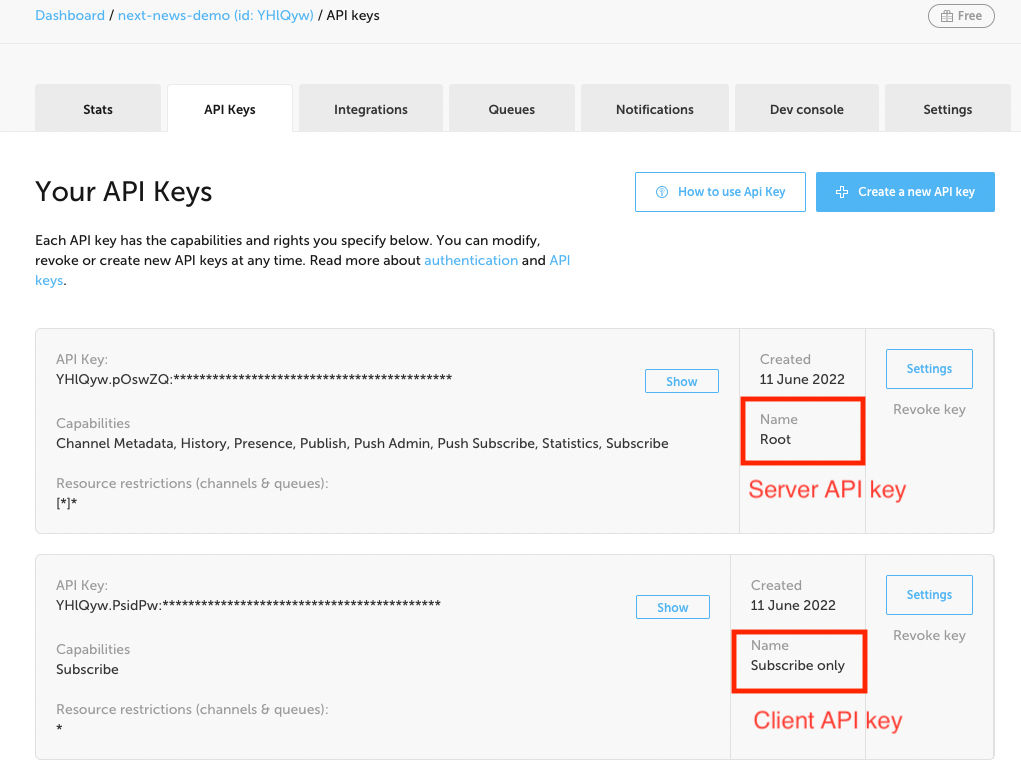
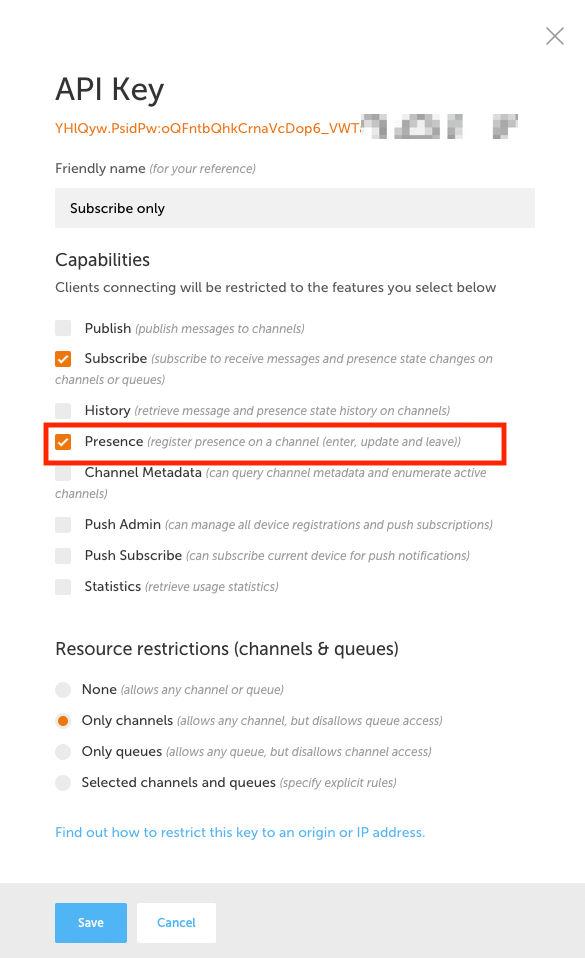
You can see that the Subscribe only key has, unsurprisingly, only the Subscribe capability. But your client will also need the Presence capability so that it can see which other clients are present on a channel, so you need to add that capability.
Click the Settings button, make the change below and click Save:
Step 5: Configure your .env file
Next.js can read from a .env file without you having to install extra dependencies. Add your server and client API keys to this file, as shown below:
# Server key must have Publish and History permissions - use app's Root key
ABLY_SERVER_API_KEY=UGCYxQ.211oIA:VgSya3hCMoQObVKkmuTYRo8se…
# Client key should have Subscribe and Presence permissions only
ABLY_CLIENT_API_KEY=UGCYxQ.uhSg9Q:A6Ftr7F0HTg1hedNA2n1iks6…
During development, the default URL is localhost:3000. When you deploy your app to Vercel in a later step this will change, so you will make it configurable from the outset.
Create a new environment variable called NEXT_PUBLIC_HOSTNAME. The NEXT_PUBLIC_ part of the name is important: it makes the environment variable visible to the browser. All other environment variables are only visible on the server.
# This will change after deployment
NEXT_PUBLIC_HOSTNAME=http://localhost:3000
Step 6: Authentication with Ably
In this application, clients will authenticate with the server using an API endpoint to retrieve a token. This means that you will never expose your API keys to the client and risk it being compromised. Your server will authenticate using an API key, using the Ably REST SDK.
So that you can identify individual users as publishers of messages to the channel, you will assign each a random name using a handy NPM module called unique-names-generator.
Install these modules now:
npm install ably unique-names-generator
Now you need to create an API endpoint that will perform the authentication step. Remember how we talked about Vercel Serverless functions earlier? This is a perfect use case for one.
Create a page called createTokenRequest.js in the /pages/api directory. This code will act as an HTTP handler for the endpoint /api/createTokenRequest. Clients will make HTTP requests to this endpoint when they want to authenticate with the Ably platform. Populate the file with the following code:
import Ably from "ably/promises";
import { uniqueNamesGenerator, adjectives, colors, animals } from "unique-names-generator";

export default async function handler(req, res) {
  const client = new Ably.Realtime(process.env.ABLY_CLIENT_API_KEY);

  const randomName = uniqueNamesGenerator({
    dictionaries: [adjectives, animals, colors],
    length: 2,
  });

  const tokenRequestData = await client.auth.createTokenRequest({
    clientId: randomName,
  });

  res.status(200).json(tokenRequestData);
}
This handler assigns a random clientId for the user on the Ably platform, authenticates using the client API key and returns a token that the client will use to perform subscribe and presence operations.
To work with Ably on the client, you will need to install Ably’s React Hooks package from Ably Labs. (Note that it is important to use version 2.0.4 or above, otherwise you will run into code transpilation errors):
npm install @ably-labs/react-hooks
You can then use the React Hooks’ configureAbly function to authenticate against your new /api/createTokenRequest endpoint. Enter the following code in index.js, below the final import statement and before the definition of the Home component:
...
import { configureAbly } from "@ably-labs/react-hooks";

configureAbly({
  authUrl: `${process.env.NEXT_PUBLIC_HOSTNAME}/api/createTokenRequest`,
});
...
Execute npm run dev and visit http://localhost:3000. You can't see it yet, but you're now connected to Ably!
Step 7: Build the list of participants
Next up is the first bit of Ably functionality: a list of users connected to a specific messaging channel, which you will retrieve using Ably’s Presence feature.
Create a new component in the components directory, called Participants.js and enter the following code:
import React from "react";
import { usePresence, assertConfiguration } from "@ably-labs/react-hooks";
import styles from "../styles/Home.module.css";

export default function Participants(props) {
  const ably = assertConfiguration();
  const [presenceData] = usePresence("headlines");

  const presenceList = presenceData.map((member, index) => {
    const isItMe = member.clientId === ably.auth.clientId ? "(me)" : "";

    return (
      <li key={index} className={styles.participant}>
        <span className={styles.name}>{member.clientId}</span>
        <span className={styles.me}>{isItMe}</span>
      </li>
    );
  });

  return <ul>{presenceList}</ul>;
};
assertConfiguration is a utility function to check that the component can access the Ably instance you created in index.js. It throws an error if it cannot.
The Participants component employs the usePresence() hook from Ably’s React Hooks to retrieve a list of members present on a specific channel. In this case, we’ll use the name headlines for the channel that users will publish news article URLs to.
It processes the list of members and checks to see if the clientId matches the one that was assigned to this specific instance during authentication. If so, then it appends “(me)” to that clientId in the list and then displays the list.
You must now import and use this component in the index.js page:
import Head from "next/head";
import Image from "next/image";
import ablyLogo from "../public/ably-logo.svg";
import styles from "../styles/Home.module.css";
import Participants from "../components/Participants";
import { configureAbly } from "@ably-labs/react-hooks";

configureAbly({
  authUrl: `${process.env.NEXT_PUBLIC_HOSTNAME}/api/createTokenRequest`,
});

export default function Home() {
  return (
      …
        <h1>Realtime News</h1>
        <h2>Share your favorite news articles</h2>
        <h3>Participants</h3>
        <Participants />
      </main>
    </div>
  );
}
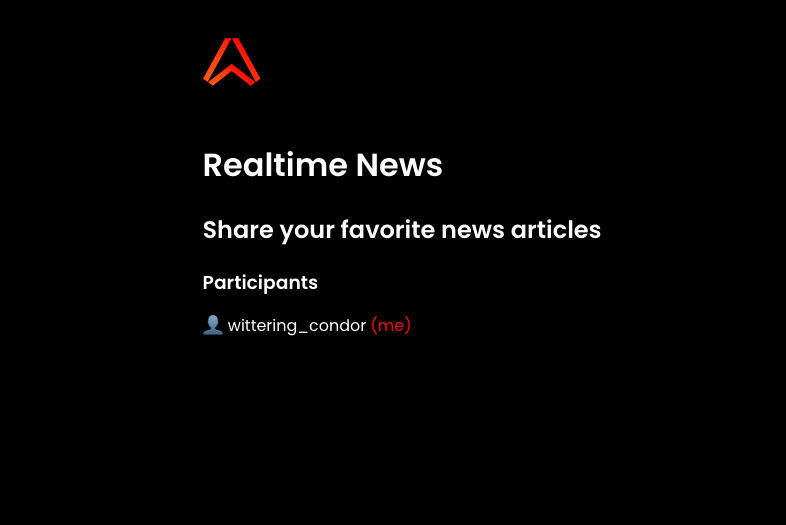
Your page should update and you will see the name of the current user in the participant list:
Note: If you don’t see this page, then your server might not be running. Execute npm run dev and refresh the page.
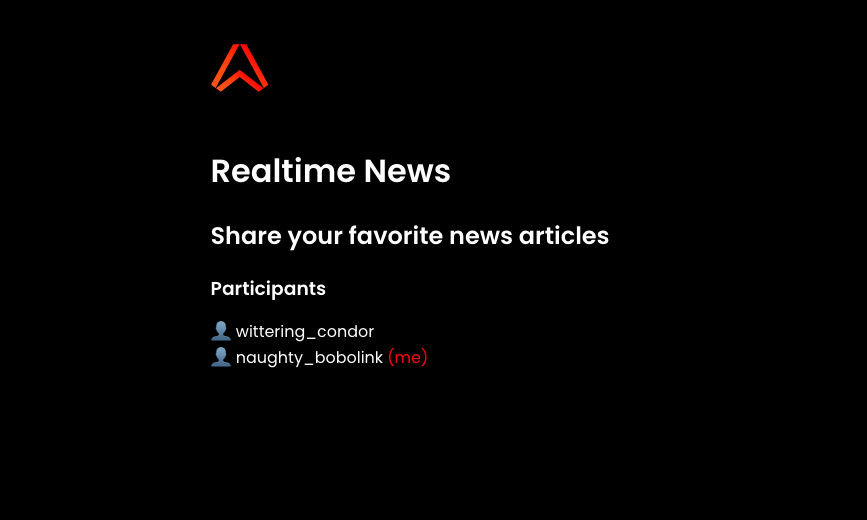
Open a new tab and note that a new user appears in the list and that both lists update accordingly:
Step 8: Publish articles
By electing to publish from the server, you can validate and pre-process what clients send to the channel. For instance, you might want to implement a profanity filter, which is trivial to do server-side.
In this tutorial, you will take the URLs submitted by users and submit them to the server. The server will first check to see if the URL is valid. If so, it will look up the OpenGraph data associated with that URL and retrieve any available title, description, and image information to use for the preview.
First, install the following NPM packages:
npm install open-graph-scraper url-exists-nodejs
Then, create another API endpoint, just as you did for authentication. Clients will make a POST request to the /api/publish endpoint to publish a URL. The request body will contain a text field that contains the URL they want to submit to your service.
Create a publish.js file in the /pages/api directory and populate it with the following code:
import Ably from "ably/promises";
import urlExists from "url-exists-nodejs";
import ogs from "open-graph-scraper";

const ably = new Ably.Rest(process.env.ABLY_SERVER_API_KEY);
const channel = ably.channels.get("headlines");

export default async function handler(req, res) {
  if (req.method !== "POST") {
    res.status(405).json({});
    return;
  }

  const validUrl = await urlExists(req.body.text);
  if (!validUrl) {
    res.status(400).json({ url: req.body.text, message: "not a valid URL"});
    return;
  }

  const { result } = await ogs({ url: req.body.text });

  if (!result.success) {
    res.status(400).json({ message: "not a valid URL" });
    return;
  }

  channel.publish("new-headline", {
    author: req.body.author,
    site:  result?.ogSiteName || "unknown",
    title: result?.ogTitle || "unknown",
    desc: result?.ogDescription || "unknown",
    image: result.ogImage?.url || "",
    url: req.body.text
  });

  res.status(200).json({});
}
This code:
- Instantiates an instance of ably using the REST SDK and authenticates with the server API key you created earlier
- Stores a reference to the headlines channel using ably.channels.get
- Checks that the incoming request body contains a URL
- Validates that the URL exists
- Looks up the OpenGraph data associated with the URL
- Publishes the user-submitted URL and the fetched OpenGraph data to the headlines channel, with the topic name “new-headline”
With your server running, make a test request to your new endpoint using Curl (or Postman, if you prefer to use a GUI):
curl -X POST http://localhost:3000/api/publish -H 'Content-Type: application/json' -d '{"text":"https://bbc.co.uk"}'
If everything works, you should just see an empty JSON response in the terminal:
{}%
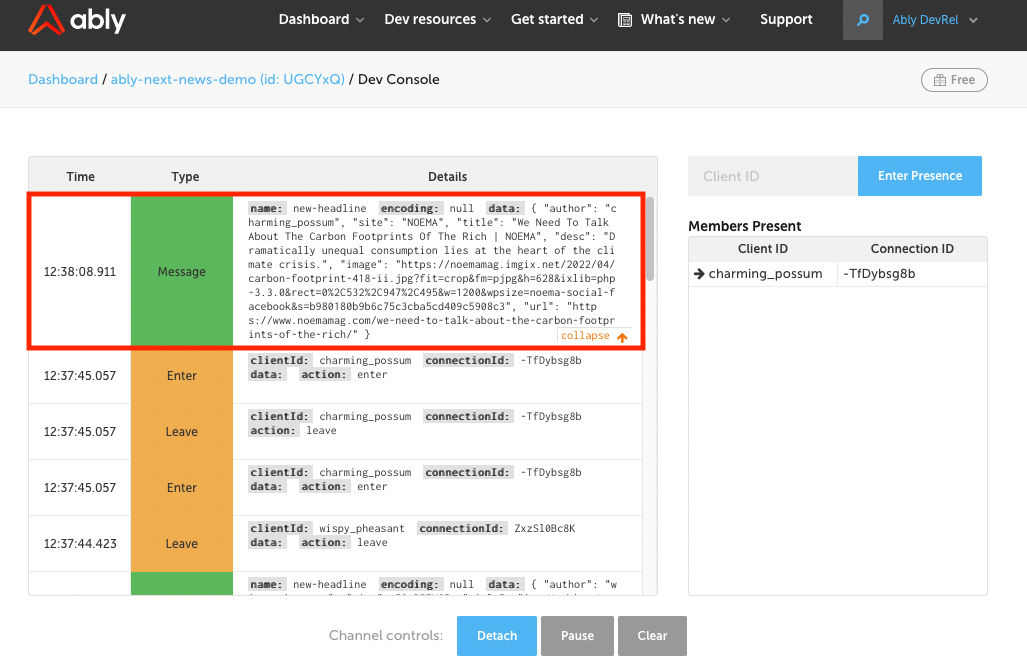
To verify that your messages are publishing correctly, visit your app settings in the Ably Dashboard and select the Developer console tab. Enter the channel name (headlines) where indicated in the diagram below and click Enter Presence. Execute the Curl (or Postman) request again.
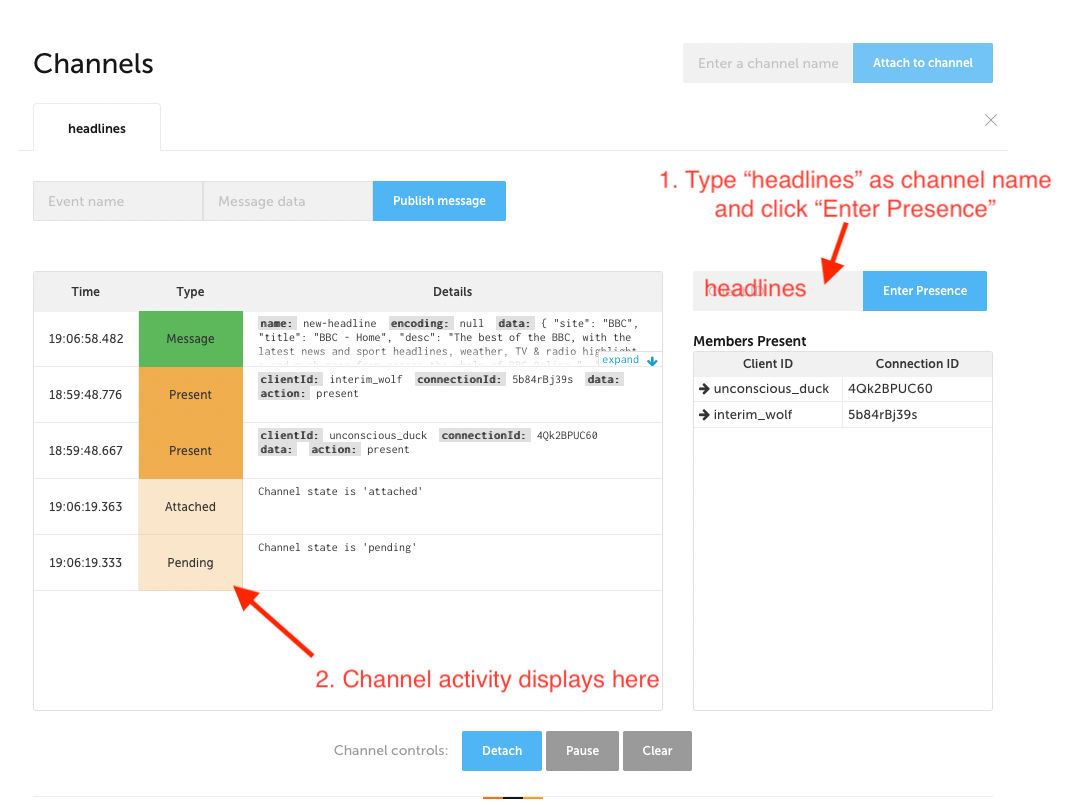
If you see your message in the channel activity on the left-hand side of the page then publishing is working. Now you need to add a way to publish from the client and also list the articles that have already been published. You’ll deal with the publishing side of things first.
Step 9: Implement a UI for publishing
You will create a new component called Articles for this. In a file called Articles.js in the components directory, enter the following code:
import React, { useState } from "react";
import { useChannel } from "@ably-labs/react-hooks";
import styles from "../styles/Home.module.css";

export default function Articles() {
  let inputBox = null;

  const [headlineText, setHeadlineText] = useState("");

  const [_, ably] = useChannel("headlines", (headline) => {
    // update headlines
  });

  const headlineTextIsEmpty = headlineText.trim().length === 0;

  const handleFormSubmission = async (event) => {
    const nonEnterKeyPress = event.charCode && event.charCode !== 13;
    if (nonEnterKeyPress || headlineTextIsEmpty) {
      return;
    }

    event.preventDefault();

    await fetch("/api/publish", {
      method: "POST",
      headers: { "Content-Type": "application/json" },
      body: JSON.stringify({ text: headlineText, author: ably.auth.clientId }),
    });

    setHeadlineText("");
    inputBox?.focus();
  };

  return (
    <div>
      <form onSubmit={handleFormSubmission} className={styles.form}>
        <input
          type="text"
          ref={(element) => {
            inputBox = element;
          }}
          value={headlineText}
          placeholder="News article url"
          onChange={(event) => setHeadlineText(event.target.value)}
          onKeyPress={handleFormSubmission}
          className={styles.input}
        />
        <button
          type="submit"
          className={styles.submit}
          disabled={headlineTextIsEmpty}
        >
          Submit
        </button>
      </form>
    </div>
  );
}
This component displays a form for the user to submit new headlines. You can see the form markup in the return statement.
This code:
- Creates a React use state hook to store the headline URLs that the user submits.
- Connects to the headlines channel in Ably with useChannel. Ultimately, you will use this to display a list of headline previews to the user. For now, you’re just using it to get access to the Ably instance you configured in index.js. Your application needs access to this instance to determine the clientId of the user who wants to publish the headline, so that it can associate the headline with the correct user.
- Calls handleFormSubmission when the user enters a URL which submits it to the /api/publish endpoint that you created in Step 8.
Import the Articles component in index.js, after the import of the Participants component:
import Articles from "../components/Articles";
Then, add it to the page markup, below the Participants component:
...
  <main className={styles.main}>
    <Image
      alt="ably logo"
      src={ablyLogo}
      width="160px"
      height="100%"
    ></Image>
    <h1>Realtime News</h1>
    <h2>Share your favorite news articles</h2>
    <h3>Participants</h3>
    <Participants />
  </main>
...
Test this by ensuring that your development server is still running (if not, then relaunch it using npm run dev) and visiting http://localhost:3000.
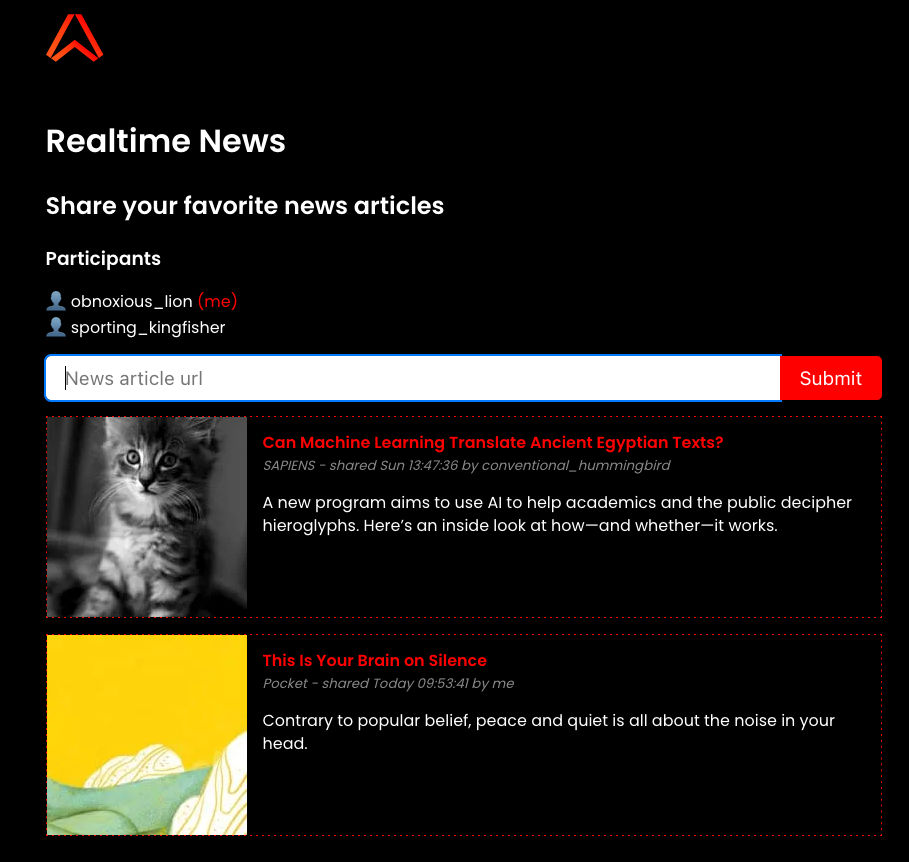
You should see the following form:
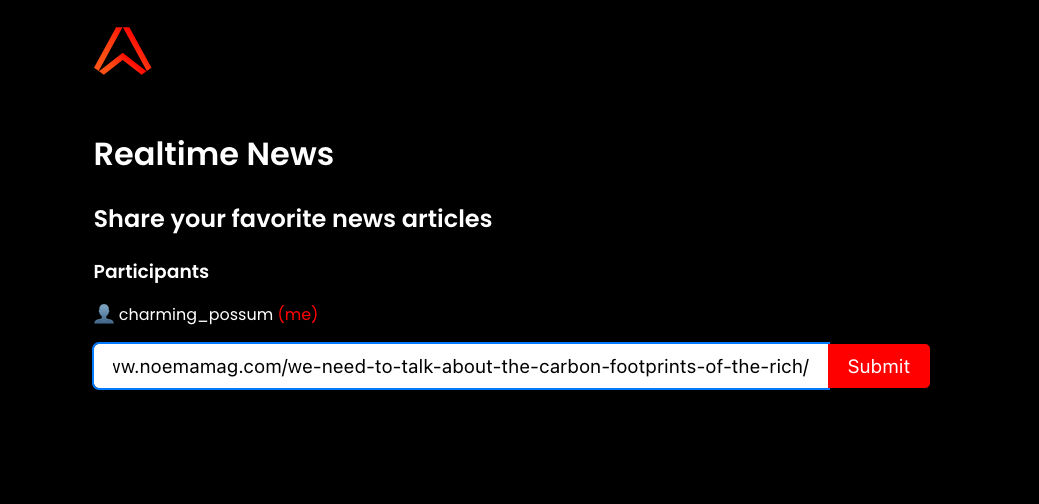
Enter a URL from a news article and click Submit.
Then, return to the dev console in your Ably dashboard and locate the message:
The publishing side of your app is now working. You now need to list the articles that have been published.
Step 10: Retrieve the latest messages
When the user first visits the page, you don't want them to see just an empty page. You also want them to see recent messages published to the channel before they subscribed to it.
In order to do this, we're going to Ably's History API and also a really neat feature that Next.js offers, called Incremental Static Regeneration (ISR). ISR is one of the approaches Next.js offers that enables you to create static pages out of "live" data. This is great for fast site loading times and also SEO.
Create the lib/history.js file and populate it with the following code:
import Ably from "ably";

const rest = new Ably.Rest.Promise({
  key: process.env.ABLY_SERVER_API_KEY,
});

const channel = rest.channels.get("headlines");

export async function getHistoricalMessages() {
  const resultPage = await channel.history({ limit: 5 });
  /*
    See issue: https://github.com/vercel/next.js/issues/11993.
    The JSON must be re-parsed or certain Message object items
    cannot be serialized by props later.
  */
  const historicalMessages = JSON.parse(JSON.stringify(resultPage.items));
  return historicalMessages;
}
The getHistoricalMessages function simply makes a call to the History API, to retrieve the five most recent messages on the headlines channel. To add these messages to the page, modify index.js as follows.
First, import the getHistoricalMessages function:
import { getHistoricalMessages } from "../lib/history";
Then, add a props argument to the Home component:
export default function Home(props) {
  return (
    <div className={styles.container}>
    ...
Add a history property to the Articles component, which references props.history:
<Articles history={props.history} />
Finally, add a getStaticProps function at the bottom of index.js. This is a special Next.js function that pre-renders the page at build time. It populates props by calling the getHistoricalMessages function you created earlier and passes it to the Home component. In our example, we're setting the revalidate property to 10, to incrementally regenerate the page every ten seconds:
export async function getStaticProps() {
  const historicalMessages = await getHistoricalMessages();

  return {
    props: {
      history: historicalMessages,
    },
    //enable ISR
    revalidate: 10,
  };
}
This is great! It means that our site visitors will see recent messages almost instantaneously, and search engines can crawl these pages to boost SEO rankings. However, it does pose a potential issue when we use it with Ably. That is, what happens if new messages arrive on the channel while we're retrieving history? This could result in a race condition and messages appearing out of order.
To avoid this problem, we're going to use Ably's channel rewind feature, which is built into Ably's React Hooks. This is a convenient way of retrieving messages that have been published to the channel up to two minutes before the current client attaches to that channel. That doesn't give us the flexibility of the History API, but still allows us to show the user some history while they interact with the page.
You'll know when the user has connected to Ably when your app makes a call to the Ably React Hooks useChannel hook in the Articles component. What you'll do is set a flag which, when updated, clears out the existing state which was populated by the call to the History API (from the server) and replaces it from then on with historical articles retrieved using channel rewind (on the client).
Change the code in the components/Article.js file as follows:
/*
clearHistoryState:
  - When true, historical messages are retrieved and rendered statically from the History API.
  - When false, historical messages are retrieved using channel rewind to prevent a race condition
    where new messages are arriving on the channel while history is still being retrieved.
*/
let clearHistoryState = true;

export default function Articles(props) {
  let inputBox = null;

  const [headlineText, setHeadlineText] = useState("");
  const [headlines, updateHeadlines] = useState(props.history);
  const [_, ably] = useChannel("[?rewind=5]headlines", (headline) => {
    if (clearHistoryState) {
      resetHeadlines();
      clearHistoryState = false;
    }

    updateHeadlines((prev) => [headline, ...prev]);
  });

  const resetHeadlines = () => {
    updateHeadlines([]);
  };
The useChannel function fires every time a new message appears in the headlines channel. You capture these headlines and update the state of the component using a new React state hook. You also show the last five messages in the channel using channel rewind. Using rewind is as simple as prefixing the channel name with [?rewind=N], where N is the maximum number of messages to retrieve.
But no one can see the historical messages yet! You'll fix that in the next step.
Step 11: Generate the article previews
You now need to show the existing URLs with all their associated OpenGraph data gathered during the publishing step.
Create a new component for this, called ArticlePreview (/components/articlePreview.js), with the following code:
import React from "react";
import styles from "../styles/Home.module.css";
import Image from "next/image";

export default function ArticlePreview({ index, headline }) {
  return (
    <article key={index} className={styles.card}>
    <Image
        className={styles.pic}
        src={`https://res.cloudinary.com/mark-ably/image/fetch/w_200,h_200,c_fill/${headline.data.image}`}
        alt={headline.data.title}
        width={200}
        height={200}
        objectFit="cover"
        quality={80}
    ></Image>

      <div className={styles.info}>
        <h1 className={styles.title}>
          <a href={headline.data.url} className={styles.link}>
            {headline.data.title}
          </a>
        </h1>
        <div className={styles.details}>
          {headline.data.site} - shared {headline.data.timestamp} by {headline.data.author}
        </div>
        <p>{headline.data.desc}</p>
      </div>
    </article>
  );
};
The component takes a props object that consists of an arbitrary index and the headline. The index is just used to provide the article with a unique key, which helps React keep track of which elements in an array have changed, been added, or been removed.
Note that we’re using a proxy for the preview image URL that OpenGraph returns for each article that you submit for publishing. That’s because we want to use the Next.js Image tag to display the image, which has some useful optimization features.
But, a limitation of using Image is that the image itself must be either statically imported or accessible via a whitelisted external URL. Since you don’t know in advance what URLs our users will submit to your app, you need to proxy the URLs. This tutorial uses Cloudinary which lets you serve up images dynamically via a CDN and also transform the images on the fly using path parameters.
To whitelist Cloudinary, you must add cloudinary.com as an approved image host in next.config.js:
/** @type {import('next').NextConfig} */
const nextConfig = {
  reactStrictMode: true,
  swcMinify: true,
  images: {
    domains: ["res.cloudinary.com"],
  },
}

module.exports = nextConfig
Note: You must restart the server after making any changes to next.config.js.
You can now add the ArticlePreview component as a child of the Articles component.
At the bottom of the /components/Articles.js file, add a function called processMessage that inspects the message payload and formats the data so that is ready for display:
function processMessage(headline, currentClientId) {
  headline.data.timestamp = "timestamp" in headline ?
      formatDate(headline.timestamp) : "earlier";
  headline.data.url = headline?.data?.url || "http://example.com";
  headline.data.image = headline?.data?.image || "http://placekitten.com/g/200/300";
  return headline;
}
You’ll see that this code is formatting the date from the timestamp. Create the formatDate function immediately below processMessage to handle the formatting:
function formatDate(date) {
  const regex = /(?:[^T]+)T([0-9:]+)/gm;
  const dateToFormat = new Date(date).toISOString();
  const match = regex.exec(dateToFormat);
  return match[1];
}
Import the ArticlePreview component as a child component of the Articles component. Your list of imports in /components/articles.js should now look like this:
import React, { useState } from "react";
import { useChannel } from "@ably-labs/react-hooks";
import ArticlePreview from "./ArticlePreview";
import styles from "../styles/Home.module.css";
Then, just above the handleFormSubmission function, call the processMessage function for each headline in your React headlines use state hook, passing in the headline and the clientId of the publisher:
const processedHeadlines = headlines.map((headline) =>
    processMessage(headline, ably.auth.clientId)
);
Directly below the processHeadlines function, create a new variable called articles that populates the ArticlePreview component for each of the processed headlines:
const articles = processedHeadlines.map((headline, index) => (
    <ArticlePreview key={index} headline={headline} />
));
Finally, add the articles variable (within a <div> tag) to the bottom of the return statement (beneath the form markup) to display the previews on the page:
return (
<div>
  <form onSubmit={handleFormSubmission} className={styles.form}>
    <input
      type="text"
      ref={(element) => {
        inputBox = element;
      }}
      value={headlineText}
      placeholder="News article url"
      onChange={(event) => setHeadlineText(event.target.value)}
      onKeyPress={handleFormSubmission}
      className={styles.input}
    />
    <button
      type="submit"
      className={styles.submit}
      disabled={headlineTextIsEmpty}
    >
      Submit
    </button>
  </form>
  // add the articles variable here
  <div>{articles}</div>
</div>
);
Step 12: Test your creation
Ensure that your server is running and then open two or more tabs at https://localhost:3000.
Find an article online, and submit its URL. If the site in question has OpenGraph data associated with it you’ll see a preview of the article appear simultaneously in all the open app tabs. If no preview image is available you’ll see a cute kitten instead:
Step 13: Deploy your app to Vercel
Before you unleash your new app on the world, you need to prepare it for its new home on Vercel.
First, you’ll have to pre-empt any CORS issues. In next.config.js, add the following HTTP headers. These specify which origins, methods, and other features your requests will support:
/** @type {import('next').NextConfig} */

const nextConfig = {
  reactStrictMode: true,
  images: {
    domains: ["static.ably.dev", "res.cloudinary.com"],
  },
  async headers() {
    return [
      {
        // match all API routes
        source: "/api/:path*",
        headers: [
          { key: "Access-Control-Allow-Credentials", value: "true" },
          { key: "Access-Control-Allow-Origin", value: "*" },
          {
            key: "Access-Control-Allow-Methods",
            value: "GET,OPTIONS,PATCH,DELETE,POST,PUT",
          },
          {
            key: "Access-Control-Allow-Headers",
            value:
              "X-CSRF-Token, X-Requested-With, Accept, Accept-Version, Content-Length, Content-MD5, Content-Type, Date, X-Api-Version",
          },
        ],
      },
    ];
  },
};

module.exports = nextConfig;
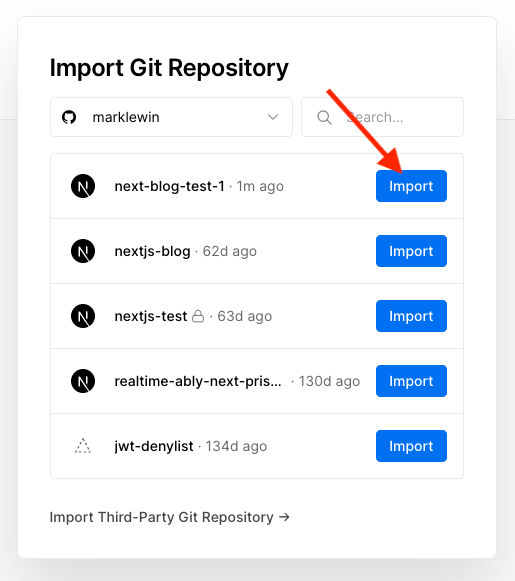
Vercel deploys your app from GitHub (and also GitLab and BitBucket, but this tutorial assumes that you’re using GitHub).
In order to deploy your new chat app to Vercel you'll need to:
- Create a GitHub account (if you don't already have one)
- Push your app to a new GitHub repository
- Create a Vercel account
- Create a new Vercel project and import your app from your GitHub repository. (This will require you to authorize Vercel to use your GitHub account).
Before you push your code to GitHub, add your .env file to .gitignore, by executing the following code in your terminal in your project’s root directory. Vercel manages its own environment variables and you don’t want your API keys visible on GitHub:
echo ".env" >> .gitignore
Then, commit and push your local repository to GitHub. (Instructions)
Visit your Vercel dashboard and import your repository into Vercel:
In the dialog box that displays, click the Deploy button:
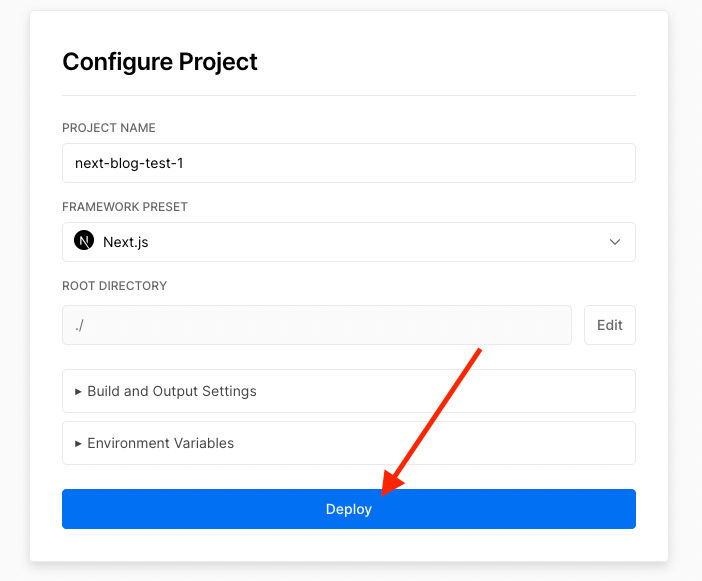
It will take a minute or two for Vercel to deploy your code. Once it’s done, click the preview of your website to open it in a browser.
Note that your app doesn’t yet work, because you haven’t configured it correctly yet and to do so, you need the URL that Vercel assigned to you. Copy the URL from the address bar (which should end in .vercel.app) then close the tab. Go back to the tab that displays your website preview and click Go to Dashboard.
Go to the Settings tab at the top of the dashboard page and select Environment Variables from the menu on the left.
Add the following environment variables:
- NEXT_PUBLIC_HOSTNAME=your Vercel URL (Important! Do not include any trailing backslash (/) )
- ABLY_SERVER_API_KEY=from your .env file
- ABLY_CLIENT_API_KEY=from your .env file
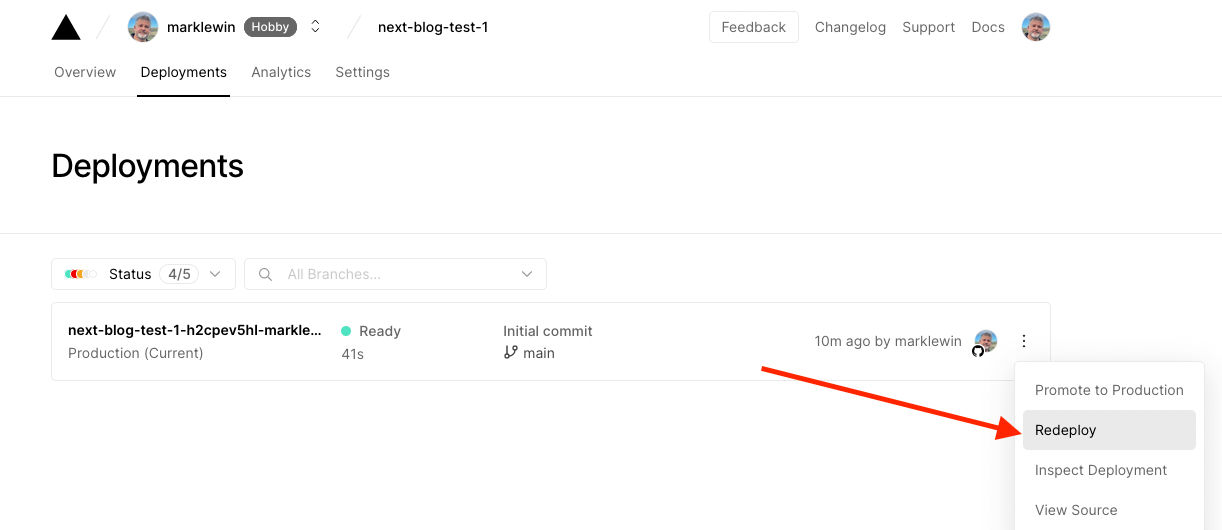
Click the Deployments tab at the top of the page and redeploy your app:
When the deployment is complete, click the Visit button to re-open your application in one or more tabs and start posting headlines!
It's time to implement realtime functionality!
In this tutorial, you learned how to implement realtime functionality in a Next.js application and deploy it to Vercel. Along the way, you learned some best practices about authentication and publishing and also how to use Ably’s Presence, History, and Channel Rewind features.
You can definitely improve on this app. For one thing, you might find that certain URLs with query parameters don’t pass the validation test. You can implement your own validation rules to get around this.
And, if you want to take it up a notch, this seems like the sort of app that would work well as a Hacker News-type clone. Consider adding some voting buttons and perhaps even a commenting feature with realtime commenting, like we demonstrated in our recent post about creating live updates to blog comments.
We’d love to see where you take this. Contact us on Twitter @ablyrealtime, so we can share your apps!