


How to handle URL redirects when using a headless CMS
When using a headless CMS with web, content is decoupled from the site implementation, yet it still holds the data that are typically used to define URLs. How do we ensure that when that content changes, the site issues a proper URL redirect?

In this article, I’ll explain what the URL slug is and how it’s typically used in website implementations. I will also touch on the risks connected to its changes and how to mitigate them by preserving the URL slug history. The code samples in this article are built for Next.js, but the process of handling redirects can be similarly applied to any website framework.
What is the URL slug?
Simply put, the URL slug is the last part of the URL. It’s the segment that identifies a specific content item, and we use it to build the final URL.
Let’s say we have a series of blog posts. They are always accessible at the following URL: https://kontent.ai/blog/{urlSlug}:
| Blog post title | Url slug | URL |
| How to re-platform your website without the risky ‘big bang’ release | replatforming-existing-site | https://kontent.ai/blog/replatforming-existing-site |
| How to verify and process webhook notifications in Next.js | processing-webhooks-in-next-js | https://kontent.ai/blog/processing-webhooks-in-next-js |
| How to avoid production errors caused by content changes on Jamstack sites | avoid-production-errors-after-unexpected-content-model-changes | https://kontent.ai/avoid-production-errors-after-unexpected-content-model-changes |
URL building in the site implementation
The first part of the URL (https://kontent.ai/blog/) is defined by the site implementation. In there, you know that, for example, blogs are always rendered under /blog and products under /store/product. The URL is a combination of the path defined by the site and the URL slug defined in the content item:
https://kontent.ai/blog/ + replatforming-existing-site
In Next.js, we typically define the URLs using a page component on a path that corresponds to the URL: /src/pages/blog/[slug].tsx.
Why are URL slug changes a problem?
So what is the worst thing that can happen when a URL slug changes?
First of all, URL slugs typically don’t change. A content editor defines the URL slug when creating the content item; the page gets indexed in search engines, gains a score, and drives traffic to your site. However, sometimes editors have valid reasons for changing the URL slug.
If editors simply changed the URL slug of a page, the page would cease to exist on its original URL with all of its consequences like the loss of organic traffic, people getting 404 errors, and so on.
So how can we mitigate that? There are three steps:
- Preserve the history of URL slug changes.
- Process both current and old URL slugs in the site implementation.
- Redirect old URL slugs to new ones and always show the right content.
Preserve the history of URL slug changes
As a prerequisite to handling any redirects, we need to know the current and historical URL slugs:
| Blog post | Current URL slug | Previously used URL slugs |
| How to verify and process webhook notifications in Next.js | processing-webhooks-in-next-js | next-js-webhooks next-webhooks ... |
The published content item holds only the current URL slug. For the history, we’ll use an extra custom element called “URL slug history” listed in the Kontent.ai Custom Elements gallery. The custom element watches over each item’s published URL slug, and if it changes, it saves the old one automatically.
To use the custom element, we first need to deploy it. You can use any host you like as long as it can host HTML and JavaScript files. The easiest option is probably Netlify, as the repository contains a button that allows you to fork it and deploy it there in a single click.
When you have the code deployed, note its URL.

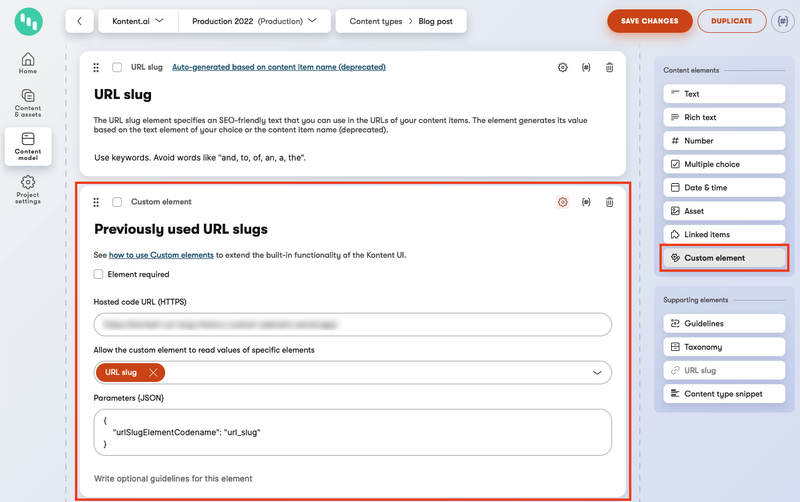
Add the custom element to your content type and fill the fields this way:
- Hosted code URL (HTTPS)
This is the URL of your deployed fork of the custom element. - Allow the custom element to read values of specific elements
Select the original URL slug field. - Parameters {JSON}
Use the following JSON and replace the placeholder with your URL slug element’s codename:{"urlSlugElementCodename": "url_slug_element_codename_placeholder"}
When you open a content item that uses this content type, depending on its workflow step, you will see this:

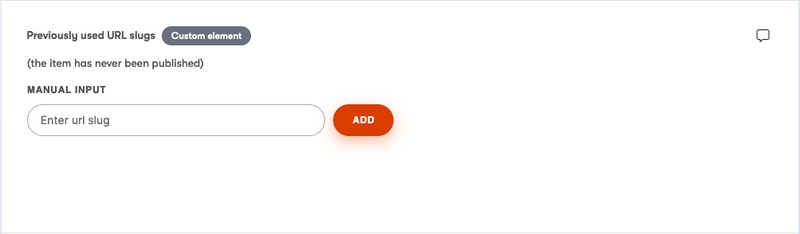
The custom element will handle the URL slug history for us and deliver the data as an array of strings in the Delivery API response:
...
"url_slug_history": {
  "type": "custom",
  "name": "Previously used URL slugs",
  "value": "[\"old-slug-1\",\"old-slug-2\", ...]"
},
...
Handling the redirects in the site implementation
Now that we have the current and history URL slugs in the API response, we can implement the redirects in the code. We’ll focus on Next.js, but as I mentioned before, you can apply a similar approach to any other framework.
In Next.js, the dynamic pages use two specific methods to handle page generation:
getStaticPaths
Used to get all paths on which Next.js should generate pages (or redirects).getStaticProps
Used to build the final page. It is invoked for each path we provided ingetStaticPaths.
In getStaticPaths, we need to provide all paths, current and previous ones. All other paths will return 404. We can get both types of URL slugs this way:
const blogPosts = await deliveryClient
    .items<BlogPostModel>()
    .type(projectModel.contentTypes.blog_post.codename)
    .elementsParameter([
        projectModel.contentTypes.blog_post.elements.url_slug.codename,
        projectModel.contentTypes.blog_post.elements.url_slug_history.codename,
    ])
    .depthParameter(0)
    .toPromise()
Note: This example uses models automatically generated by the Kontent.ai Model Generator.
You see that here in getStaticPaths, we have the information about which URL slug is current and which should be redirected (url_slug_history). The problem with Next.js is that it will only let us return values for variables defined in the page’s path. Let’s say we’re working with blog posts rendered at https://kontent.ai/blog/{blog post URL slug}. The page component will sit at /pages/blog/[slug].tsx, so the only parameter we can return is slug.
Why is that a problem? Later, in getStaticProps, we only get the URL slug without any additional info, so we’d have to do one extra query to Kontent.ai API per each blog post to find out whether we’re working with the current or historical slug. That would determine whether we should render a page or issue a redirect. That is unacceptable performance-wise if you work with thousands of blog posts.
The community is still waiting for Next.js to provide better support for transferring data between the mentioned two methods, but until then, we can use the suggested workaround using cache files. It allows us to share more data between the getStaticPaths and getStaticProps via physical files shared between processes.
Building the paths and redirects in getStaticPaths
So, in getStaticPaths, we use the query above and compose the list of paths and redirects:
export const getStaticPaths: GetStaticPaths = async () => {
    const posts = /* see code example above */

    // transform all slugs into a flat list of [slug, redirectsTo]
    // current slug has redirectsTo undefined

    const allSlugs = [].concat(
        ...posts.data.items.map(item => [
            {
                slug: item.elements.urlSlug.value
            },
            ...(JSON.parse(item.elements.urlSlugHistory.value)
                .map(oldSlug => {
                    slug: oldSlug,
                    redirectsTo: item.elements.urlSlug.value
                })
        ]))

    // store the streamlined list of slugs into physical file to share among processes
    await fs.writeFile(path.join(process.cwd(), 'slugs.db'), JSON.stringify(allSlugs))

    // return all slugs (only slugs) to Next.js
    return {
        paths: allSlugs.map(slug => ({
            params: {
                slug: slug.slug,
            },
        }))
    }
}
Let’s showcase this code with an example. We used this blog post before:
| Blog post | Current URL slug | Previously used URL slugs |
| How to verify and process webhook notifications in Next.js | processing-webhooks-in-next-js | next-js-webhooks next-webhooks ... |
In allSlugs, we create a list of URL slugs of all blog posts with the information about their validity (undefined redirectsTo property):
[
    { slug: 'processing-webhooks-in-next-js' },
    { slug: 'next-js-webhooks', redirectsTo: 'processing-webhooks-in-next-js' },
    { slug: 'next-webhooks', redirectsTo: 'processing-webhooks-in-next-js' }
    ...
]
Then, we save the data into a physical file slugs.db and return both current and historical slugs to Next.js.
Rendering the blog post in getStaticProps
In getStaticProps, we first need to check the slug. Remember, the function will be called for each provided path, including the historical ones we need to redirect:
export const getStaticProps: GetStaticProps = async ({ params, preview }) => {
	const slug = params.slug.toString()

	if (!preview) {
		const data = await fs.readFile(path.join(process.cwd(), 'slugs.db'))
		const path = JSON.parse(data).find(s => s.slug === slug)

		if (path.redirectsTo) {
			return {
				redirect: {
					permanent: true,
					destination: `/blog/${path.redirectsTo},
				},
			}
		}
	}

	// fetch the blog post data from Kontent
	// build the page
}
We first check the URL slug of the page and see if it should be redirected. We take the data of the slug from the physical file slugs.db. If it’s a historical URL slug, it will have the redirectsTo property filled with the new URL slug. In that case, we directly tell Next.js to redirect. Otherwise, we continue with standard processing—fetching the blog post data from Kontent.ai and building the page.
Note: Depending on whether or not you use the preview mode for fetching content, you may want to enable/disable the redirects check for Next.js preview.
And that’s it. The old URL slugs will be properly redirected, the current ones will show content. Remember to take this approach for all dynamically generated pages you want to protect from untracked URL slug changes.
Conclusion
In this article, I showed you how to handle URL slug changes in the Next.js and Kontent.ai combo. I presented the URL slug history custom element that automatically tracks all URL slug changes, keeps history, and provides the data in the Delivery API response. I explained how to properly implement the redirecting logic in Next.js and how to share data between getStaticPaths and getStaticProps to avoid overusing the API.
Make sure to join our Discord and share your experience with handling URLs in headless space or get help from the community of Kontent.ai developers.
Feeling like your brand’s content is getting lost in the noise?
Listen to our new podcast for practical tips, tricks, and strategies to make your content shine. From AI’s magic touch to content management mastery and customer experience secrets, we’ll cover it all.
Listen now


Subscribe to Kontent.ai Newsletter
Stay in the loop. Get the hottest updates while they’re fresh!
