


Nx is a build framework for monorepos with first-class React support. It helps accelerate the adoption of proven development practices across projects of many sizes and scopes. Nx provides additional tooling for React projects to help scale and develop features at a faster pace.
This guide walks through some of the tooling provided by Nx, the creation, and structure of an Nx workspace, with an example to follow along with.
What are Monorepos
A monorepo is a single collection of all your source code that spans multiple applications, libraries, and languages. Everything in the monorepo is not deployed at the same time but is all located in a central repository. Many companies use monorepos for different organizations and projects. Some even use a single monorepo to house all the source code for projects across their entire company.
Here are some of the benefits of a monorepo:
- Shared code — Promotes reuse of validation code, UI components, and types across the code base, including code between the backend and the frontend.
- Atomic changes — Make changes to a server API and modify the clients that consume that API in the same commit. No more coordinating commits across different repositories.
- Developer mobility — Provides consistency between building and testing applications written using different tools and technologies. Developers can confidently contribute to other teams’ applications and verify that their changes are safe.
- A single set of dependencies — Use a single version of third-party dependencies for all your apps. Less frequently used applications don’t get left behind with a 3-year-old version of a framework library or an old version of a build tool.
There are also a few common misconceptions with monorepos:
- Strictly co-locating your code just by placing all your code in the same repository.
- Running all the builds, tests, and quality checks on all applications for each PR or commit.
- Deploying every application on every commit to the main branch.
- Setting up multiple scripts across applications to handle common tasks.
Just because you have all your code in a monorepo, that does not mean you have run all the tests and checks on your monorepo for every single commit. This doesn't scale well and leads to bottlenecks in your development and Continuous Integration (CI) and Continuous Deployment (CD) pipelines. Nx provides integrated tooling to intelligently determine what needs to be run through code analysis, affected commands, and computation caching.
Affected commands
Nx uses code analysis to build a dependency graph of all projects in the workspace. It then uses the dependency graph to determine what projects are impacted based on your changes between your Git branches and the main branch. Nx’s Affected Commands use this code analysis to perform the minimum set of tasks based on what's changed. Let’s look at two applications that depend on a library as an example.
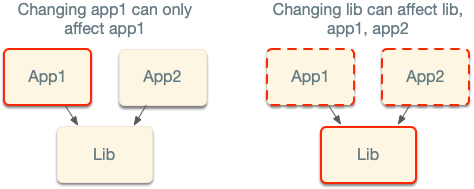
To see what applications are affected, use the nx affected:apps command. Nx analyzes the nature of the changes and determines which projects, including applications and libraries, are impacted. In the example above, changing app1 doesn’t cause app2 to be impacted, so you don’t need to run all the pre-merge steps for app2. Alternatively, changing the lib, or packages that both apps depend on does impact both applications.
Computation caching
Nx is smart in that it also knows the context in which you ran particular commands, the current hash of the files, and other environmental information.
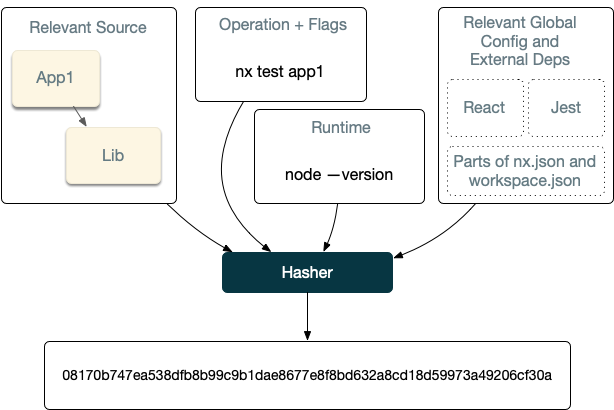
The image above displays an example of the information collected to build a unique hash used to identify the computation. With this information, Nx caches and stores these computations and can replay them if it seems the same computation is being run again.
This isn’t done through rebuilding source code. Only the artifacts produced from a given command are stored and replayed when possible. If Nx doesn’t find this computation, Nx runs the task, and after it completes, it takes the outputs and the terminal output and stores it locally (and if configured remotely). All of this happens transparently, so you don’t have to worry about it.
Creating an Nx Workspace Using a React Preset
Now that you know how Nx works, let’s try it out by building a small application that lists Star Wars characters.
Start with creating the Nx workspace with a React application using the react preset.
npx create-nx-workspace sw-org --preset react --appName myappAfter running this command, you’ll be asked to select a stylesheet format. You can choose the default for this demo. You also have the option to connect your workspace to Nx Cloud if you’d like.
After you make your selections, this command does the following:
- Generates a new Nx workspace
- Scaffolds out a new React application with modern tooling, including Jest for unit tests, and Cypress for E2E tests.
There are other presets available, such as next for Next.js projects, and react-express for a workspace with React and Express pre-configured.
Every Nx workspace has a file structure similar to this:
myorg/
├── apps/
├── libs/
├── tools/
├── workspace.json
├── nx.json
├── package.json
└── tsconfig.base.json/apps/contains the application projects. This is the main entry point for each runnable application./libs/contains the library projects. Each library defines its external API so that boundaries between libraries remain clear./tools/contains scripts that act on your codebase./workspace.jsoncontains the configuration for each project in your workspace./nx.jsonadds extra information about projects, including implicit dependencies and tags that can be used to restrict the ways projects are allowed to depend on each other./tsconfig.base.jsonsets up the global TypeScript settings and aliases.
To serve up the application, enter into the sw-org directory and run the serve command using the Nx CLI:
nx serveNote: If you don't want to install Nx globally, you can use
npx nx serveinstead.
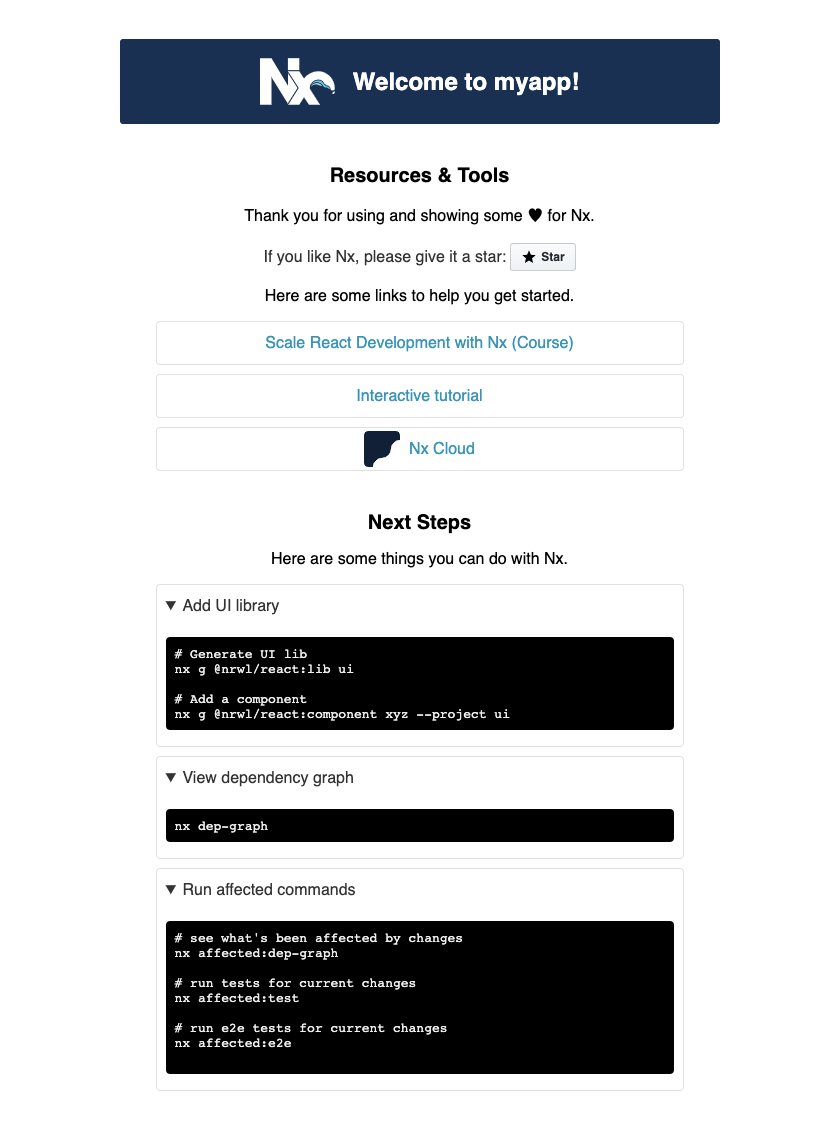
The initial application page is displayed.
Generating a Feature Library
Generating libraries in an Nx workspace is done by using the generate command with the Nx CLI. Feature libraries are used to display UI to the user, which could including routing information, and could use other libraries such as shared components.
Create one now by running:
nx generate lib peopleNOTE Nx Console also provides a full l GUI to run Nx CLI commands in your editor with native VSCode and WebStorm support.
Generating a Data Access Library
A "data access" library is where functionality for fetching and storing data for a feature exists. So any services necessary to manage the quotes are placed in this library. Throughout building applications, there will be data access libraries across multiple features.
Create the data access library by running:
nx generate lib data-accessNOTE You can also create your custom generators similar to the library generator inside an Nx workspace. This provides more flexibility to create more standards around your development processes and guidelines. Read more about workspace generators in our Workspace Generators guide.
Update the data-access library to fetch the characters from the Star Wars API.
Open up data-access.tsx and replace it with the following:
import { useEffect, useState } from "react";

export interface IPerson {
 birth_year: string;
 eye_color: string;
 films: string[];
 gender: string;
 hair_color: string;
 height: string;
 homeworld: string;
 mass: string;
 name: string;
 skin_color: string;
 created: Date;
 edited: Date;
 species: string[];
 starships: string[];
 url: string;
 vehicles: string[];
}

export interface Response<T> {
 count: number;
 next: null | string;
 previous: null | string;
 results: T[];
}

export function usePeople(page: number) {
 const [people, setPeople] = useState<IPerson[]>([]);

 useEffect(() => {
   fetch(`https://swapi.dev/api/people/?page=${page}`).then((r) =>
   r.json().then(data => data.results)
 ).then(data => {
     setPeople(data);
   });
 }, []);

 return people;
}
Now update the people feature at people.tsx to list out the characters:
import { usePeople } from '@sw-org/data-access';
import './people.module.css';

export function People() {
 const people = usePeople(1);
  return (
   <div>
     <h1>Star Wars People</h1>

     <ul>
       {
         people.map(person => (
           <li key={person.name}>
             {person.name}
           </li>
         ))
       }
     </ul>
   </div>
 );
}

export default People;
Replace the App template with the People component
import styles from './app.module.css';

import { People } from '@sw-org/people';

export function App() {
 return (
   <div className={styles.app}>
     <People/>
   </div>
 );
}

export default App;
Refreshing the application shows a list of characters.

The list of characters is simple. The business and data logic is kept in libraries. As your applications grow, the number of libraries grows along with it, but the applications remain relatively small and are only used for integrating core functionality for the app to run.
Dependency Graph
Nx knows the dependencies between projects in your workspace and can generate your dependency graph visually at any point in time.
Run the nx dep-graph command to see the current state of the workspace.
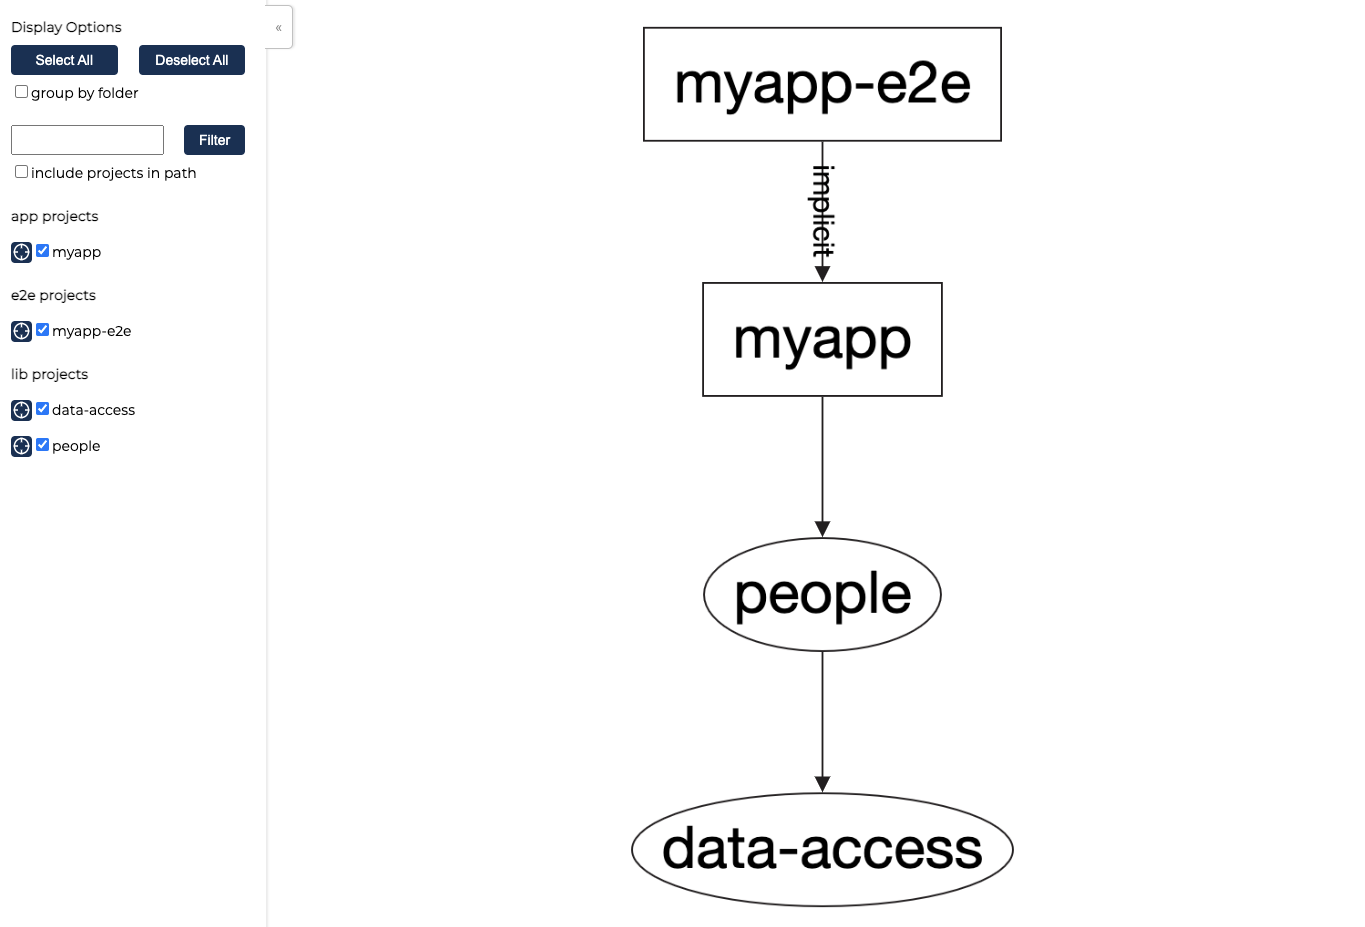
nx dep-graphThis displays the application, E2E project, and the two libraries.
NOTE: You can also have the dependency graph auto-refresh with the --watch flag.
You can also see what projects are impacted by a given change. Make a change to the App.tsx, such as removing the className, save, and run the nx affected:dep-graph command.
nx affected:dep-graphThis displays the myapp and myapp-e2e highlighted in red as affected projects.
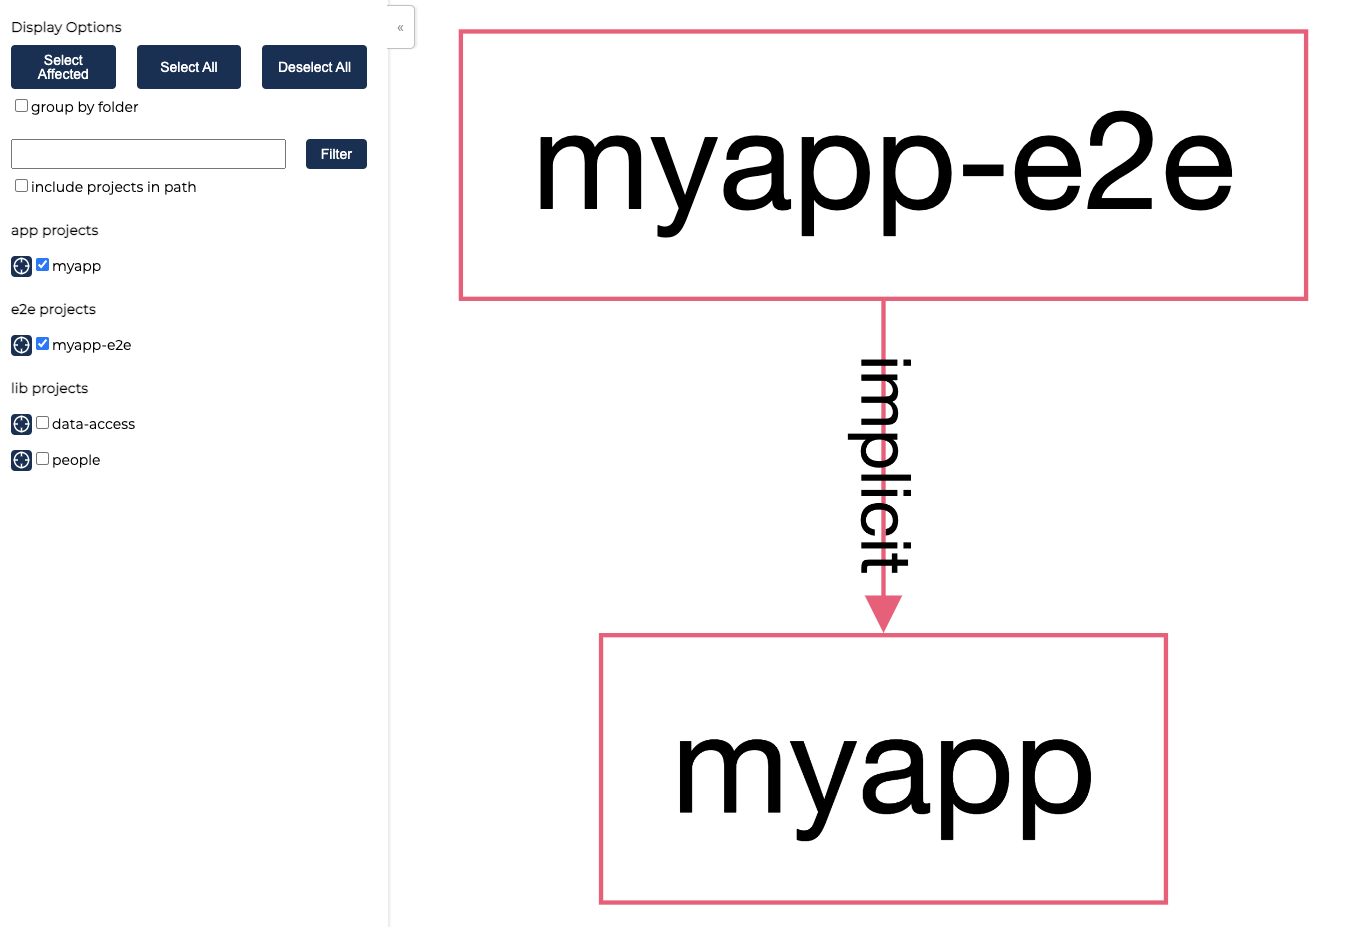
NOTE: The myapp-e2e application is directly tied to mapp, but is implicitly linked through the nx.json file. Read more about Nx configuration here.
Using Affected Commands
Nx provides affected commands to run certain tasks against affected projects. For example, make a change to the data-access library, and run nx affected:build.
nx affected:buildNx finds the affected applications impacted by changing the data-access library and runs the build target for each one of them. That way, only the affected projects are built for the given change, and not every project in the monorepo. The same commands work for test, lint, and e2e, and others.
There is also the nx affected command that works with any defined target. The alias for nx affected:build is:
nx affected --target=buildThis allows you to run any target based on the affected projects.
Using Computation Caching
Along with affected commands, Nx supports computation caching to never execute the same computation twice. This computation cache is pluggable and can be distributed. Taking **myapp as an example, run the build for myapp twice.
nx build myappWhen running the same command the second time without changes, you immediately get the cached results from the previous computation. The computation cache is done locally, but can also be distributed and extended to the rest of your team and organization.
Nx Cloud is one such option to distribute your computation cache. It includes a free tier with 5 hours of saved time per month, enterprise options, and is free for open-source projects.
Summary
Nx provides modern tooling including code analysis, code generation, code analysis, affected commands, and computation caching to scale your application development using a monorepo.
What did we cover?
- Monorepos and why you should use one
- Nx workspace structure and standardization
- Smarter tooling with code analysis, affected commands, dependency visualization, and computation caching.
Find out more with the following resources:
- Documentation at https://nx.dev
- Free Egghead course on Scaling React Development


