We develop new features, fix bugs, and, most importantly, refactor a lot of code every day. From small to large scale, all applications require automated testing to make sure they do not break when other developers add new features.
React Native apps are no different, and there are several libraries available to make the testing experience joyful and entertaining. Using Semaphore’s open-source demo application as an example, you will learn:
- Which tools to use to implement automated testing in your React Native application.
- How to set up tools and run tests.
- How to write unit, integration, and end-to-end tests.
Requirements
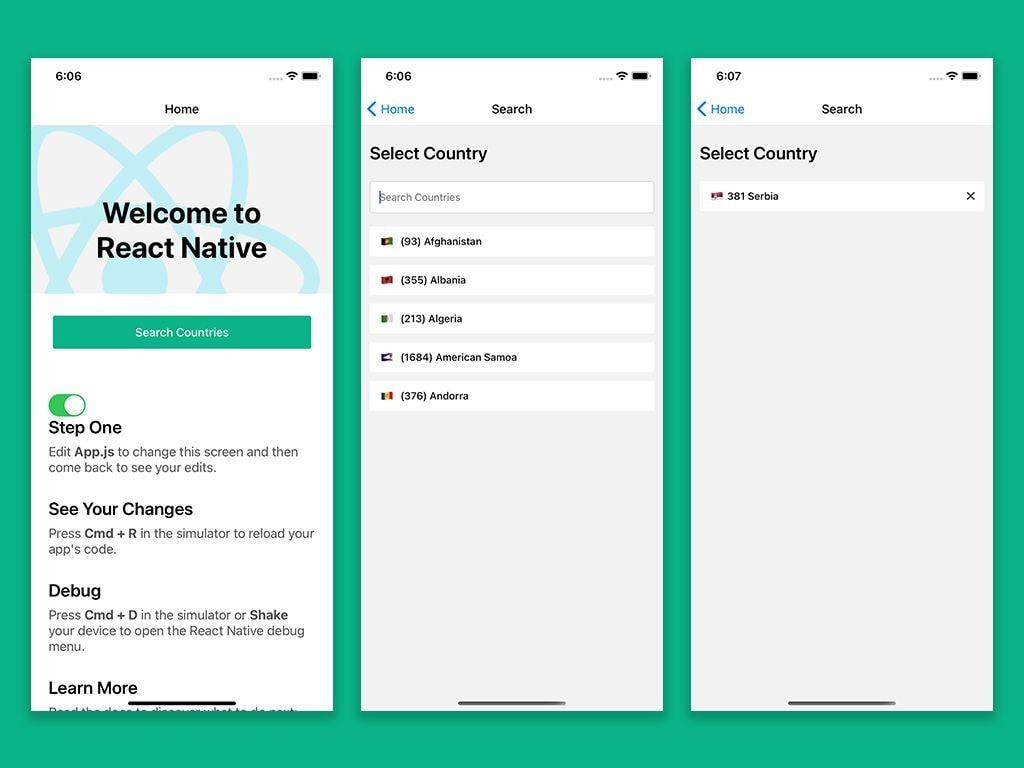
To understand UI testing for a React Native app, we have developed a small application to search and store country data.
This app uses react-navigation, react-native-vector-icons, and async-storage. Here are a few screenshots of our UI.
Setting up quality checks with typing and linting
As the application grows in size, the execution of our tests will become more costly. Thus, it is best to plan ahead to save time, and making sure there aren’t any fundamental issues such as typos in our code.
Static typing & linting can help us avoid such issues, saving us a lot of processing during building and testing. TypeScript and Eslint can be super helpful tools for setup types and linting for our applications. Thanks to the awesome people working on react-native-cli and react-native-typescript-template, we have a great ready-made toolbox for launching a React Native project.
Unit testing
Unit tests ensure that the individual units of your application work as expected in isolation.
In our React Native app we use Jest as a testing framework. Jest is a delightful JavaScript Testing Framework with a focus on simplicity. With its zero-config setup & parallelization capabilities, Jest is one of the most widely adopted testing frameworks. It comes pre-configured for React Native apps.
Adding React Native testing library
As discussed above, our testing will be more focused on user behavior than implementation details. React-test-renderer can help us render our components’ pure JavaScript objects without depending on the DOM or any other renderer. Testing user behavior will require us to interact with these components. The React-Native Testing Library (RNTL), built on top of react-test-renderer, provides a simple API to perform user interactions on react-native components.
Here is how we can add RNTL to our app:
yarn add -D @testing-library/react-nativeWriting tests
The most basic units in UI testing are components. To introduce APIs and get familiar with what we want to achieve, we’ll share a test for a simple Button component. Here is a test for it.
import 'react-native';import React from 'react';
import {render, fireEvent} from '@testing-library/react-native';

// import { render } from 'utils/testWrapper';
import Button from '../index';

// Describing a test suite
describe('<Button />', () => {
  // Describing our test
  it('Calls onPress', async () => {
    // Mocking onPress method so we can check if its called or not
    const onPress = jest.fn();

    // test id to be applied on our button component
    const testID = 'button';

    // Rendering Button component using react-native-test-renderer.
    const {getByTestId} = await render(
      <Button testID={testID} onPress={onPress} label="Button" />,
    );

    // Grabbing our button component to perform actions on it.
    const button = getByTestId(testID);

    /**
     * RNTL gives us API to fire events on node
     * Here we are firing on press event
     */
    fireEvent.press(button);

    // Asserting if given mock method is called or not.
    expect(onPress).toHaveBeenCalledTimes(1);
  });
});
Nothing new here: to start, we rendered our component with a mock method in props using RNTL’s renderer. Next, we fired a press event on our component and, thus asserted, it then called the mock method we supplied via props. If this test passes, we can be sure that our Button works as intended.
Let’s leap forward to a real-life example. As mentioned earlier, the app will allow users to select their country. For this purpose, we have a CountriesAutocomplete component, which provides a TextInput and a list. Just like any other autocomplete, it will render results based on the user’s input. Here is what the test suite for this component looks like:
import 'react-native';import React from 'react';
import {render, fireEvent} from '@testing-library/react-native';

import CountriesAutocomplete from '../index';

const COUNTRY_NAME = 'Serbia';

// Describing a test suite
describe('<CountriesAutocomplete />', () => {
  // Describing our test
  it('Displays Searched Item', async () => {
    // Mocking onPress method so we can check if its called or not
    const onSelect = jest.fn();

    // Rendering Button component using RNTL.
    const autocomplete = await render(
      <CountriesAutocomplete onSelect={onSelect} />,
    );

    // Grabbing our input to perform actions on it.
    const inputTestID = 'countriesAutocompleteInput';
    const textInput = autocomplete.getByTestId(inputTestID);

    /**
     * RNTL gives us API to fire events on node
     * Here we are firing on changeText event
     */
    fireEvent(textInput, 'focus');
    fireEvent.changeText(textInput, COUNTRY_NAME);
    expect(textInput.props.value).toBe(COUNTRY_NAME);

    // Grabbing our input to perform actions on it.
    const listItemTestID = `listItem-${COUNTRY_NAME}`;
    const firstListItem = autocomplete.getByTestId(listItemTestID);
    expect(firstListItem).toBeTruthy();
  });

  it('onSelect is called when item is pressed', async () => {
    // Mocking onPress method so we can check if its called or not
    const onSelect = jest.fn();

    // Rendering Button component using react-native-test-renderer.
    const {getByTestId} = await render(
      <CountriesAutocomplete onSelect={onSelect} />,
    );

    // Grabbing our input to perform actions on it.
    const inputTestID = 'countriesAutocompleteInput';
    const textInput = getByTestId(inputTestID);

    /**
     * RNTL gives us API to fire events on node
     * Here we are firing on focus & changeText event
     */
    fireEvent(textInput, 'focus');
    fireEvent.changeText(textInput, COUNTRY_NAME);

    // Grabbing our input to perform actions on it.
    const listItemTestID = `listItem-${COUNTRY_NAME}`;
    const firstListItem = getByTestId(listItemTestID);
    fireEvent.press(firstListItem);

    expect(onSelect).toHaveBeenCalledTimes(1);
  });
});
The suite has two tests. The first one asserts that when the user enters text, the component list will appear. Also that the result should match the input. The second test asserts that when the user selects an item from the list, it should call the mock function we supplied via props.
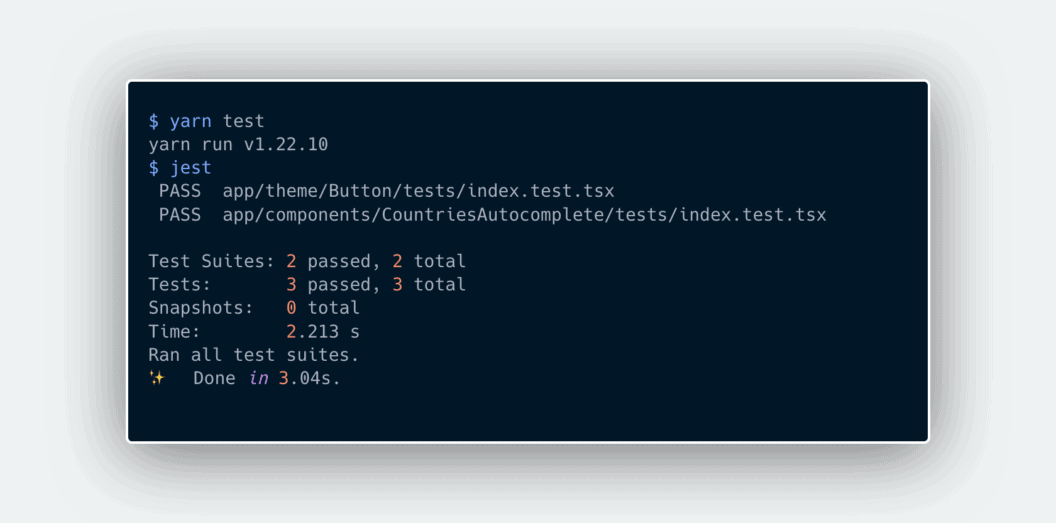
Executing tests
Jest searches for all test files and executes them from a single command. And here is what our execution and results will appear:
In the realm of UI, unit tests may not be enough to be sure that your users won’t face any bugs. But practical unit tests can help you concentrate on integrating components with more confidence.
Integration testing
Once we are sure that our components are working as intended, we can check if they function well with others. Integration testing is the most crucial part of UI testing and can give you a lot of confidence that the features of your app function well.
Writing the test case
For integration testing of the country selection feature, we will test our search screen. This screen should render Countries Autocomplete and the selected country. It also stores the country chosen in AsyncStorage provided by React Native. Furthermore, selecting the chosen country again should remove it from AysncStorage.
Equipping the environment
RNTL renders React components in headless mode, which means that native libraries will not be available during execution. Jest, however, allows us to mock methods from native libraries. Here is our mock file:
/**
 * Mocking all required for react-navigation
 */
import 'react-native-gesture-handler/jestSetup';

jest.mock('react-native-iphone-x-helper', () => ({
  getStatusBarHeight: jest.fn(),
  getBottomSpace: jest.fn(),
}));

jest.mock('@react-native-community/masked-view', () => ({}));

/* Silence the warning: Animated: `useNativeDriver` is
 * not supported because the native animated module is missing
 */
jest.mock('react-native/Libraries/Animated/NativeAnimatedHelper');

/**
 * Mocking Async Storage
 */
jest.mock('@react-native-async-storage/async-storage', () => ({
  setItem: jest.fn(),
  getItem: jest.fn(),
  removeItem: jest.fn(),
}));
As you can see, we have mocked AsyncStorage’s setItem, getItem, removeItem methods to make our integration tests platform-independent.
Writing integration tests
We will write our integration tests with RNTL, dividing our feature set into three small tests.
import 'react-native';import React from 'react';
import {render, fireEvent} from '@testing-library/react-native';
import AsyncStorage from '@react-native-async-storage/async-storage';

import SearchScreen, {COUNTRY_LOCAL_STORAGE_KEY} from '../index';

const COUNTRY_NAME = 'Serbia';
const COUNTRY_DETAILS =
  '{"name":"Serbia","native":"Србија","phone":"381","continent":"EU","capital":"Belgrade","currency":"RSD","languages":["sr"],"emoji":"🇷🇸","emojiU":"U+1F1F7 U+1F1F8"}';

// Describing a test suite
describe('<SearchScreen />', () => {
  it('Displays selected country', async () => {
    /**
     * Rendering screen
     */
    const screen = await render(<SearchScreen />);

    /*
     * Grabbing our input to perform actions on it.
     */
    const inputTestID = 'countriesAutocompleteInput';
    const textInput = screen.getByTestId(inputTestID);

    /**
     * Here we are firing on focus & changeText event
     */
    fireEvent(textInput, 'focus');
    fireEvent.changeText(textInput, COUNTRY_NAME);

    /**
     * Selecting item from list
     */
    const listItemTestID = `listItem-${COUNTRY_NAME}`;
    const firstListItem = screen.getByTestId(listItemTestID);
    fireEvent.press(firstListItem);

    /**
     * Grabbing & asserting selected item's name
     */
    const selectedCountryName = screen.getByTestId('selectedItemName');
    expect(selectedCountryName).toBeTruthy();
    expect(selectedCountryName.children).toContain(COUNTRY_NAME);
  });

  it('Stores selected country in local storage', async () => {
    /**
     * Rendering screen
     */
    const screen = await render(<SearchScreen />);

    /**
     * Here we are searching & selecting country
     */
    const inputTestID = 'countriesAutocompleteInput';
    const textInput = screen.getByTestId(inputTestID);

    fireEvent(textInput, 'focus');
    fireEvent.changeText(textInput, COUNTRY_NAME);

    const listItemTestID = `listItem-${COUNTRY_NAME}`;
    const firstListItem = screen.getByTestId(listItemTestID);
    fireEvent.press(firstListItem);

    /**
     * Asserting country storage.
     */
    expect(AsyncStorage.setItem).toHaveBeenCalledWith(
      COUNTRY_LOCAL_STORAGE_KEY,
      COUNTRY_DETAILS,
    );
  });

  it('Removes selected country from local storage', async () => {
    /**
     * Rendering screen
     */
    const screen = await render(<SearchScreen />);

    /**
     * Here we are searching, selecting country & removing
     */
    const inputTestID = 'countriesAutocompleteInput';
    const textInput = screen.getByTestId(inputTestID);

    fireEvent(textInput, 'focus');
    fireEvent.changeText(textInput, COUNTRY_NAME);

    const listItemTestID = `listItem-${COUNTRY_NAME}`;
    const firstListItem = screen.getByTestId(listItemTestID);
    fireEvent.press(firstListItem);

    const selectedItem = screen.getByTestId('selectedItem');
    fireEvent.press(selectedItem);

    /**
     * Asserting country deletion.
     */
    expect(AsyncStorage.removeItem).toHaveBeenCalledWith(
      COUNTRY_LOCAL_STORAGE_KEY,
    );
  });
});
Here is the summary of each test:
- Displays selected country: we asserted that when the user taps an item on the search screen, the country name autocompletes, and the screen displays the item as selected.
- Stores selected country in local storage: we asserted that search screen should store the selected item in local storage by calling AsyncStorage’s
setItemmethod. - Removes selected country from local storage: we asserted that when a user taps the selected item, it is removed from local storage using AsyncStorage’s
removeItemmethod.
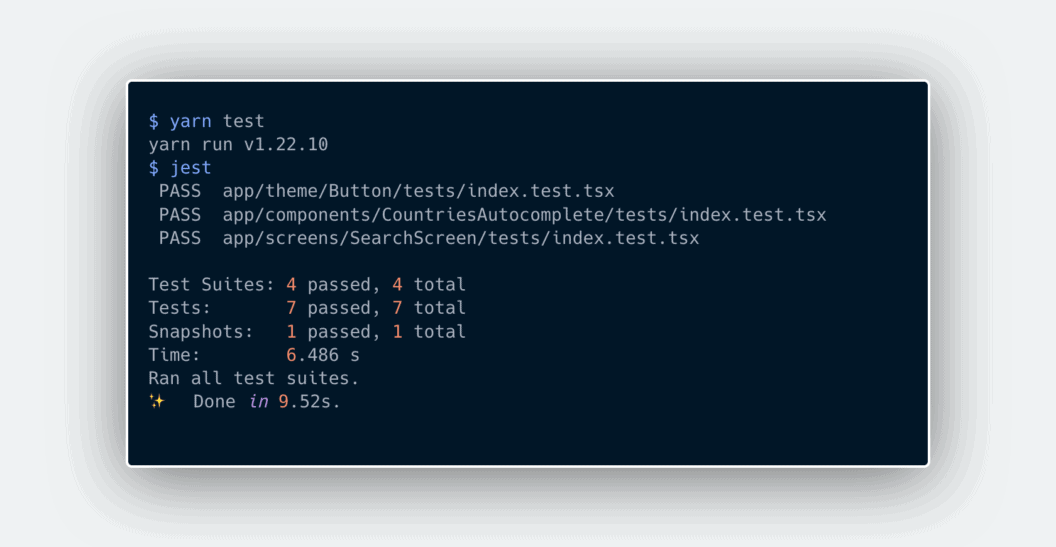
Executing integration tests
Now it’s time to see if all our components work together; the execution will be the same as unit tests. The output can be seen below.
End-to-end testing with Detox
Now that we have made sure that our different components work fine together, we can start on end-to-end testing (E2E). At its simplest, E2E testing is like developing robots that perform all possible actions that a real user would perform with your application.
E2E aims to replicate real user scenarios to validate our application for real-life use-cases. To achieve this, we have to execute our tests in an environment similar to the end user’s environment. For mobile apps that implies that we should perform tests on real devices or simulators.
There are several tools available for E2E testing of mobile apps. We have opted for Detox: a Gray box end-to-end testing and automation library for mobile apps. Detox was built for react-native and provides an excellent developer experience, which are the key factors behind its selection. Detox’s APIs for user interactions make it easier to test apps the way users actually use them.
Platform setup
Let’s begin setting up Detox by adding the package and its types to our app.
yarn add detox @types/detox -DJust like other testing dependencies, we will add Detox and types as dev dependencies. After installation, it’s time to configure Detox. We will only touch on a few basics in this article to get our tests running, but you can more details in the in-depth guide if you want to really dive in.
Below we have defined our Detox configurations in .detoxrc.js:
module.exports = {  "configurations": {
    "ios.sim.debug": {
      "binaryPath": "ios/build/Build/Products/Debug-iphonesimulator/ReactNativeSemaphoreNew.app",
      "build": "xcodebuild ONLY_ACTIVE_ARCH=YES -workspace ios/ReactNativeSemaphoreNew.xcworkspace -scheme ReactNativeSemaphoreNew -configuration Debug -sdk iphonesimulator -derivedDataPath ios/build -UseModernBuildSystem=YES",
      "type": "ios.simulator",
      "name": "iPhone 11"
    },
    "ios.sim.release": {
      "binaryPath": "ios/build/Build/Products/Release-iphonesimulator/ReactNativeSemaphoreNew.app",
      "build": "xcodebuild ONLY_ACTIVE_ARCH=YES -workspace ios/ReactNativeSemaphoreNew.xcworkspace -scheme ReactNativeSemaphoreNew -configuration Release -sdk iphonesimulator -derivedDataPath ios/build -UseModernBuildSystem=YES",
      "type": "ios.simulator",
      "name": "iPhone 11"
    },
    "android.emu.debug": {
      "binaryPath": "android/app/build/outputs/apk/debug/app-debug.apk",
      "build": "cd android && ./gradlew assembleDebug assembleAndroidTest -DtestBuildType=debug && cd ..",
      "type": "android.emulator",
      "name": "Pixel_4_API_28"
    },
    "android.emu.release": {
      "binaryPath": "android/app/build/outputs/apk/release/app-release.apk",
      "build": "cd android && ./gradlew assembleRelease assembleAndroidTest -DtestBuildType=release && cd ..",
      "type": "android.emulator",
      "name": "Nexus_S_API_24"
    }
  },
  "test-runner": "jest"
};
As you can see, we have divided our configurations into four different sections, two for Android and two for iOS. Both OSes have configs for testing debug and release versions. Each of these configs has a build command, binary path, type, and name.
Test setup
Moving on to our test suite, we will be using Jest just like as we did in unit and integration testing. We will create an e2e directory at the root of our project that will contain configs.json, which is read by Detox for the JS environment setup. This is what it looks like:
{
    "setupFilesAfterEnv": ["./init.js"],
    "testEnvironment": "node",
    "reporters": ["detox/runners/jest/streamlineReporter"],
    "verbose": true,
    "preset": "ts-jest"
}
Detox will execute the initialization file defined in configs at the very beginning of test execution. In our case, it is init.js as shown below:
const detox = require('detox');const adapter = require('detox/runners/jest/adapter');
const specReporter = require('detox/runners/jest/specReporter');

const config = require('../.detoxrc.js');

// Set the default timeout
jest.setTimeout(1000000);
jasmine.getEnv().addReporter(adapter);

// This takes care of generating status logs on a per-spec basis. By default, jest only reports at file-level.
// This is strictly optional.
jasmine.getEnv().addReporter(specReporter);

/**
 * beforeAll
 * This will be executed before our testing begins,
 * We have initialized detox with our configs here.
 */
beforeAll(async () => {
  await detox.init(config);
});

/**
 * beforeEach
 * This will be executed before each of our tests suite,
 * It can be used for several cleanup tasks.
 */
beforeEach(async () => {
  await adapter.beforeEach();
});

/**
 * afterAll
 * This will be executed after all of our tests suite,
 * Here we have add detox cleanup to.
 */
afterAll(async () => {
  await adapter.afterAll();
  await detox.cleanup();
});
This file defines tasks to be performed before, between, and after our test suites. We can also use each hook for many different cleanups and setup tasks.
Writing E2E tests
Finally, it’s time to put up some actual tests. We will flex our muscles with a simple test suite that verifies UI and toggle button behavior on our home screen.
import {expect, device, element, by} from 'detox';
describe('HomeScreen UI', () => {
  /**
   * beforeEach
   */
  beforeEach(async () => {
    await device.reloadReactNative();
  });

  /**
   * Most basic test
   */
  it('should show app screen text', async () => {
    await expect(element(by.text('Step One'))).toBeVisible();
    element(by.id('homeScreen')).scroll(200, 'down');
    await expect(element(by.text('See Your Changes'))).toBeVisible();
  });

  /**
   * Tests toggle behavior
   */
  it('should show switch and toggle it on', async () => {
    const isAndroid = device.getPlatform() === 'android';

    await expect(element(by.id('toggle'))).toBeVisible();
    if (!isAndroid) {
      await expect(element(by.id('toggle'))).toHaveValue('0');
      await element(by.id('toggle')).longPress();
      await expect(element(by.id('toggle'))).toHaveValue('1');
    }
  });
});
We will keep it simple to get familiar with Detox’s APIs. Below you can see a summary of what we have done in this suite.
- Detox will run the
beforeEachhook before every test defined in the suite. Since all tests in this suite are independent, we will reload React Native to get a fresh run. - The first test verifies the content of the screen. For devices of lower dimensions, we have to scroll our screen a little to make sure the desired content is visible.
- We assert that the value of the switch should toggles when the user presses it.
Now we will add a suite to verify country selection flow. As defined earlier, this feature allows our users to select their country. The app saves it, so when users open the app again, they can see their chosen country.
import {expect, device, element, by} from 'detox';
const COUNTRY_NAME = 'Serbia';
const OTHER_COUNTRY_NAME = 'United States';

describe('Select Country', () => {
  /**
   * Check for UI
   */
  it('should show app search screen button', async () => {
    await expect(element(by.id('searchButton'))).toBeVisible();
  });

  /**
   * Verify navigation
   */
  it('should navigate to search screen', async () => {
    await element(by.id('searchButton')).tap();
    await expect(element(by.id('searchScreen'))).toBeVisible();
  });

  /**
   * Search & Select
   */
  it('should search & select country', async () => {
    await element(by.id('countriesAutocompleteInput')).typeText(COUNTRY_NAME);
    await element(by.id(`listItem-${COUNTRY_NAME}`)).tap();
    await expect(element(by.id('selectedItem'))).toBeVisible();
  });

  /**
   * Relaunch app & verify saved data
   */
  it('should show selected country on next launch', async () => {
    await device.reloadReactNative();
    await element(by.id('searchButton')).tap();
    await expect(element(by.id('selectedItemName'))).toHaveLabel(COUNTRY_NAME);
  });

  /**
   * Remove selected item
   */
  it('should remove selected country on press', async () => {
    await element(by.id('selectedItem')).tap();
    await expect(element(by.id('countriesAutocompleteInput'))).toBeVisible();
  });

  /**
   * Re-Iterate selection and removal
   */
  it('should select & remove country again', async () => {
    await element(by.id('countriesAutocompleteInput')).typeText(
      OTHER_COUNTRY_NAME,
    );
    await element(by.id(`listItem-${OTHER_COUNTRY_NAME}`)).tap();
    await expect(element(by.id('selectedItemName'))).toHaveLabel(
      OTHER_COUNTRY_NAME,
    );
    await element(by.id('selectedItem')).tap();
    await expect(element(by.id('countriesAutocompleteInput'))).toBeVisible();
  });

  /**
   * Relaunch app & verify data is removed
   */
  it('should persist removal of country on next launch', async () => {
    await device.reloadReactNative();
    await element(by.id('searchButton')).tap();
    await expect(element(by.id('countriesAutocompleteInput'))).toBeVisible();
  });
});
Here we have divided the test flow into small steps to make it more readable.
- Check for UI: we asserted that the home screen has a button for navigating the search screen.
- Verify navigation: we asserted that the search screen should appear when the user taps on the proper button.
- Search and select: we searched and selected a country by tapping on search results. We asserted that the selected country is displayed as desired.
- Relaunch app and verify saved data: to mimic what happens when the app launches again, we reloaded React Native. After navigating to the search screen, we asserted that it displays the country we had selected in the previous step.
- Remove selected item: we asserted that the selected item is removed by pressing it, allowing the user to search for a country again.
- Reiterate selection and removal: to be more confident about single session functionality, we have reiterated the selection and removal flow with another country.
- Relaunch app and verify data removal: just like when we relaunched our app to check if it permanently stores the country that we had selected, and we have asserted the same for removal.
This brief test suite covers most of the edge cases.
Executing E2E tests
To execute our tests, we will build the app and run tests using Detox:
detox build --configuration ios.sim.debug
detox test --configuration ios.sim.debug 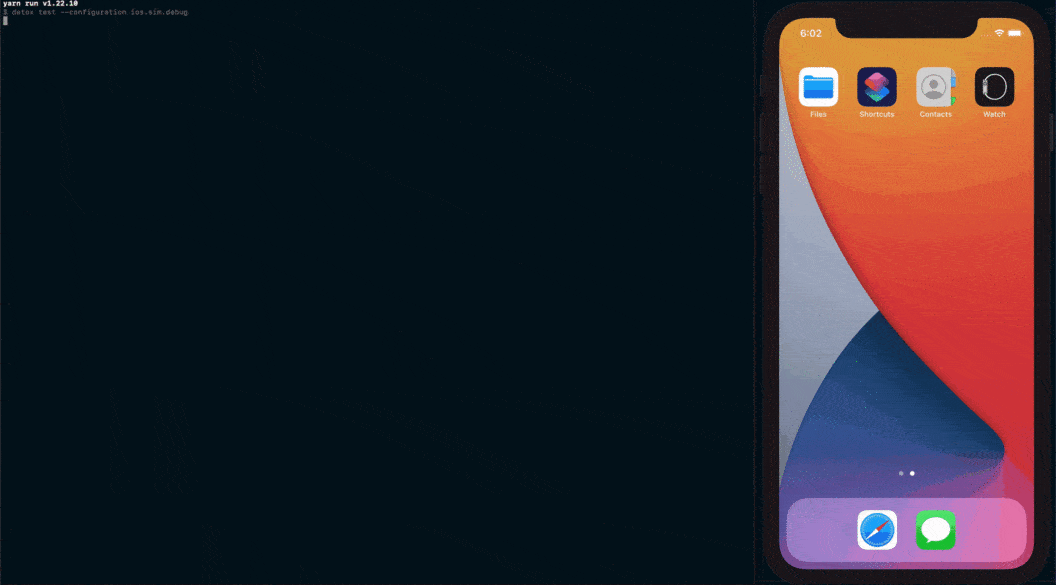
🥳 it works! Doesn’t it feel good?
In a nutshell
Developers new to Test-Driven Development (TDD) aren’t familiar with automated testing. They usually have doubts about the value that testing creates versus the time spent writing tests. Most of these arguments are rooted in several myths circulating among the community. But the reality is that automated testing is the only way to make sure software doesn’t break as it grows.
As Alan Page put it:
“If we want to be serious about quality, it is time to get tired of finding bugs and start preventing their happening in the first place.”
You can find the repo of our sample app here.
We would be happy to see what other features you would like us to test for you. Please feel free to open issues and send PRs.
Happy Testing 🚀
NB: Semaphore now has the Test Reports feature. It allows you to see failed tests via the Test Reports dashboard, find skipped tests and see the slowest tests in your test suite. Read more about Test Reports.