Intro
In this blog post I will detail how to leverage AWS Amplify, AWS Appsync and Amazon S3 to provide an image upload capability into a react native app.
This blog assumes that the reader is familiar with AWS Amplify and its feature categories, however if you are not familiar then please have a read of this great intro by @ajonp one of our AWS community members.
I will also be working off an existing AWS backend application that has already been created with the AWS Amplify CLI and has had both the 'auth' and 'api' feature categories added. You can follow along with this creation by going to the official Amplify react-native docs. Or ;tldr it and simply clone this repo
Note - if you do end up cloning the repo, remember to run 'amplify configure' and 'amplify init' to re-configure the project to a new cloud back end in your own AWS account.
What are we building ?
The base application we will be adding photo/image storage to should look something like the below image.

There are two views in this app
- A list of Todo's that have already been created.
- A form to create a new Todo
Clicking on 'New To Do' button on the 'list view' will bring you to the 'create view' and once a new todo has been created the app will navigate back to the 'list view' from the 'create view'
So, nothing too tricky here, what we are going to add to this app is the ability to save images to our cloud backend when in the 'create view' and the ability to see those images in the 'list view'.
Adding the image concept to backend resources.
First thing is confirming what amplify feature categories we have installed - to find this out we simply run the amplify status command which gives the following output

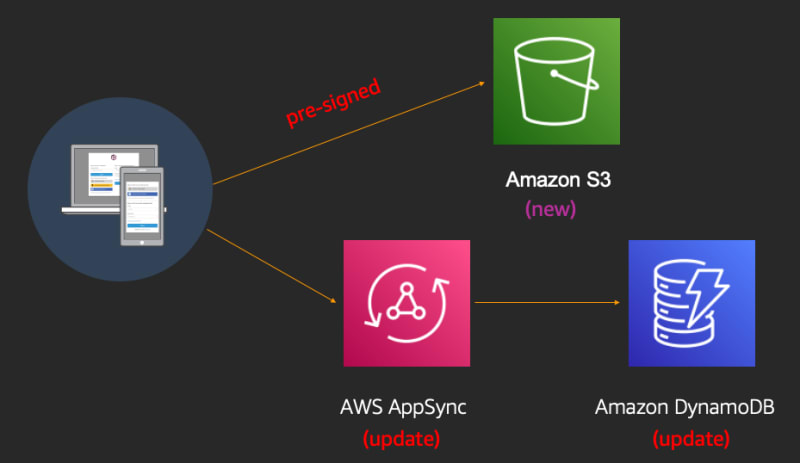
As you can see, we have both auth and api feature categories installed - so that means that there is an Amazon Cognito instance handling users and auth, an AWS Appsync instance handling the GraphQL API and an Amazon DynamoDB instance handling data persistence.
Adding an S3 storage bucket.
First thing is to add the new Storage feature category to this existing backend. This is super easy to do by running the amplify add storage command in the terminal and selecting the following options

Note - most of these are defaults apart from the 'Who should have access' question where I have selected Auth users only and given them full CRUD privilege.
Adding an 'image' to our API definition
The next step is to add the concept of an image to our GraphQL schema definition. You can find the schema definition under ./amplify/backend/api/myapi/schema.graphql
We simply add a new String type called image - which will hold our image name when we persist an image and an image pre-signedURL when we retrieve an image. The schema should now look like this

Note: if we want to add FGAC to any of the fields in the schema we could use the '@auth' transformer directive - for more detail on access control, transformer directives and @auth [read this article] https://aws.amazon.com/blogs/mobile/graphql-security-appsync-amplify/ - by Brice Pelle.
Once that has been updated, we go back to our terminal and run amplify update api command to regenerate the api definition. The output from this command should look similar to the below:

Once complete we finally need to call amplify push --y to push all of our local changes into our cloud back end. This means that out back-end services will now look like the following architectural diagram with the addition of the S3 bucket that the Amplify CLI Storage category has provisioned.
Updating the react native client application
So that is enough messing around in the terminal, now it’s time to write some code. We will be making all the changes in a single file App.js and the first thing we will do is add in some additional state to store the image name and the imageURI we want to add to each todo. So, something like
const initialTodoState = { name: '', description: '', image: '' }
const initialAppState = {showForm: false, imageURI: '' }
Note - All of the code for the finished app can be found here
Selecting Images
Once we have that we need to write a function that locates images on the device and displays them for the user to select. Luckily there is a third-party library called React Native Image Picker that will do most of this for us. So, let’s create a function to call this library, it should look something like this.
handleChoosePhoto = async () =>
   {
    try {
      launchImageLibrary({
        mediaType: 'photo',
        includeBase64: false,
        maxHeight: 200,
        maxWidth: 200,
      }, (response) => {
        if (response.uri) {
          updateAppState( 'imageURI', response.uri )
          const filename = uuid.v4() + '_todoPhoto.jpg'
          updateTodoState('image', filename)
        }
      })
    } catch (error) {
      console.log(error)
    }
  }
The handleChoosePhoto function is calling the launchImageLibrary function, that is part of react-native-image-picker's api. We are simply passing in some options like, image type , image height and image width and from the response we get the imageURI ( the location on the image on the device ) and we save this and a unique image name in the state fields we created earlier.
Note: We a using the react-native-uuid library to make sure all images have unique names - this makes it easier when we store these names in DynamoDB.
When implemented the 'handleChoosePhoto' UI looks like this:

Uploading Images
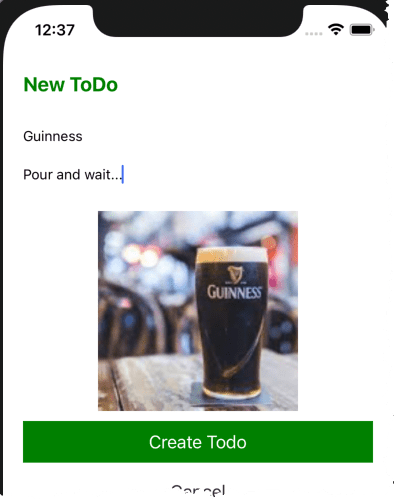
Once we select the image, we can now create a Todo in the 'create view' that contains the image we have selected by simply adding the following tag in the App.js 'render' function
<Image source={{uri: todo.image}} style={styles.image}/>
which should look something like this after adding in the appropriate tag.
We next need to implement the function that is called by the 'Create Todo' button. This addTodo() function is where we add the image upload code to the existing GraphQL api call as shown below
async function addTodo() {
    try {
      // new code for images
      const photo = await fetch(appstate.imageURI)
      const photoBlob = await photo.blob();
      await Storage.put(todoState.image, photoBlob, {
        level: 'private',
        contentType: 'image/jpg'
      })

      //existing api code
      const todo = { ...todoState }
      setTodos([...todos, todo])
      await API.graphql(graphqlOperation(createTodo, { input: todo }))
      setTodoState(initialTodoState)
      setAppState(initialAppState)

    } catch (err) {
      console.log('error creating todo:', err)
    }
  }
Here we are fetching the blob of the photo we have selected using the stored imageURI and then passing the result along with the unique image name to the Amplify Storage.put() call. Not forgetting as we are using a new Amplify category of 'Storage' we need to import the relevant libraries at the top of App.js in the imports section
import { API, graphqlOperation, Storage} from 'aws-amplify'
Once we have stored the blob in S3 using Storage.put() the last part of the function persists the image name along with all the other todo data in DynamoDB via the AppSync GraphQL api call, before finally re-setting any state.
Downloading Images
So now we have our image uploaded as part of the ‘create view’, the final step is to view the images when our initial 'list view' displays. It is currently looking very empty

To implement this, we first of all add in an image tag to the UI that renders the list.
<Image source={{uri: todo.image}} style={styles.image}/>
Then we update the fetchTodos function to retrieve the relevant image for every Todo we have in our list.
async function fetchTodos() {
    try {
      //fetch the recipes from the server
      const todoData = await API.graphql(graphqlOperation(listTodos));
      let todos = todoData.data.listTodos.items
      // for all todos get the pre-signURL and store in images field
      todos = await Promise.all(todos.map(async (todo) =>{
        const imageKey = await Storage.get(todo.image, { level: 'private' })
        console.log(imageKey)
        todo.image = imageKey;
        return todo;
      }));
      setTodos(todos)
      setTodoState(initialTodoState)
      setAppState(initialAppState)
    } catch (err) { console.log('error fetching todos ') + err }
  }
And that is it!! your app should now look like this, where the image is downloaded into the app from the S3 bucket using the pre-signed URL that Storage.get() so conveniently generates.

Conclusion
So that is it, in a few minutes we have added an image upload and download feature into our existing react native application.
All we needed to do is update our backend using the Amplify CLI to provision our S3 bucket and change the schemas of our DynamoDB table and Appsync API. Then using the Amplify client libraries write a Storage.put() function and a Storage.get() function to add and retrieve the images. The result was not only fast to achieve, but also came with security built in.
Thanks for reading, hopefully this makes adding this kind of feature to your react native application a breeze - if you would like me to go into more detail on any of the features of AWS Amplify or indeed anything AWS related in a future post - just post in the comments below.
Likewise, any feedback is always welcome either here or catch me on the socials.


Top comments (0)