There are many ways to fetch data from an external API in React. But which one should you be using for your applications in 2021?
In this tutorial, we will be reviewing five of the most commonly used patterns to fetch data with React by making an HTTP request to a REST API.
We will not only cover how to fetch data, but how to best handle loading and error state upon fetching our data.
Let’s get started!
For all of these examples, we will be using an endpoint from the popular JSON Placeholder API, but you can use your own API that you have created (such as a Node API with Express) or any other public API.
Want Your Own Copy?
Click here to download the cheatsheet in PDF format (it takes 5 seconds).
It includes all of the essential information here as a convenient PDF guide.
1. How to Fetch Data in React Using the Fetch API
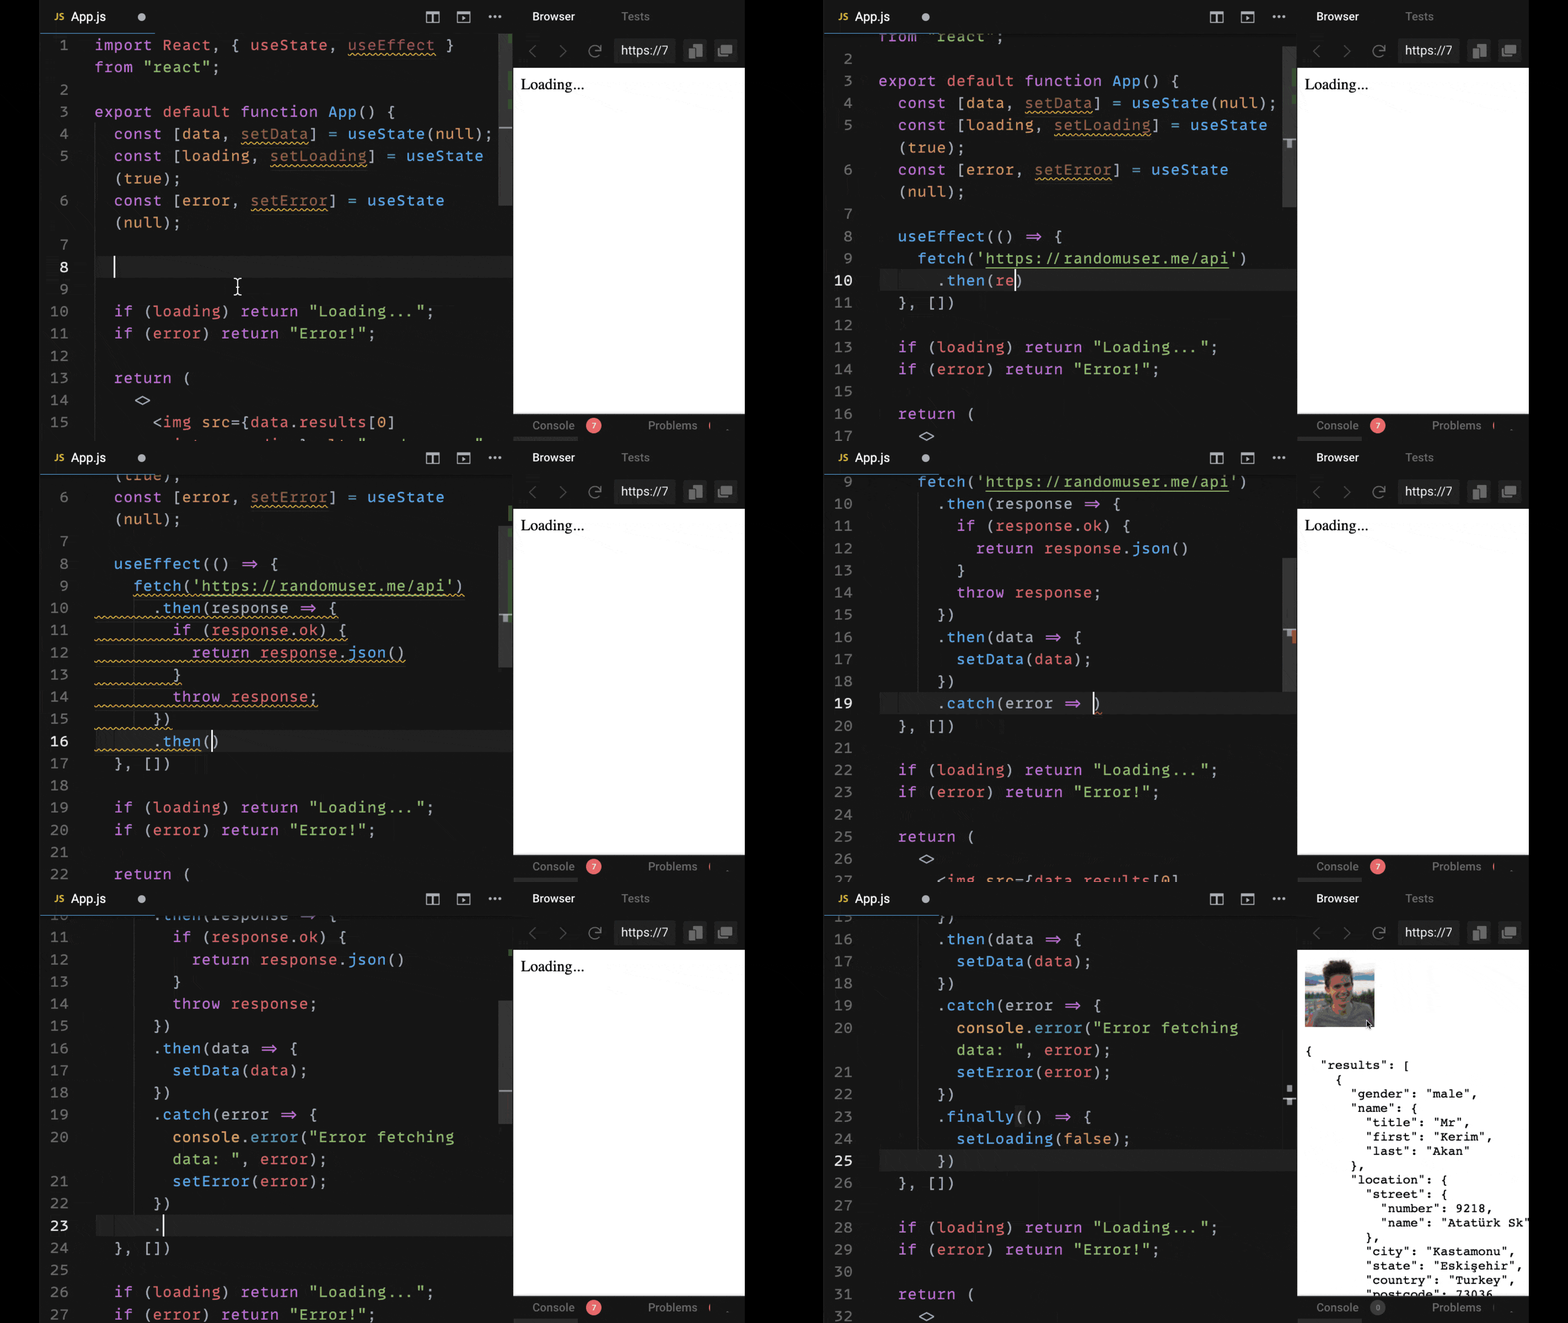
The most accessible way to fetch data with React is using the Fetch API.
The Fetch API is a tool that's built into most modern browsers on the window object (window.fetch) and enables us to make HTTP requests very easily using JavaScript promises.
To make a simple GET request with fetch we just need to include the URL endpoint to which we want to make our request. We want to make this request once our React component has mounted.
To do so, we make our request within the useEffect hook, and we make sure to provide an empty dependencies array as the second argument, so that our request is only made once (assuming it's not dependent on any other data in our component).

Within the first .then() callback, we check to see if the response was okay (response.ok). If so, we return our response to pass to the next, then call back as JSON data, since that's the data we'll get back from our random user API.
If it's not an okay response, we assume there was an error making the request. Using fetch, we need to handle the errors ourselves, so we throw response as an error for it to handled by our catch callback.
Here in our example we are putting our error data in state with setError. If there's an error we return the text "Error!".
Note that you can also display an error message from the error object we put in state by using error.message.We use the .finally() callback as function that is called when our promise has resolved successfully or not. In it, we set loading to false, so that we no longer see our loading text.
Instead we see either our data on the page if the request was made successfully, or that there was an error in making the request if not.
2. How to Fetch Data in React Using Axios
The second approach to making requests with React is to use the library axios.
In this example, we will simply revise our Fetch example by first installing axios using npm:
npm install axiosThen we will import it at the top of our component file.
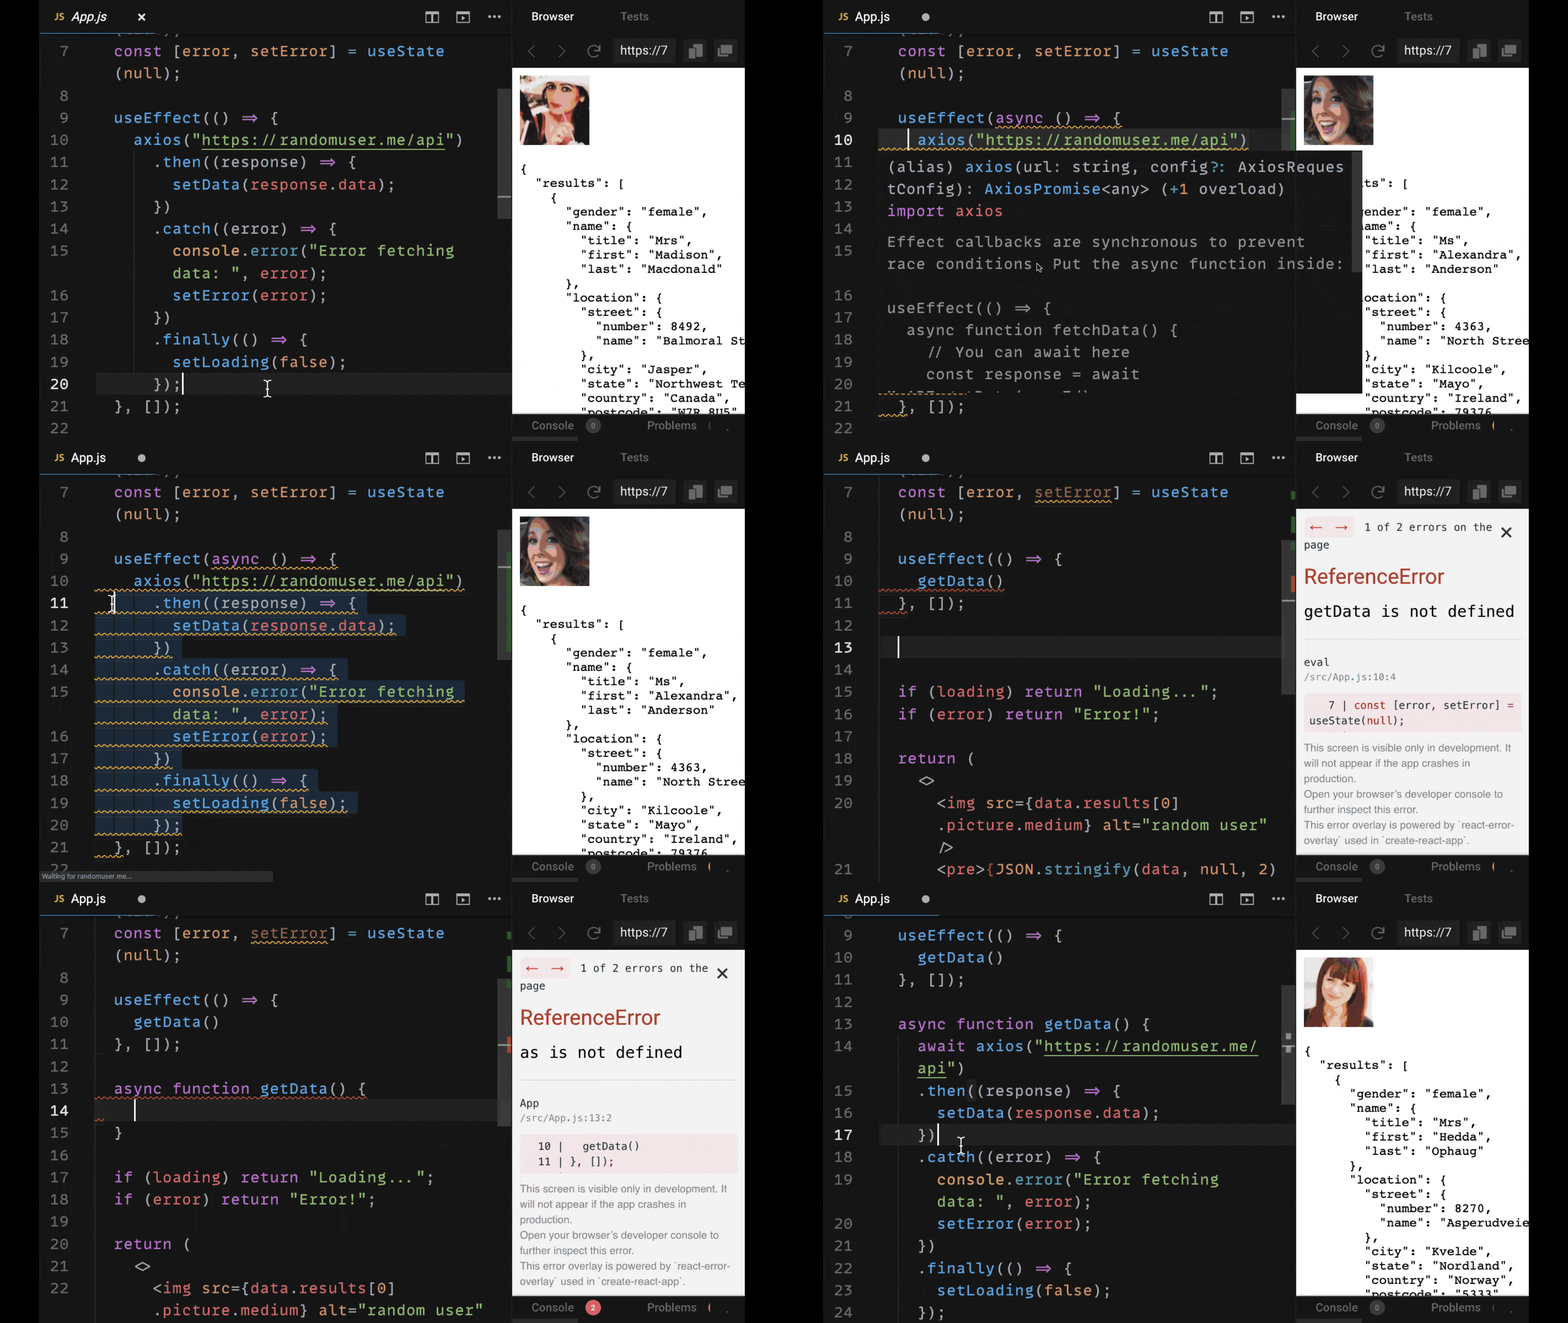
What axios enables us to do is to use the exact same promise syntax as fetch – but instead of using our first then callback to manually determine whether the response is okay and throw an error, axios takes care of that for us.
Additionally, it enables us in that first callback to get the JSON data from response.data.
What's convenient about using axios is that it has a much shorter syntax that allows us to cut down on our code and it includes a lot of tools and features which Fetch does not have in its API.
All of these reasons are why it has become the go-to HTTP library for React developers.

3. How to Fetch Data in React Using async / await syntax
In ES7, it became possible to resolve promises using the async / await syntax.
The benefit of this is that it enables us to remove our .then(), .catch(), and .finally() callbacks and simply get back our asynchronously resolved data as if we were writing synchronous code without promises altogether.
In other words, we do not have to rely on callbacks when we use async / await with React.
We have to be aware of the fact that when we use useEffect, the effect function (the first argument) cannot be made an async function.
If we take a look at the linting error that React gives us if we were using Create React App to build our project, we will be told that this function cannot be asynchronous to prevent race conditions.

As a result, instead of making that function async, we can simply create a separate async function in our component, which we can call synchronously. That is, without the await keyword before it.
In this example, we create an async function called getData. By calling it synchronously within useEffect, we can fetch our data like we would expect.
4. How to Fetch Data in React Using a Custom React Hook (useFetch)
Over time, you may realize that it gets a bit tedious and time-consuming to keep writing the useEffect hook with all of its boilerplate within every component in which you want to fetch data.
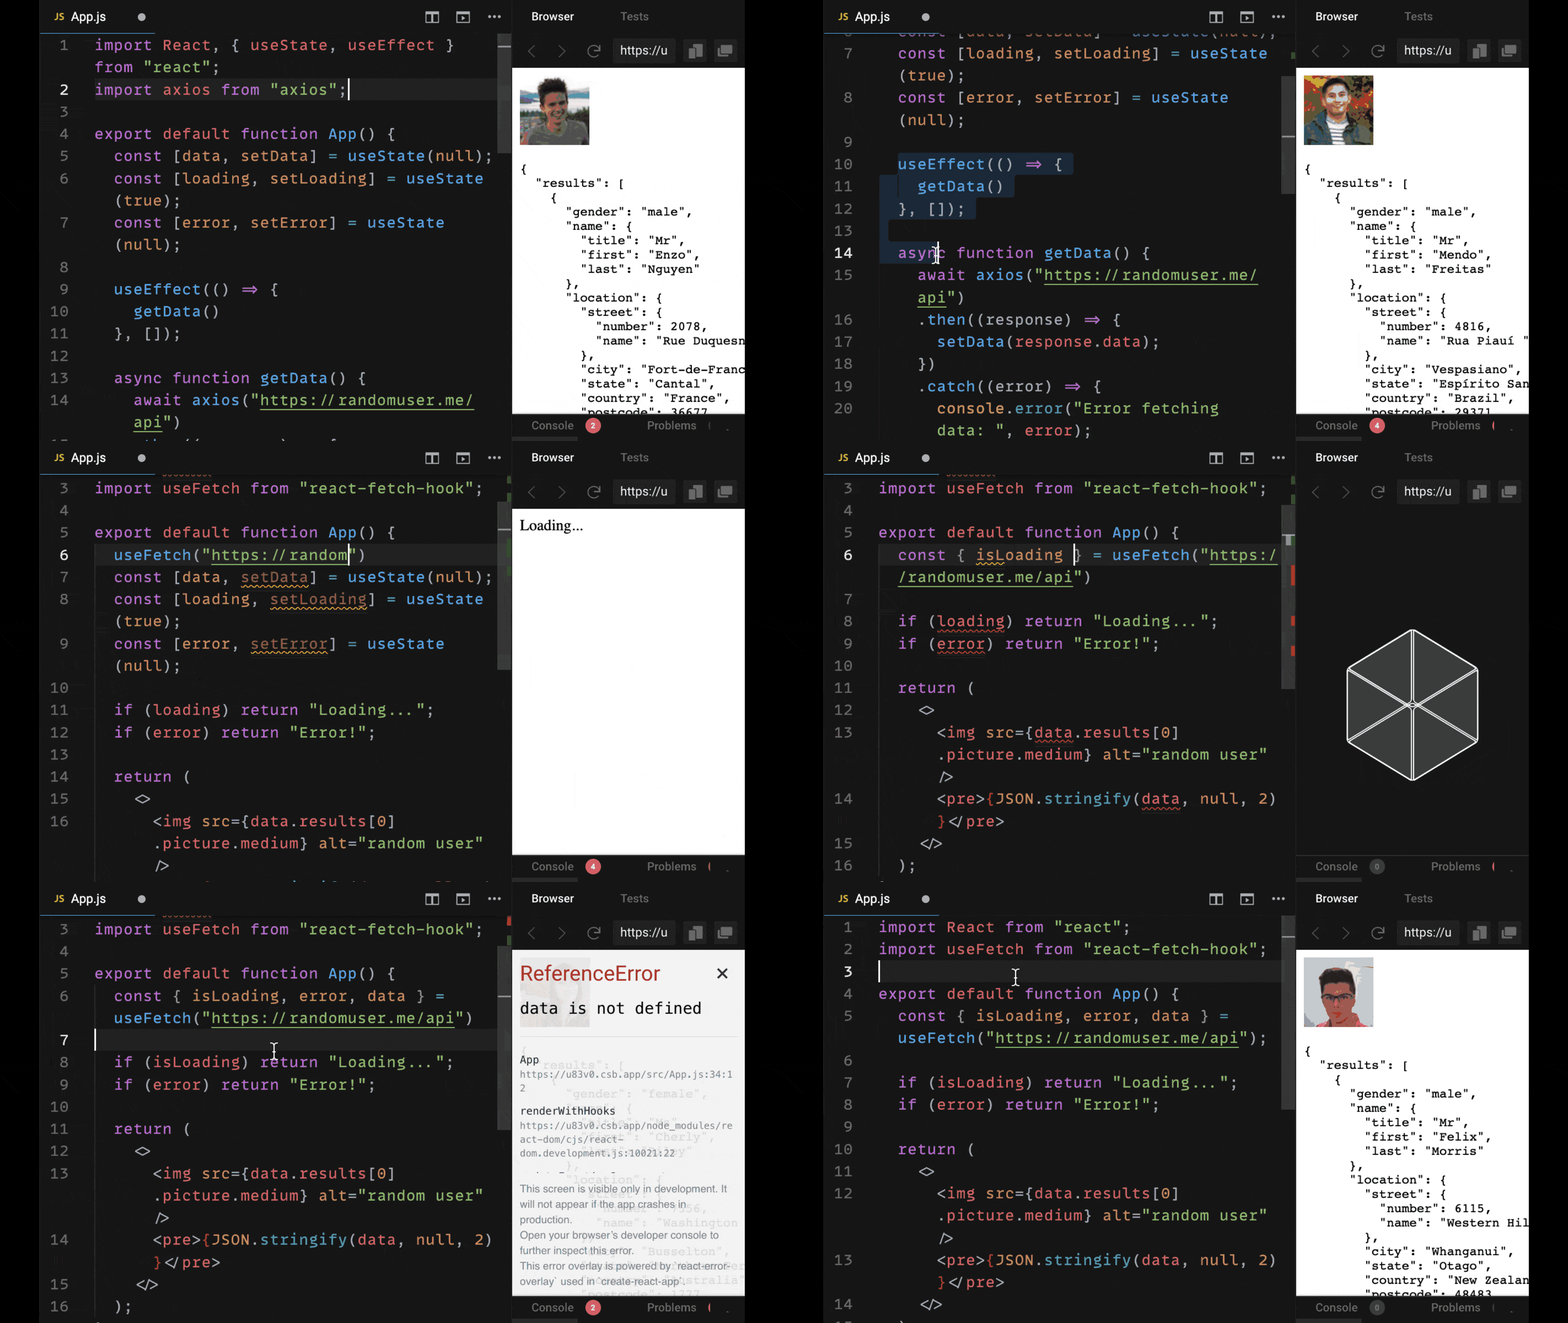
To cut down on our reused code, we can use a custom hook as a special abstraction, which we can write ourselves from a third party library (like we are here, using the library react-fetch-hook).
A custom hook that makes our HTTP request allows us to make our components much more concise. All we have to do is call our hook at the top of our component.

In this case, we get back all the data, loading, and error state that we need to be able to use the same structure for our component as before, but without having to useEffect. Plus, we no longer need to imperatively write how to resolve our promise from our GET request every time we want to make a request.
5. How to Fetch Data in React Using the React Query Library
Using custom hooks is a great approach to writing much more concise HTTP requests to get our data and all of its related state. But a library that really takes data fetching with hooks to the next level is React Query.
React Query not only allows us to use custom hooks that we can reuse across our components in a concise way, but it also gives us a great deal of state management tools to be able to control when, how, and how often our data is fetched.
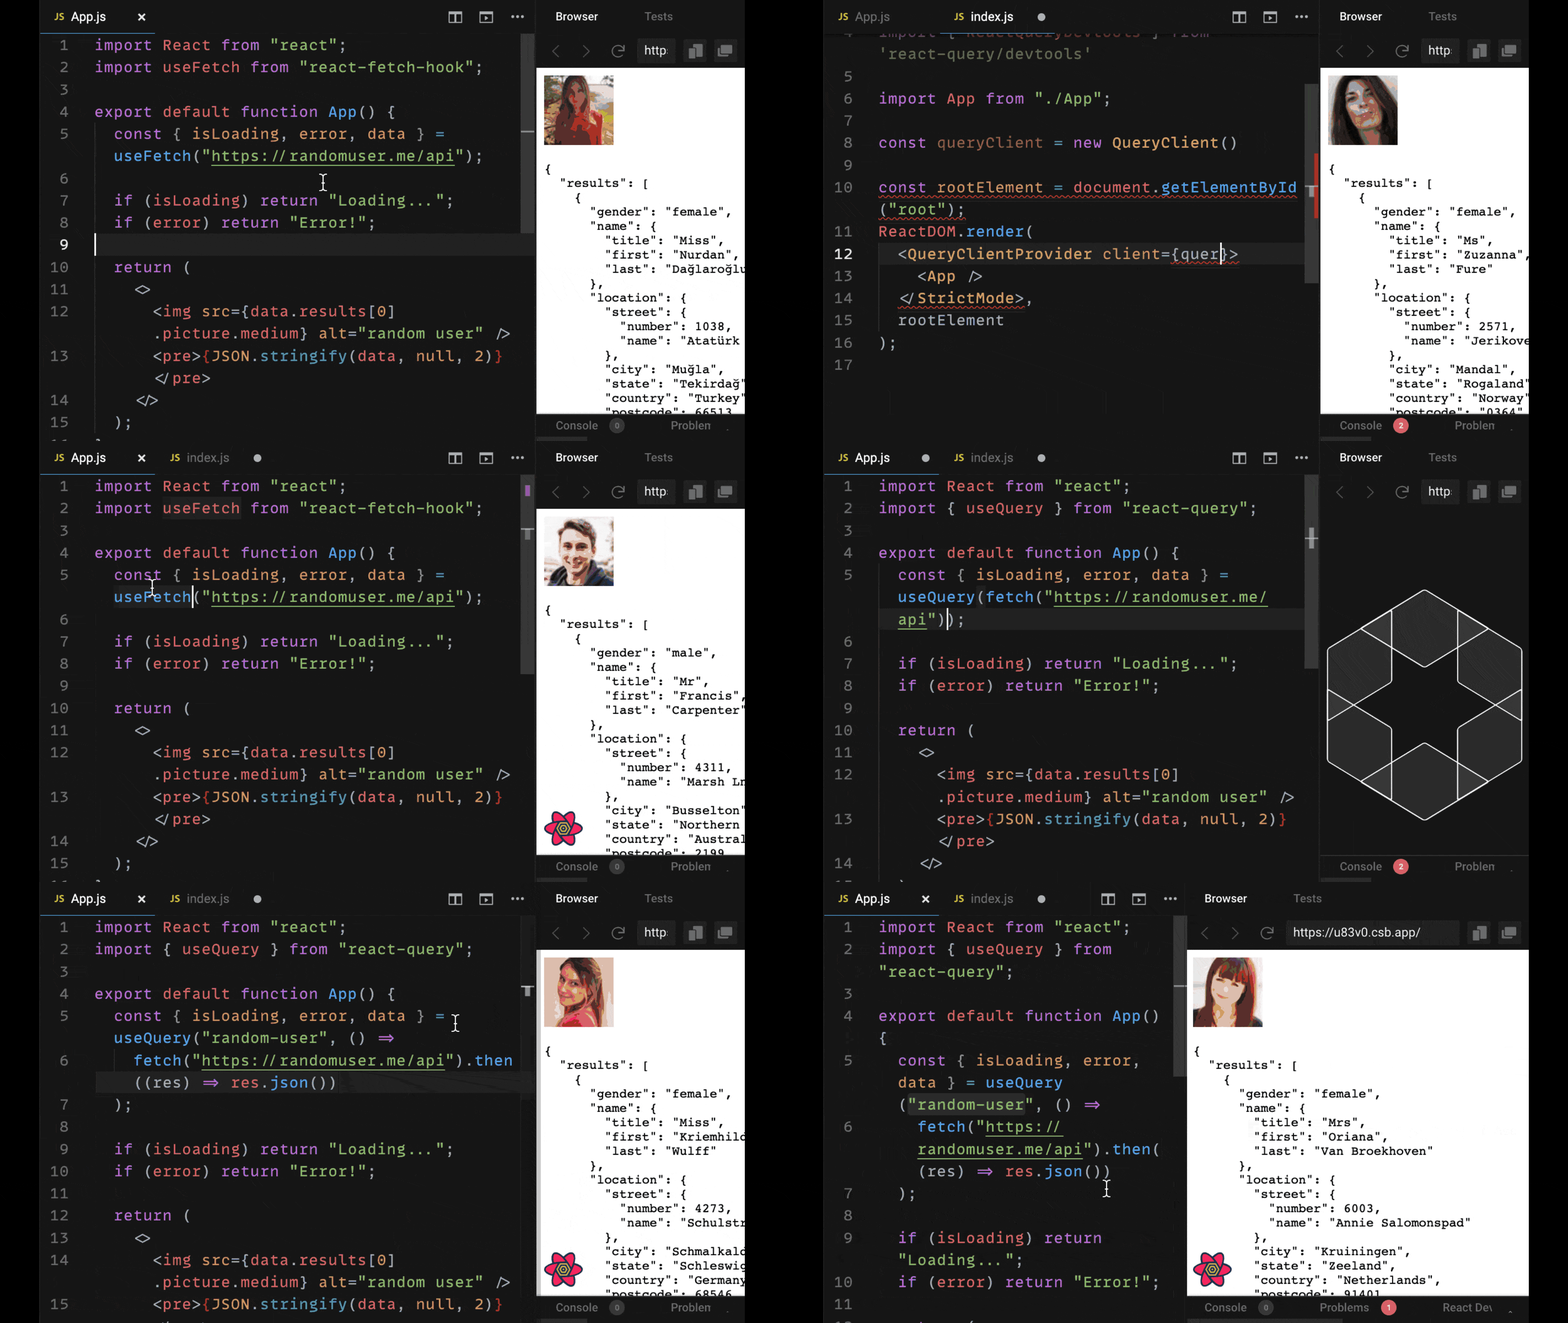
In particular, React query gives us a cache, which you can see below through the React Query Devtools. This enables us to easily manage the requests that we have made according to key value that we specify for each request.
For the requests below, our query for our random user data is identified by the string 'random-user' (provided as the first argument to useQuery).

By referencing that key, we can do powerful things such as refetch, validate or reset our various queries.
If we rely on our custom hook solution or useEffect, we will refetch our data every single time our component is mounted. To do this is in most cases unnecessary. If our external state hasn't changed, we should ideally not have to show loading state every time we display our component.
React Query improves our user experience greatly by trying to serve our data from its cache first and then update the data in the background to display changes if our API state has changed.
It also gives us an arsenal of powerful tools to better manage our requests according to how our data changes through our request.
For example, if our application allowed us to add a different user, we might want to refetch that query, once the user was added. If we knew the query was being changed very frequently, we might want to specify that it should be refreshed every minute or so. Or to be refreshed whenever the user focuses their window tab.
In short, React Query is the go-to solution for not only making requests in a concise manner, but also efficiently and effectively managing the data that is returned for our HTTP requests across our app's components.
Want to keep this guide for future reference?
Click here to download the cheatsheet as a helpful PDF.
Here are 3 quick wins you get when you grab the downloadable version:
- You'll get tons of copyable code snippets for easy reuse in your own projects.
- It is a great reference guide to strengthen your skills as a React developer and for job interviews.
- You can take, use, print, read, and re-read this guide literally anywhere that you like.
Become a Professional React Developer
React is hard. You shouldn't have to figure it out yourself.
I've put everything I know about React into a single course, to help you reach your goals in record time:
Introducing: The React Bootcamp
It’s the one course I wish I had when I started learning React.
Click below to try the React Bootcamp for yourself:

